
Imagine transforming small spaces into lush, vibrant plant havens using items you already own. You don’t need expensive pots or fancy tools to create a beautiful green oasis. With a little ingenuity, you can design an eco-friendly setup that’s kind to both your wallet and the planet.
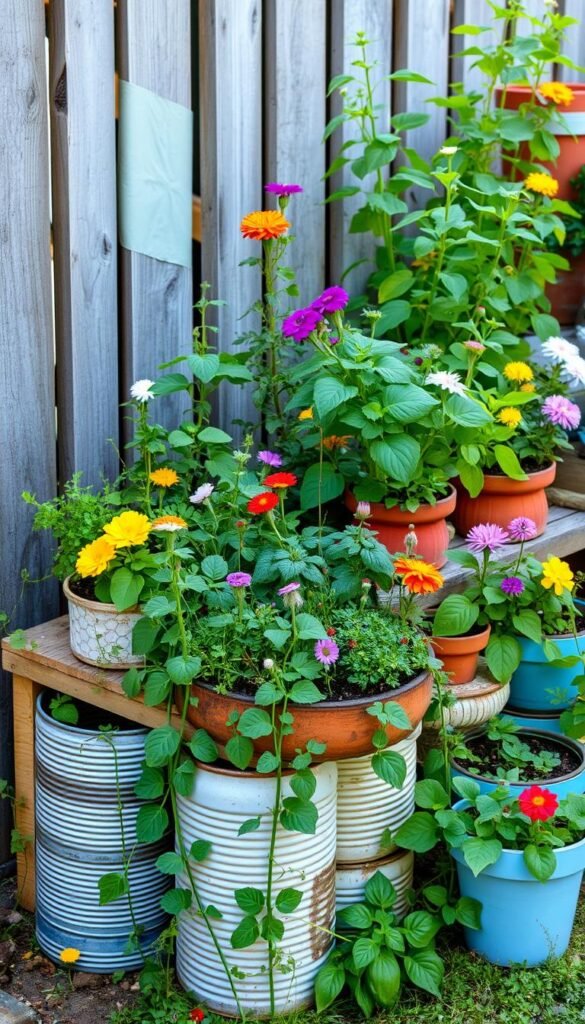
Repurposing everyday objects—like old buckets, jars, or even shoes—adds character to your space while reducing waste. This approach keeps costs low and gives forgotten items a new life. For example, wooden crates or tin cans become charming homes for herbs, veggies, or flowers.
Sustainability is at the heart of this method. By reusing materials, you cut down on plastic waste and avoid buying new products. Pair these upcycled planters with nutrient-rich soil from compost bins or community gardens for even bigger savings.
In this guide, you’ll discover clever ways to maximize your resources. Learn how to source free or low-cost supplies, mix DIY soil blends, and arrange plants for visual impact. Whether you’re growing snacks on a balcony or herbs on a windowsill, these tips make it simple and rewarding.
Key Takeaways
- Repurpose household items like jars or crates as unique planters
- Reduce plastic waste by avoiding store-bought containers
- Combine upcycled materials with homemade compost for cost-effective growth
- Create visual interest through creative arrangements of plants and containers
- Access fresh produce even in small urban spaces
Introduction to Budget-Friendly Container Gardening
Growing fresh greens doesn’t require a backyard or a big investment. With a few clever strategies, you can nurture vibrant plants in any corner of your home. This approach lets you enjoy nature’s rewards while keeping expenses minimal.
More people are embracing sustainable practices that cut waste and curb overconsumption. Container setups fit perfectly into this movement—they reuse materials and shrink your environmental footprint. Even a sunny windowsill becomes a productive space for herbs or veggies.
Why spend on pricey nursery plants when seeds and cuttings work just as well? Starting from scratch costs pennies and gives you control over your garden’s growth. Plus, homegrown food tastes better and skips the plastic packaging.
In the sections ahead, you’ll learn how to:
- Design eye-catching arrangements using everyday items
- Mix nutrient-rich soil without breaking the bank
- Propagate plants from kitchen scraps or neighbors’ clippings
Whether you’re in an apartment or a suburban house, these ideas adapt to your lifestyle. Let’s turn your space into a thriving, eco-conscious oasis.
Understanding the Basics of Container Gardening
Starting your green oasis begins with three essentials: sturdy holders, quality dirt, and reliable gear. These elements work together to help roots breathe and plants thrive. Let’s break down what you need to set up a healthy growing space.
Key Components of a Successful Container Garden
Your holders need drainage holes to prevent waterlogged roots. Old toolboxes, ceramic bowls, or even retro colanders can become homes for herbs and veggies. One gardener shared:
“My vintage bird bath now grows strawberries—it’s functional art!”

| Container Type | Best For | Drainage Tip |
|---|---|---|
| Plastic bins | Leafy greens | Drill 5-7 holes |
| Terracotta pots | Succulents | Add gravel layer |
| Metal buckets | Flowers | Use landscape fabric |
Soil matters just as much as the container. Mix two parts potting soil with one part compost for nutrient-rich growth. Avoid dense garden dirt—it suffocates roots.
Essential Tools and Materials
You’ll need three basic items:
- Hand trowel for transplanting
- Watering can with a narrow spout
- Pruners for trimming
Stainless steel tools last longer than plastic ones. A moisture meter ($8 online) helps prevent overwatering. Remember: Good gear saves time and reduces plant stress.
Master these fundamentals, and you’ll create a thriving ecosystem—no fancy equipment required. Up next: smart layouts that maximize every inch of your space.
Planning Your Garden on a Budget
Ever wondered how to turn a cramped patio into a thriving green retreat? Smart design choices let you grow more while spending less. Start by sketching your space—note sunlight patterns and areas where reused items could shine as plant holders.
Designing Your Space Efficiently
Group pots by water needs to simplify care. Place tall plants like tomatoes at the back of balconies, with trailing herbs in front. A baker’s rack or ladder works wonders for vertical layers. One urban grower shared:
“My fire escape holds 12 pots—it’s like a salad bar with a view!”
Sunlight is your garden’s fuel. Track how rays move across your space:
| Container Type | Best Plants | Sun Hours Needed |
|---|---|---|
| Wooden crates | Lettuce, spinach | 3-4 |
| Galvanized buckets | Peppers, basil | 6+ |
| Hanging baskets | Strawberries, petunias | 5-6 |
Mix edible and decorative species for dual-purpose beauty. Try pairing purple kale with marigolds—both thrive in similar conditions. Old drawers become rustic window boxes, while colanders planted with succulents add quirky charm.
Plan for growth stages. Start seeds in egg cartons, then transfer to larger pots as plants mature. This staggered approach prevents overcrowding and keeps your setup adaptable.
Selecting Affordable Containers and Materials
Your dream green space starts with smart container choices that don’t drain your wallet. Hunt for holders at thrift stores, online marketplaces, or even neighborhood “free piles” to keep costs near zero. With a sharp eye, you’ll spot hidden gems perfect for growing.

Finding Cost-Effective Pots and Planters
Thrift stores and flea markets overflow with unique finds—think ceramic bowls, vintage toolboxes, or unused baking pans. One gardener told us:
“I grow mint in retro lunchboxes—they’re cheerful and cost $1 each!”
Repurposed items like paint buckets or storage bins cut costs while adding personality. Drill drainage holes using a basic household drill bit. Metal containers work well for heat-loving peppers, while wooden crates suit moisture-sensitive herbs.
| Container Material | Best Use | Cost Efficiency |
|---|---|---|
| Terracotta | Succulents, herbs | $$ (long-lasting) |
| Plastic bins | Leafy greens | $ (lightweight) |
| Fabric pots | Root vegetables | $$ (reusable) |
| Metal buckets | Flowers | $ (durable) |
| Wooden crates | Strawberries | Free (upcycled) |
Durability matters more than price. A $3 plastic pot might crack in one season, while a $5 ceramic bowl lasts years. Balance aesthetics with function—galvanized troughs pair rustic charm with excellent drainage.
Mix sizes and textures for visual depth. Cluster small tin cans of basil around a large whiskey barrel tomato planter. Remember: Great design thrives when creativity meets practicality.
Repurposing Everyday Items into Garden Containers
What if your next planter is hiding in plain sight? Everyday objects can become eye-catching homes for your favorite greens. With a little imagination, you’ll turn overlooked items into functional pieces that spark joy and growth.
Unconventional Vessels for Vibrant Growth
Old mailboxes make whimsical holders for trailing flowers like petunias or ivy. Drill 3-4 holes in the bottom, then paint them bold shades to match your outdoor decor. One gardener shared:
“My vintage mailbox grows herbs—it’s a neighborhood conversation starter!”
Toolboxes offer built-in drainage with their slatted designs. Line them with landscape fabric, fill with soil, and plant compact veggies like radishes or dwarf kale. Their metallic finish adds industrial charm to patios.
| Item | Best Plants | Prep Tip |
|---|---|---|
| Rain boots | Succulents | Add pebbles for stability |
| Colanders | Strawberries | Use as hanging baskets |
| Teapots | Mini herbs | Remove lid for airflow |
| Bookshelves | Pothos vines | Seal wood with eco-resin |
Stability matters. Weight lightweight containers with rocks before adding soil. For uneven surfaces like shoes, use adhesive bumpers to prevent tipping. Always prioritize drainage—a drill or heated nail can create holes in most materials.
Play with color schemes by spray-painting mismatched tins or cans. A cluster of cobalt-blue containers creates cohesion, while multicolored pots add playful energy. Upcycling keeps 9 million tons of metal and plastic out of U.S. landfills annually, making your garden both beautiful and eco-conscious.
Look around your home—that chipped bowl or retired toy chest could be your next statement planter. When function meets creativity, even a rusty toolbox becomes a thriving green space.
DIY Container Garden Hacks for Cost Savings
Your kitchen holds secret starters for a thriving green space—no fancy equipment needed. Transform scraps into fresh growth while turning household items into clever planters. These techniques keep your setup productive through every season without draining your wallet.

Give New Life to Discarded Items
Eggshells become biodegradable seed starters. Fill them with soil, plant herb seeds, and crush the shells directly into your pots later. One gardener explained:
“My basil grows faster in eggshells—they add calcium as they break down!”
Plastic yogurt cups make excellent seedling pots. Paint them vibrant colors to match your outdoor decor, then drill drainage holes. Group them on a repurposed ladder for vertical interest.
| Upcycled Item | Plant Match | Preparation |
|---|---|---|
| Mason jars | Propagated herbs | Add pebbles for drainage |
| Wine crates | Leafy greens | Line with burlap |
| Tin cans | Succulents | Sand sharp edges |
Grow Free Plants From Leftovers
Regrow lettuce by placing its core in a shallow dish of water. New leaves emerge in 7-10 days—transfer to soil for continuous harvests. Avocado pits sprout into striking houseplants when suspended over water with toothpicks.
Green onion roots thrive when replanted. Bury the white ends in a colorful pot near your kitchen window. You’ll have fresh garnishes within two weeks. Rotate these projects seasonally—try pineapple tops in summer for tropical flair.
Experiment with what you already own. That chipped mug could nurture mint, while an old toolbox might host radishes. Every successful regrowth means fewer store trips and more personalized greenery.
Building a DIY Greenhouse for Early Season Growth
Stretch your growing calendar without expensive gear by creating protective microclimates for your plants. A simple setup using everyday materials shields tender greens from frost while boosting warmth for faster growth. This approach lets you start seeds weeks earlier and extend harvests into cooler months.
Clear Plastic Bins: Your Frost-Fighting Secret
Transform a clear storage bin into a mini greenhouse in three steps:
- Flip the container upside down over your pots or garden bed
- Cut ventilation slots along the top edges using a utility knife
- Secure with bricks during windy days for stability
One urban gardener reported:
“My recycled bin greenhouse kept basil alive through a 28°F night—it’s like a cozy blanket for plants!”
Different container materials work for various needs:
| Container Type | Best For | Temperature Boost |
|---|---|---|
| Plastic bins | Seedlings | 10-15°F |
| Old windows | Tomatoes | 8-12°F |
| Milk jugs | Herbs | 5-7°F |
Smart Climate Control Tips
Balance warmth and airflow to prevent mold:
- Prop open lids during sunny afternoons
- Mist soil lightly instead of heavy watering
- Use a thermometer to monitor heat spikes
Rotate containers weekly so plants grow evenly toward light sources. Pair this system with dark-colored pots that absorb daytime heat, releasing it slowly at night. For under $15, you’ll gain 6-8 extra growing weeks—compared to $200+ commercial models.
Adapt the concept to your space: use taller bins for broccoli starts or wider ones for salad greens. As seasons change, repurpose the plastic shelters as storage for tools or soil amendments.
Making Your Own Compost and Soil Mixes
Turn kitchen scraps into garden gold with a simple compost setup. Even small spaces can host a compact bin or worm tower. Start by layering vegetable peels, coffee grounds, and dried leaves in a lidded container. This balance of “greens” and “browns” speeds decomposition while keeping odors low.

Mix finished compost with regular garden soil at a 1:3 ratio. This creates a nutrient-packed blend that helps plants thrive. One urban grower shared:
“My tomatoes doubled in size after switching to homemade mix—it’s like vitamins for the soil!”
Keep your compost active with these tips:
- Chop scraps into small pieces for faster breakdown
- Turn the pile weekly with a garden fork
- Add eggshells for calcium-rich soil
| Material | Benefit | Best For |
|---|---|---|
| Grass clippings | Nitrogen boost | Leafy greens |
| Shredded paper | Aeration | Root vegetables |
| Banana peels | Potassium source | Flowering plants |
Quality compost feeds perennials year after year. Top-dress established plants each spring and mix fresh batches for seasonal crops. Your containers will reward you with vigorous growth and abundant harvests.
Using Pot Fillers to Cut Down on Soil Costs
Did you know your empty soda bottles could slash your gardening expenses? Pot fillers—inexpensive materials placed at the base of planters—reduce soil needs while improving root health. This smart layering technique keeps your setup lightweight and wallet-friendly.
Common household items work perfectly as fillers. Crushed plastic containers, broken clay shards, or even wine corks create air pockets that prevent waterlogging. One gardener noted:
“Using leftover gravel cut my soil use by 40%—my herbs grow better than ever!”
Everyday Materials With Big Impact
| Filler Material | Benefit | Best For |
|---|---|---|
| Foam packing peanuts | Lightweight | Hanging baskets |
| Crushed bricks | Superior drainage | Succulent pots |
| Pine cones | Natural aeration | Acid-loving plants |
Follow these steps for optimal results:
- Cover drainage holes with landscape fabric
- Add 2-3 inches of filler material
- Top with quality soil mix
Lighter pots are easier to move, especially on balconies. Recycled materials keep 12-15 lbs of waste per household out of landfills annually. Pair this method with homemade compost for maximum savings.
Growing Cut-and-Come-Again Crops for Continuous Harvest
What if your leafy greens could multiply like magic? Cut-and-come-again crops let you harvest fresh produce repeatedly from the same plants. These resilient varieties regrow after each trim, offering weeks of salads and stir-fry ingredients from a single planting.

Lettuce, kale, and Swiss chard are top performers for continuous yields. Snip outer leaves with clean scissors, leaving the center intact. One gardener shared:
“My kitchen window pots supply basil and arugula all summer—I haven’t bought greens in months!”
Follow these steps to maximize regrowth:
- Harvest in the morning when leaves are crisp
- Cut above the base growth point
- Water thoroughly after trimming
| Plant | Regrowth Time | Harvests Per Season |
|---|---|---|
| Leaf lettuce | 10-14 days | 5-7 |
| Kale | 2-3 weeks | 4-6 |
| Swiss chard | 3 weeks | 3-5 |
Turn kitchen scraps into new plants. Celery butts and bok choy stems sprout roots in shallow water—transplant them to pots for endless additions to soups and salads. This cycle reduces grocery trips and keeps your garden productive for years.
Choose deep containers (12+ inches) for robust root systems. Mix quick-growing varieties like spinach with slower ones like perennial herbs. You’ll create a self-renewing system that thrives on minimal effort and maximum flavor.
Implementing Self-Watering Planters for Water Savings
Ever wished your plants could water themselves? Self-watering systems use smart design to deliver moisture directly to roots while cutting waste. These setups keep soil consistently hydrated—no more guessing games or wilted greens.
The magic lies in the wicking mechanism. A reservoir at the base holds water, while a fabric rope or felt strip draws it upward. This mimics natural groundwater movement, preventing overwatering. One urban gardener shared:
“My herbs thrived during a heatwave—the system saved 30% on my water bill!”
Build your own with these budget-friendly steps:
- Repurpose a plastic storage bin or 5-gallon bucket
- Create a false bottom using PVC pipes or recycled nursery trays
- Insert a cotton wick through the soil layer into the water reservoir
| Material | Cost | Lifespan |
|---|---|---|
| Plastic bins | $5-8 | 3-5 years |
| Terracotta pots | $12-15 | 10+ years |
| Fabric grow bags | $3-6 | 2 seasons |
Maintain your system by checking the reservoir weekly. Add diluted liquid fertilizer every 3-4 refills for nutrient boosts. During droughts, these planters use 40% less water than traditional methods.
Rotate plants seasonally to maximize your investment. Leafy greens and herbs perform best in spring, while deeper-rooted veggies like cherry tomatoes excel in summer. With proper care, your setup becomes a water-wise powerhouse that pays for itself in one growing season.
Incorporating Perennials for Year-Round Produce
What if your garden could replenish itself season after season with minimal effort? Perennials offer exactly that—a sustainable way to enjoy fresh picks without annual replanting. These hardy plants thrive in containers and planters, making them ideal for small spaces craving year-round productivity.
Benefits of Long-Term Planting
Once established, perennials like asparagus and rhubarb produce for 5-10 years. Their deep root systems withstand temperature swings, reducing water needs. A gardener in Oregon shared:
“My patio planter of strawberries yields fruit every June like clockwork—zero replanting required!”
Mix these champions with annuals for non-stop harvests. Try this rotation strategy:
- Plant perennial herbs (thyme, rosemary) in large pots
- Add quick-growing lettuce around their bases
- Replace greens seasonally while herbs keep thriving
| Plant | Harvest Time | Container Size |
|---|---|---|
| Artichokes | Spring/Fall | 18″ deep |
| Kale (perennial) | Year-round | 12″ wide |
| Chives | Spring to Frost | 8″ diameter |
Choose self-pollinating varieties to maximize yields. Dwarf fruit trees in half-barrel planters add beauty while producing snacks. Over time, these investments cut grocery bills and garden chores—nature’s win-win.
Leveraging Seeds and Stem Cuttings for Budget Gardening
What if one packet of seeds could fill your space with months of fresh blooms and snacks? Propagation lets you multiply plants for pennies—no nursery trips required. A $3 seed packet grows 50+ coleus plants, while store-bought starters cost $5 each. That’s a 98% savings!
Seeds offer endless variety. Try rare heirloom tomatoes or vibrant zinnias without breaking the bank. Start them in recycled egg cartons or takeout containers. Keep soil moist but not soggy, and place near a sunny window. In 7-14 days, you’ll see sprouts!
For faster results, use stem cuttings. Snip 4-6″ sections from healthy plants like Red Leaf Hibiscus or purple heart. Remove lower leaves, then:
- Dip the cut end in honey (a natural rooting hormone)
- Plant in a container with moist potting mix
- Cover with a plastic bag to trap humidity
“My purple heart cuttings rooted in 10 days—now I’ve gifted them to six neighbors!”
| Method | Cost per Plant | Success Rate |
|---|---|---|
| Seeds (coleus) | $0.06 | 85% |
| Cuttings (hibiscus) | $0.20 | 75% |
| Nursery Plants | $4.99 | 100% |
Experiment with different species. Herbs like mint and basil root easily in water—no soil needed! Share extras with friends or swap at local plant exchanges. Every successful propagation boosts your skills and slashes future costs.
Track your progress in a journal. Note which techniques work best for your climate and container setups. Soon, you’ll have a self-sustaining garden that grows as quickly as your confidence.
Maximizing Space with Vertical Planters and Grow Bags
What if your walls could produce fresh herbs and veggies? Vertical systems turn unused vertical surfaces into productive growing zones. Pocket planters and fabric grow bags let you stack plants upward—perfect for balconies or narrow patios.
These space-savers work like multi-level shelves for greenery. The GreenStalk system, for example, offers tiered pockets that rotate for easy access. One gardener raved:
“My GreenStalk holds 30 plants in 2 sq ft—it’s like a living pantry!”
Follow these steps to set up your vertical garden:
- Measure your available wall or railing space
- Choose systems with built-in drainage (metal grids or felt pockets work best)
- Position sun-loving plants like cherry tomatoes at the top
| System Type | Best For | Space Saved | Price Range |
|---|---|---|---|
| Pocket planters | Strawberries, herbs | 80% | $25-40 |
| Stackable towers | Leafy greens | 75% | $50-90 |
| Hanging bags | Peppers, flowers | 65% | $15-30 |
| Wall-mounted trays | Microgreens | 90% | $35-60 |
Pair vertical units with ground-level containers for layered beauty. Try trailing ivy in hanging planters above barrel-grown citrus trees. This combo creates microclimates—vines shade tender roots below.
Maintenance is simple. Use drip irrigation lines or self-watering spikes to reach upper tiers. Rotate plant positions monthly for even sun exposure. With smart planning, you’ll harvest more from 10 sq ft than others do from 100.
Budget-Friendly Container Gardening: Creative Hacks to Save Money
Your journey to a greener space doesn’t need to drain your savings—it starts with reimagining what’s already around you. Throughout this guide, we’ve explored how everyday items become thriving plant homes while keeping costs minimal. Let’s revisit the smartest strategies for cultivating abundance on a budget.
Upcycling transforms discarded objects into functional art. Old boots grow herbs, colanders cradle strawberries, and bookshelves host cascading vines. As one gardener shared:
“My thrifted toolboxes now overflow with peppers—each harvest feels like a victory!”
These solutions prove beauty thrives in unexpected places.
Three pillars support affordable growth:
- Resourcefulness: Use soda bottles as pot fillers or eggshells as seed starters
- Sustainability: Create compost from kitchen scraps to enrich homemade soil mixes
- Adaptability: Rotate crops in vertical systems and self-watering planters
| Method | Savings | Impact |
|---|---|---|
| Repurposed containers | 80-100% | Reduces plastic waste |
| Stem cuttings | 90% vs nursery plants | Encourages biodiversity |
| Perennial crops | 60% annual savings | Long-term yields |
Whether you’re nurturing windowsill herbs or balcony tomatoes, these approaches adapt to your space. Start small—propagate green onion scraps in mason jars or build a mini greenhouse from storage bins. Each success builds confidence and cuts future costs.
Ready to begin? Grab those unused items gathering dust and give them new purpose. Your thriving container setup awaits—one creative hack at a time.
Conclusion
You’ve discovered how ordinary objects become extraordinary homes for plants. From thrifted treasures to kitchen scraps, every choice nurtures both greenery and your wallet. These methods prove that vibrant growth thrives where creativity meets practicality.
Repurposing materials reduces waste while adding personality to your space. DIY soil blends and self-watering systems keep plants healthy without costly inputs. One gardener’s old colander becomes another’s strawberry paradise—your imagination sets the limits.
Experimentation fuels success. Try regrowing lettuce from stubs or training vines along repurposed ladders. Each season offers chances to refine techniques and swap ideas with fellow growers. Sustainability isn’t perfection—it’s progress through small, smart choices.
Ready to dig in? Grab those unused jars or bins and start planting. Share your progress with neighbors or online communities. Every sprout marks a step toward fresher meals, cleaner air, and a lighter environmental footprint. Your green journey begins with one seed—and countless possibilities.


