
What if your empty coffee tins and rinsed-out plastic jugs could become the stars of your outdoor space? Instead of tossing them, these everyday items hold surprising potential. With a little creativity, you can turn them into charming planters, organizers, or decorative accents for your balcony.
Start by gathering clean, dry materials. Washing metal and plastic thoroughly removes residues and ensures longevity. This simple step transforms forgotten jars or bottles into blank canvases for your projects. Imagine herbs sprouting from a painted tin or trailing vines spilling from a hanging jug!
This guide walks you through easy transformations. You’ll discover how to craft vertical gardens using stacked containers or create whimsical lanterns for evening ambiance. Each project helps reduce waste while adding personality to compact areas.
Ready to unlock hidden value in items headed for recycling? Let’s explore budget-friendly ways to reimagine your balcony. You’ll find clever storage hacks and eye-catching displays that prove sustainability can be stylish.
Transform Your Balcony into a Creative Oasis
Your outdoor space deserves more than folding chairs and neglected corners. With everyday materials and fresh ideas, you can craft a retreat that mirrors your personality. Start by visualizing how each zone could serve your home – a reading nook, mini garden, or storage hub.
Discover Inspiring Ideas for Outdoor Spaces
Think beyond basic flower pots. Paint striped patterns on cleaned containers to group gardening tools or display succulents. Hang repurposed jars with tea lights for evening charm. These small touches turn bland areas into lively spots.
Try stacking different-sized tins for a vertical herb wall. Use drilled plastic jugs to organize seed packets or balcony accessories. Every project balances practicality with visual appeal.
Setting the Stage for Your DIY Projects
Measure your space and sketch layouts before cutting or drilling. Collect all materials – sandpaper, paints, hooks – to avoid mid-project delays. Clean surfaces thoroughly to ensure paint adheres well.
Allocate time wisely: break tasks into 30-minute sessions if needed. Label cleaned containers by purpose (herbs, tools, decor) to streamline your workflow. A little prep work lets creativity flow without frustration.
Your transformed balcony awaits! With these ideas, even limited areas become extensions of your home. Remember: recycling isn’t just eco-friendly – it’s your shortcut to a unique outdoor haven.
Creative Ways to Repurpose Coffee Tins

Ever wonder what to do with those empty metal cylinders after your morning brew? These sturdy coffee containers become versatile blank slates with just a little effort. Let’s turn them into functional art that sparks joy on your balcony.
Simple Cleaning and Preparation Techniques
Start by scrubbing off sticky labels and residue. Soak tins in warm water with baking soda for 10 minutes – this removes odors and leftover grounds. Dry thoroughly to prevent rust.
Sand rough edges gently for a smooth finish. Wipe surfaces with rubbing alcohol to help paint adhere better. Now your coffee tins are ready for their glow-up!
Innovative Crafting Ideas for Coffee Containers
Transform cleaned tins into herb planters by drilling drainage holes. Paint them in bold patterns using acrylics, or wrap with burlap for rustic charm. Add chalkboard labels to track your basil or mint.
Turn larger containers into utensil holders using Mod Podge and fabric scraps. For a playful idea, cluster painted tins as vertical storage for small tools or colorful container gardening flowers.
Best part? You’re using things already in your home. A coat of spray paint or some twine can make yesterday’s trash today’s conversation piece. What ways will you reimagine these everyday items?
Milk Jug Makeovers for Stylish Storage
That rinsed-out gallon sitting by your sink? It’s about to become your new favorite organizer. With minimal effort, these plastic heroes evolve from recyclables to sleek storage solutions that blend seamlessly with your home aesthetic.
Start by washing the jug thoroughly with soapy water. A vinegar rinse eliminates lingering odors. Dry completely before cutting – this ensures clean edges for your project.
Slice off the top third diagonally to create a scoop-like opening. Smooth rough edges with sandpaper. The built-in handle becomes a hanger for wall-mounted tool holders or herb planters.
Elevate your design with spray paint in matte finishes or geometric stencils. Line cut-out sections with fabric scraps using waterproof glue. Suddenly, that plain jug holds art supplies or kitchen utensils with flair.
- Use painted jugs as modular drawer dividers
- Stack two for a nested pantry grain container
- Mount vertically to store garden twine or ribbons
Every transformed container tackles clutter while reducing single-use waste. Your revamped jugs prove sustainability never sacrifices style – they’re functional art pieces whispering, “I’m saving the planet, one spoon holder at a time.”
Eco-Friendly Tips to Upcycle Plastic Containers

Have you ever stared at that empty detergent bottle or yogurt tub and wondered, “Could this plastic actually be useful?” Spoiler: It absolutely can. With smart strategies, these everyday items become tools for reducing waste while adding personality to your space.
Choosing the Right Containers for Your Space
Start by assessing your needs. A wide-mouth jar works better for storing bulk spices than a narrow bottle. Look for sturdy shapes that won’t warp over time – think salad containers or juice jugs. Match sizes to your storage goals: shallow bins for office supplies, tall ones for vertical gardening.
- Check labels for recycling codes – #2 and #5 plastics are most durable
- Prioritize containers with smooth surfaces for easier painting
- Use clear varieties to create visible pantry organizers
Preparation is key. Remove sticky residue by soaking in warm soapy water. A baking soda scrub tackles stubborn glue. For lingering smells, wipe interiors with white vinegar. Dry thoroughly before crafting.
Now, let’s get creative. Turn round tubs into cable organizers by cutting notch openings. Stack square boxes as modular drawer dividers. Paint opaque containers with chalkboard paint for reusable labels. Every idea gives plastic a second life while decluttering your home.
Remember: The right plastic item becomes whatever you need – a planter, tool caddy, or art supply holder. Your choices today shape a greener tomorrow, one repurposed container at a time.
DIY Projects That Blend Function and Art
Turn ordinary household items into pieces that work hard and look stunning with these clever techniques. Whether you’re crafting planters or organizers, the right tools and creative approaches elevate simple materials into eye-catching solutions.
Tools and Materials You’ll Need
Gather these essentials before starting:
- A hot glue gun for quick, durable bonds
- Spray paint in matte or metallic finishes
- Fine-grit sandpaper for smoothing edges
- Acrylic paints and stencils for patterns
- Waterproof sealant for outdoor projects
These supplies let you explore different ways to combine practicality with style. The glue gun becomes your best friend for attaching handles or decorative elements securely.
Step-by-Step Project Examples
Geometric Planter: Clean an old tin and sand its surface. Spray-paint a base color, then use painter’s tape to create triangle patterns. Fill shapes with contrasting acrylics. Seal with weatherproof coating for balcony use.
Fabric-Wrapped Storage Caddy: Cut a plastic jug to your desired height. Apply Mod Podge to attach patterned fabric scraps, smoothing wrinkles as you go. Use the hot glue gun to secure edges and add rope handles.
These ways use basic items to solve storage needs while adding visual interest. One idea leads to another – try marbleizing paint effects or embedding mosaic tiles for texture!
Containers as Functional Planters

Ready to give your balcony greenery a sustainable twist? Those cleaned-out jars and tubs can become thriving homes for herbs, flowers, or succulents. The secret lies in two essentials: smart drainage and nutrient-rich soil.
Ensuring Proper Drainage and Soil Health
Start by drilling 3-5 small holes bottom of your chosen vessel. This prevents root rot by letting excess water escape. Place a layer of pea gravel or broken pottery shards at the bottom before adding soil – this improves airflow and mimics natural ground conditions.
Mix potting soil with compost for hungry plants. A 2:1 ratio gives roots nutrients while maintaining lightness. For moisture-loving varieties like mint, add coconut coir to retain water without sogginess.
- Elevate planters using bricks or wooden slats to enhance drainage
- Check holes bottom monthly for clogs using a toothpick
- Refresh topsoil every 6 weeks to replenish minerals
Your revamped containers will support lush growth when you balance hydration and airflow. Watch your balcony transform into a vibrant oasis where practicality meets green living!
Upcycling Containers: Coffee Tins, Milk Jugs, and More for Balconies
What’s hiding in your recycling bin right now? Those ordinary items could become extraordinary additions to your outdoor space with simple tweaks. Over the years, creative minds have transformed household discards into functional art – a tradition you can continue today.
Start by viewing waste through a new lens. That chipped mug or cracked jar? It’s not trash – it’s raw material. Make sure every part gets prepped properly: scrub interiors, smooth rough edges, and seal surfaces. These steps turn potential eyesores into durable foundations.
Modern ideas build on decades of resourcefulness. Your grandmother’s generation reused coffee cans for storing nails; today, they’re painted planters bursting with petunias. The difference? Contemporary techniques blend practicality with bold design choices like geometric patterns or mixed textures.
- Convert cracked ceramic pots into succulent displays
- Turn shipping crates into modular vertical gardens
- Use vintage tins as quirky herb containers
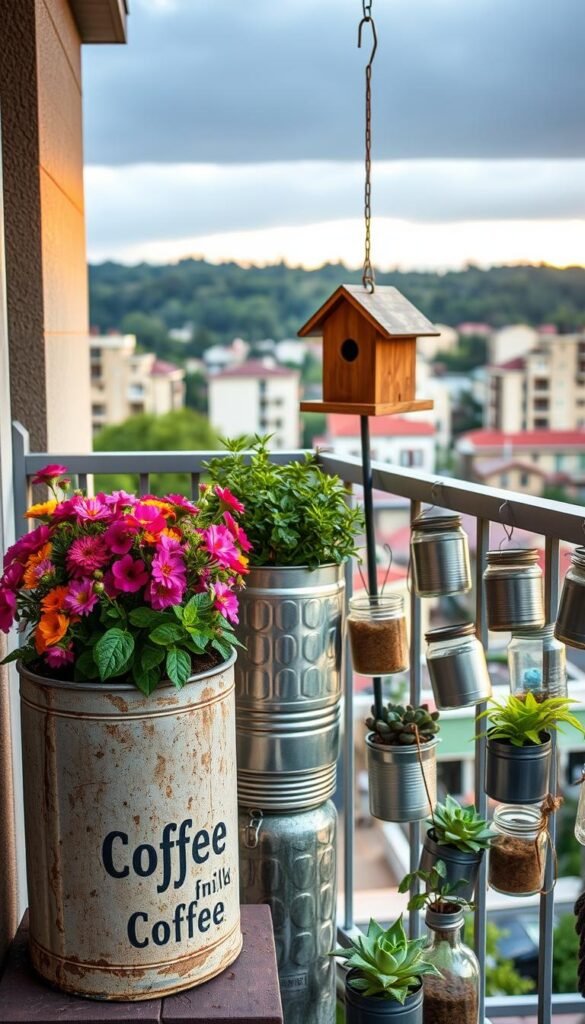
Your projects should serve two purposes: reducing waste while sparking joy. A rusty biscuit tin becomes a charming bird feeder with drainage holes and fresh paint. Those plastic containers from last week’s takeout? They’re now hanging organizers for gardening gloves.
Make sure creativity guides every step. Layer spray-painted finishes for depth, or stencil meaningful quotes onto surfaces. As you work, remember you’re part of a movement that’s reshaped sustainability over the years – one revived coffee tin at a time.
Using Hot Glue Guns and Spray Paint for a Fresh Look

Transform mundane items into eye-catching decor with two simple tools. A spray paint can and hot glue gun become your secret weapons for breathing new life into old objects. These materials let you upgrade anything from chipped planters to dated organizers in minutes.
Techniques to Achieve a Professional Finish
Start with clean, dry surfaces for spray paint adhesion. Apply thin, even coats in sweeping motions 8-10 inches away. Let each layer dry completely to avoid drips. For metallic finishes, use light passes to prevent pooling.
Your hot glue gun excels at attaching beads, fabric, or reclaimed wood accents. Create dimensional textures by drawing patterns directly onto surfaces. Press materials into warm glue quickly – it sets in under a minute!
| Tool | Best For | Pro Tip |
|---|---|---|
| Spray Paint | Smooth color transitions | Use cardboard as a spray booth |
| Hot Glue | 3D embellishments | Apply dots under ribbons for grip |
Try these different ways to elevate ordinary things:
- Turn a cereal box into a chic tray with gold paint and rope handles
- Add geometric glue designs to plain jars before painting
- Layer spray-painted lids as wall art
Embrace recycling by incorporating bottle caps or broken tiles into designs. That cracked bowl becomes a mosaic masterpiece with glue and patience. Remember: Every thing you refresh keeps materials out of landfills while adding personality to your space.
Repurposing Containers for Organized Storage
Tired of cluttered drawers and chaotic shelves? Those empty boxes and spare things around your home hold the key to order. With clever arrangements, everyday vessels become sleek organizers that tame messes while adding character.
Start by matching container sizes to your needs. Tall coffee cans work for spatulas or paintbrushes. Shallow plastic bins keep craft supplies visible. Group similar items together – think buttons in mint tins or charging cables in decorated shoeboxes.
Labeling makes systems intuitive. Cut shapes from recycled paper bags or magazine pages. Attach them with mod podge for rustic tags. Color-code lids with washi tape to quickly spot baking tools versus office gear.
| Container Type | Best For | Pro Tip |
|---|---|---|
| Plastic bins | Under-sink storage | Drill holes for ventilation |
| Metal boxes | Workshop tools | Line with cork for scratch protection |
| Cardboard boxes | Toy rotation | Wrap in fabric for durability |
Arrange boxes vertically to maximize space. Stack spice jars on a lazy Susan inside a cabinet. Mount plastic bins on pegboards for adjustable garage storage. Every solution should serve your space and spark joy when you open the drawer.
Experiment freely – that mismatched set of jars becomes a charming desk organizer with twine accents. Your home gains harmony when things have designated spots. Who knew tidiness could look this good?
Easy Steps to Clean and Prep Your Old Containers

That sticky jar in your recycling bin could become tomorrow’s herb planter with proper prep. Before transforming everyday items, you’ll need to erase their past lives. Let’s turn grimy surfaces into blank canvases ready for creativity.
Removing Residue for a Smooth Surface
Start by soaking labels in warm water for 10 minutes. Peel off what you can, then attack stubborn glue with a DIY scrub: mix 2 tbsp baking soda and 5 drops lemon essential oil. This combo cuts through residue without harsh chemicals.
Make sure to focus on the bottom of containers – hidden gunk here can ruin paint adhesion later. Use an old toothbrush to scrub curved edges. For plastic items like milk jugs, avoid abrasive pads that cause scratches.
Rinse thoroughly and dry upside-down on a rack. Check for lingering smells by holding the container near your nose. Tackle odors with a vinegar-water soak (1:3 ratio) for 30 minutes. Now your recycling bin treasures are ready for their glow-up!
Pro tip: Always test cleaning methods on a small area first. Some plastics become brittle if soaked too long. Your prepped items will now hold paint better and last longer, reducing waste while boosting project success rates.
Balancing Functionality and Aesthetics in Your DIY Upcycles
Ever feel torn between making something useful and keeping it pretty? The magic happens when your projects serve daily life while sparking joy. Start by asking: “Will this solve a problem and look intentional in my space?”
A painted utensil holder becomes art when shaped like a cactus. Drill holes in its “arms” for scissors or pens. This great way blends Southwest vibes with tool organization. Use leftover tile fragments to create mosaic patterns on plain surfaces – beauty meets durability.
| Project | Function | Aesthetic Feature | Materials |
|---|---|---|---|
| Herb Wall | Grows fresh food | Color-coded pots | Reused jars, acrylics |
| Storage Bench | Holds outdoor cushions | Stenciled floral design | Wooden crates, spray paint |
| Bird Feeder | Attracts wildlife | Hand-painted details | Tin can, waterproof sealant |
Keep designs practical with these tips: Use outdoor-safe paints for weather resistance. Add removable liners to decorative planters for easy soil changes. For family-friendly projects, try chalkboard labels kids can customize.
Turn ordinary resources into standout pieces. That cracked serving tray? Line it with pebbles for a succulent display that hides flaws. Repurpose glass bottles as pendant lights using twine and LED bulbs. Every part of your creation should enhance your patio container gardening space while reducing waste.
Remember: Great design solves problems first. Build sturdy structures, then layer colors and textures. Your ways of merging utility with style will make every project feel purposeful – and totally Instagram-worthy!
Incorporating Natural Elements into Your Upcycled Decor

Nature’s treasures can transform your repurposed items into earthy masterpieces. Imagine smooth river rocks lining a painted plastic planter or moss creeping over a paper-wrapped jar. These touches bring outdoor charm to functional pieces while celebrating sustainability.
Using Stones, Plants, and Recycled Materials
Start by layering small stones at the bottom of containers for drainage and texture. Top with nutrient-rich soil and trailing plants like ivy or strawberries. This combo turns old buckets into living art that thrives on patios.
Pair organic materials with manmade elements for contrast:
- Wrap paper grocery bags around glass bottles – stamp leaf patterns with acrylic paint
- Hot-glue dried citrus slices to plastic storage bins for a pop of color
- Fill repurposed crates with herbs and edible flowers for food-scaping
Your garden becomes a partner in design. Use fallen branches as curtain rods for hanging planters or pinecones as natural drawer pulls. These details invite wildlife while reducing budget-friendly container gardening costs.
Mix textures for depth: pair rough terracotta shards with sleek metal tins. Line the bottom of planters with coffee filters before adding soil – they retain moisture without rotting. Every layer should support plant life while enhancing visual appeal.
Remember: True beauty lies in balance. Let weathered wood frames showcase vibrant succulents. Allow peeling paint on a salvaged chair to contrast with lush garden greens. Your space will hum with life when nature and creativity collaborate.
Simple Tricks for Enhancing Container Durability
Want your creations to withstand seasons of use? A few smart tweaks can turn fragile materials into long-lasting staples. Start by focusing on water resistance – the #1 enemy of DIY projects.
Apply outdoor-grade sealant to surfaces exposed to rain or humidity. For wooden boxes, use boiled linseed oil – a method perfected years ago that still protects against rot. Metal items benefit from rust-resistant spray coatings applied in thin layers.
Reinforce weak spots creatively:
- Line boxes with plastic bags for hidden water barriers
- Wrap corners in leftover bike tubes using waterproof glue
- Press crushed eggshells into cracks before painting (a zero-waste filler!)
Many ways use existing resources cleverly. Old shower curtains become lining for planters. Melt candle stubs to seal porous surfaces – a trick passed down through years of crafting wisdom.
Investing time upfront pays off. Let sealants cure fully between coats. Sand rough edges to prevent future splits. These steps might add 20 minutes to your project but extend its life by years.
Your revitalized pieces will handle weather, weight, and daily use gracefully. With these resources-friendly fixes, you’re building durability into every creation – one reinforced corner at a time!
Personalizing Your Upcycling Projects

Your creations become extensions of your personality when you infuse them with unique details. Whether adding bold patterns or nostalgic touches, these ways turn functional items into conversation starters. Let’s explore how to make each piece distinctly yours.
Add a Touch of Color and Texture
Revive plain surfaces with unexpected materials. Try these ideas:
- Layer fabric scraps over paper-wrapped boxes using decoupage glue
- Press dried flowers into wet paint for organic texture
- Stencil metallic leaf patterns onto matte backgrounds
| Material | Use Case | Vintage Twist |
|---|---|---|
| Fabric Remnants | Drawer liners | Grandma’s quilt patterns |
| Magazine Pages | Collaged lids | Retro comic book art |
| Natural Fibers | Jute-wrapped handles | 1970s macramé knots |
Creative Labeling and Finishing Ideas
Make organization delightful with these touches:
- Write chalkboard labels in your family’s handwriting styles
- Cut shaped tags from painted cereal boxes
- Burn botanical names into wood slices with a soldering iron
Next time you’re crafting, raid your recycling bin for materials. Those takeout boxes from years ago? They’re perfect for storing garden seeds when lined with patterned paper. Let your family members add their own flair – kids love stamping potato-print designs!
Remember: The magic lies in details. A single stripe of copper paint or a handwritten tag can get really personal. Your projects will shine when they reflect the time and care you’ve invested.
Integrating Sustainable Practices in Your DIY Projects
Imagine crafting with purpose, where every project leaves a lighter footprint. Sustainable practices transform DIY from a hobby into a way to protect resources while beautifying your space. Start by viewing scraps as opportunities – that leftover fabric becomes drawer liners, and mismatched buttons turn into cabinet knobs.
Reuse materials across every area of your home:
- Turn takeout containers into bathroom cotton swab holders
- Convert cracked bowls into pet food stations for your dog
- Use cereal boxes as drawer dividers for office supplies
Plastic becomes particularly versatile. Clean yogurt tubs make perfect seedling starters, while detergent bottles morph into watering cans. Always drill drainage holes when creating planters – this simple way prevents root rot and extends your container’s life.
Your glue gun plays a key role in reducing waste. Apply precise amounts to avoid excess strings, and save dried glue blobs for future repairs. Pair this tool with salvaged materials like broken tiles or fabric scraps for zero-waste creations.
Every small way you repurpose items adds up. That shoebox-turned-storage bin keeps clutter from landfills. Those painted jars holding kitchen tools? They’re silent eco-warriors. Even your dog’s upcycled feeding station becomes part of the solution.
Focus on multi-functional designs. A storage ottoman made from old sweaters and coffee cans serves as seating while hiding blankets. These thoughtful ways make sustainability seamless in daily room activities. Your creations become proof that style and conscience coexist beautifully.
Step-by-Step Guide to Your DIY Balcony Transformation
Ready to turn clutter into curb appeal? Follow this battle-tested plan refined over years of trial and error. You’ll blend smart ideas with household resources to create a space that works as hard as it impresses.
- Map Your Vision
Sketch your balcony layout, noting sunlight patterns and existing furniture. Mark zones for food plants, seating, and storage. This prevents overcrowding and ensures each thing has purpose. - Gather Materials
Collect cleaned jars, tins, and plastic containers. Grab your hot glue gun, drill, and outdoor-safe paints. Raid cabinets for unused resources like twine or fabric scraps. - Build Functional Bases
Drill drainage holes in planters – three per container. Layer pebbles at the bottom to manage water flow. For hanging pieces, reinforce handles with extra glue.
Pro Tip: Test paint colors on scrap cardboard first. Sunlight alters hues dramatically!
| Challenge | Solution | Tools Used |
|---|---|---|
| Limited Space | Vertical herb wall | Stacked tins, hot glue |
| Poor Drainage | Elevated plant stands | Bricks, wooden slats |
| Bland Aesthetics | Stenciled patterns | Acrylics, masking tape |
Finish with weatherproof sealant to protect against rain. Add personality through things like hand-painted labels or mosaic tile accents. You’ll get really creative once the basics are set!
Remember: Great spaces evolve. Revisit your layout each season, swapping water-loving plants for drought-tolerant succulents in summer. Your balcony will stay fresh for years with these adaptable ideas.
Final Thoughts to Inspire Your Upcycled Balcony Journey
What stories could your discarded items tell if given a second chance? Throughout this guide, you’ve discovered ways upcycle everyday materials into thriving planters, clever storage, and vibrant decor. Each project proves creativity thrives when we rethink our relationship with ordinary objects.
Remember those rinsed-out jugs and empty tins? They’re not trash – they’re opportunities. By managing water flow in planters and choosing food-inspired herbs, you’ve learned to balance practicality with beauty. Your balcony now breathes life through tiny gardens that once lived in recycling bins.
Here’s a tip: Keep experimenting. Those ‘ugly’ things hiding in your home today could be tomorrow’s centerpiece. Share your creations, swap ideas, and watch how small changes ripple into lasting habits over the years.
Next time you spot a potential project, dive in. Every choice stitches sustainability into daily life. Your journey evolves with each rescued container and nurtured plant. Now go make magic from the mundane!


