
Tired of spending hours pulling unwanted plants from your garden? You’re not alone. Many gardeners struggle with keeping their soil healthy while battling persistent growths. The good news? There’s a smarter way to maintain your outdoor space without constant work.
Using the right ground cover can cut weeding time by up to 90%. This simple method also protects your plants and improves soil quality over time. Whether you have a small backyard plot or larger beds, these approaches fit easily into a packed schedule.
Studies show that proper layering makes a big difference in preventing unwanted sprouts. Pair this with no-dig methods, and you’ll see even better results. Ready to transform your outdoor area into a low-maintenance paradise? Let’s explore how.
Why Mulch Is Your Garden’s Best Defense Against Weeds

Ever wonder why some gardens stay weed-free with little effort? The answer often lies in a simple layer of organic or inorganic material spread across the soil. This unsung hero not only saves time but also nurtures your plants.
How Mulch Suppresses Weed Growth
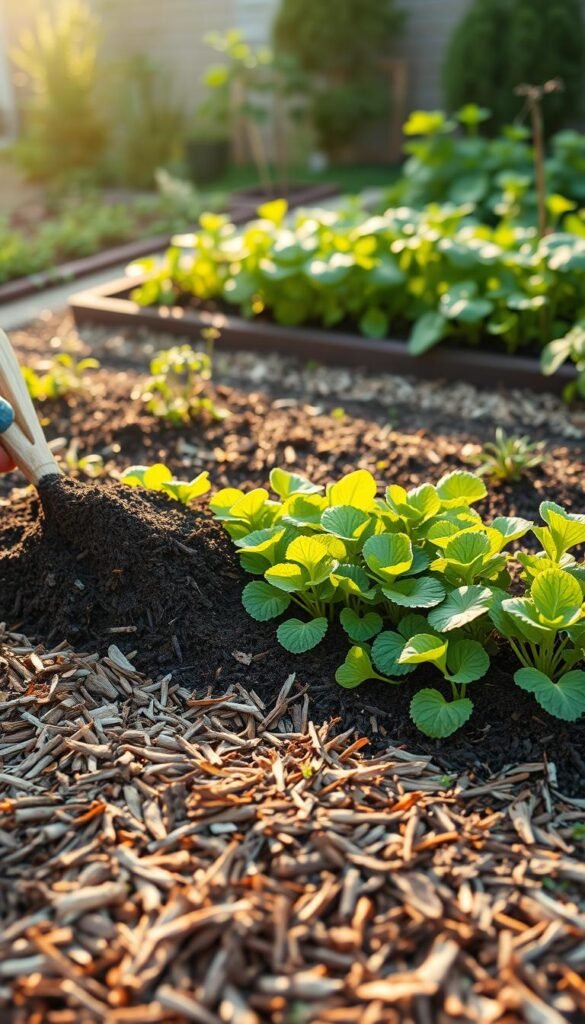
Mulch acts like a sunscreen for your soil, blocking up to 95% of weed seeds from germinating. A 3–4 inch layer filters out UV light, starving unwanted sprouts of the energy they need to grow.
Worried about mulch introducing new weeds? Properly processed organic options (like shredded bark or straw) rarely contain viable seeds. For extra protection, avoid fresh grass clippings or unaged compost.
The Bonus Benefits: Moisture Retention and Soil Health
Beyond weed control, mulch keeps soil hydrated. Studies show it reduces evaporation by 70%, cutting watering needs in half. Your plants’ roots stay cooler in summer and insulated in winter, with temperatures moderated by 15°F.
Healthy soil thrives under mulch. Microbial activity increases by 30%, breaking down organic matter into nutrients. Compare decomposition rates:
- Straw: 6–12 months
- Wood chips: 1–3 years
- Leaves: 3–6 months
USDA data confirms mulched soil retains 60% more nitrogen, boosting plant growth naturally. It’s a win-win for your garden and your schedule.
Choosing the Right Mulch for Your Garden
Not all ground covers work equally well for every planting scenario. The best pick depends on your soil type, climate, and what you’re growing. Here’s how to match materials to your needs effortlessly.
Organic vs. Inorganic: Pros and Cons
Organic options like compost or straw break down over time, feeding your soil with nutrients. They’re ideal for vegetable patches but need yearly refreshing. Tip: Avoid fresh grass clippings near seedlings—they can overheat and harm young roots.
Inorganic choices (gravel, landscape fabric) last longer but don’t improve soil. They’re low-maintenance for pathways or perennial beds. The EPA recommends organic mulch for sustainability:
“Recycled materials like bark or leaves reduce landfill waste while enriching ecosystems.”
Best Types for Different Plants
Vegetables: Straw retains moisture and keeps fruits clean. Studies show it reduces soil-borne diseases by 25%.
Flowers: Shredded bark balances aesthetics and function. Acid-loving plants (roses, azaleas) thrive under pine needles.
Shrubs: Wood chips provide long-term coverage but avoid them in annual beds—they temporarily tie up nitrogen during decomposition.
| Type | Cost (per sq ft) | Moisture Retention | Best For |
|---|---|---|---|
| Straw | $0.10–$0.30 | 85% | Tomatoes, strawberries |
| Wood chips | $0.20–$0.50 | 70% | Trees, shrubs |
| Compost | $0.15–$0.40 | 90% | All-purpose |
| Pine needles | $0.25–$0.60 | 75% | Blueberries, rhododendrons |
Test bulk mulch for weed seeds by spreading a sample on wet paper towels for a week. If sprouts appear, request a heat-treated batch from suppliers like EarthGro or Coast of Maine.
Preparing Your Garden Beds for Mulching

The secret to long-term weed control starts with proper bed preparation. Taking time now to clear and condition your soil ensures mulch works effectively for seasons to come. Follow these steps to create the ideal foundation.
No-till methods reduce weed germination by 80%, according to agricultural studies. Instead of disrupting soil, focus on smothering existing growth and boosting natural fertility. This protects delicate root systems while preventing buried weed seeds from surfacing.
Clearing Existing Weeds Without Chemicals
Solarization uses sunlight to kill weeds and seeds naturally. Cover moist ground with clear plastic for 2-6 weeks during hot weather. The trapped heat pasteurizes the top 6 inches of soil—perfect for annual beds.
Five budget-friendly weeding tools under $50:
- CobraHead weeder ($30) for precise root removal
- Hori-Hori knife ($25) for tough taproots
- Stirrup hoe ($20) for quick surface slicing
- Dandelion digger ($12) for deep-rooted pests
- Hand cultivator ($15) for between plants
Pro tip: The chop-and-drop method turns pulled weeds into mulch. Leave chemical-free annuals to dry on pavement before redistributing as organic matter.
Soil Conditioning Tips for Maximum Effectiveness
Test soil pH before mulching—most plants thrive at 6.0-7.0. Use a $10 test kit from your local extension office. For compacted ground, look for these signs:
- Water pools instead of soaking in
- Shovels bounce off hard layers
- Roots grow sideways instead of downward
“Mix 3 inches of compost into clay soils and 1 inch into sandy soils for optimal texture,” recommends the USDA’s National Organic Program guidelines.
Avoid rototilling—it brings hidden weed seeds to the surface. Instead, try the lasagna method: layer cardboard, compost, and straw to build soil tilth naturally. Your future self will thank you when weeding time drops by hours.
Minimizing Weeds with Mulch: Core Techniques

Want to spend less time battling unwanted plants and more time enjoying your outdoor space? The right approach can turn your garden into a low-maintenance retreat. These proven methods make weed control effortless while nourishing your soil.
The 3-Inch Rule: Ideal Depth for Weed Suppression
Three inches is the magic number for stopping weeds in their tracks. Research shows this depth blocks 95% of unwanted growth by creating a light barrier. Too thin? Weeds push through. Too thick? Water struggles to reach roots.
Measure with common objects if you don’t have a ruler:
- A credit card is 0.03 inches thick
- Four quarters stacked equal 0.68 inches
- A standard soup can is about 3 inches tall
Maintain this depth throughout the season. As organic material breaks down, add thin layers to stay effective. For sloped areas, use netting or jute mesh to prevent washouts.
Sheet Mulching (Lasagna Method) for Total Weed Control
This no-dig method builds rich soil while smothering existing weeds completely. Start with cardboard as your base layer—it lasts 2-3 seasons before decomposing. Avoid glossy or colored materials that may contain toxins.
Seven safe cardboard sources:
- Plain shipping boxes (remove tape)
- Pizza boxes (grease-free sections)
- Cereal boxes (uncoated varieties)
- Egg cartons (paper-based)
- Toilet paper tubes
- Paper grocery bags
- Moving boxes (undyed)
“Sheet mulching reduces watering needs by 50% during droughts,” notes the University of California’s Master Gardener Program.
Layer materials in this order for best results:
- Cardboard (overlap edges by 6 inches)
- Compost or manure (1-2 inches)
- Straw or leaves (3 inches)
- Wood chips or bark (2-inch top layer)
Many cities offer free compost through municipal programs—check your local waste department. Calculate needs by multiplying bed area (sq ft) by 0.25 (for 3-inch depth). A 100 sq ft space requires about 0.75 cubic yards.
For more mulching techniques that block light and retain, explore our detailed guide. These methods create a protective blanket that keeps your garden thriving with minimal effort.
Low-Effort Mulching Strategies for Busy Gardeners

What if your garden could weed itself while improving soil health? Living mulches and automated systems offer an effective way to save time while keeping your plants thriving. These smart strategies work year-round with minimal input after initial setup.
Using Living Mulches Like Clover or Creeping Thyme
White clover does double duty as both ground cover and natural fertilizer, adding 150lbs of nitrogen per acre annually. Low-growing plants like creeping thyme form dense mats that block weeds while attracting pollinators. University trials show these living covers reduce maintenance by 40% compared to bare soil.
Top performers for different needs:
- Nitrogen boost: White clover (1/4 lb seed per 1,000 sq ft)
- Drought tolerance: Corsican mint thrives in dry shade
- Pollinator magnet: Creeping phlox blooms attract butterflies
For beginners, sweet woodruff makes a forgiving choice under trees. Avoid common beginner gardening mistakes by matching plants to your light conditions.
Automating Mulch Renewal with Seasonal Drop-Ins
Timed-release pellet systems maintain consistent coverage without weekend labor. Popular options like Scotts Turf Builder pellets break down gradually, feeding soil microbes while suppressing weeds. For larger areas, subscription services deliver fresh material right when needed.
Pro tips for hands-off care:
- Mark calendar reminders for spring/fall refresh
- Use drip-edge spreaders for even distribution
- Interplant every 6-8 weeks for continuous coverage
“Living mulch systems create the perfect place for beneficial insects while protecting soil structure,” notes the Ecological Landscape Alliance.
Pair these approaches with pollinator-friendly options like yarrow or lavender for a garden that cares for itself. Your future free weekends will thank you.
Mulching Around Trees and Shrubs the Right Way

Your landscape trees deserve better than the common ‘mulch volcano’ mistake. Proper techniques protect roots while helping plants thrive. Unlike annual beds, woody plants need special consideration for long-term health.
Avoiding “Mulch Volcanoes” That Harm Plants
Piling material against trunks is the #1 problem for urban trees. Research shows this practice increases mortality by 300%. Instead, leave 2-3 inches of clearance around the base to allow air flow.
Why volcanoes damage plants:
- Traps moisture against bark, causing rot
- Encourages girdling roots that strangle trees
- Creates habitat for rodents and pests
Five tools under $30 to fix existing issues:
- Root collar excavator ($25)
- Hand cultivator ($12)
- Soil knife ($18)
- Measuring caliper ($15)
- Leaf rake ($10)
“Mulch should resemble a donut, not a mountain—flat and wide with space at the center,” advises the International Society of Arboriculture.
Creating Water-Catching Basins for Drought Resilience
Proper basins capture 80% of rainfall, directing water to roots. Measure the canopy spread—your basin should extend to the drip line. This creates a reservoir that slowly releases moisture.
For established trees:
- Build berms 3-4 inches high at the edge
- Use wood chips or shredded bark inside
- Check depth annually with a ruler
Prevent gopher damage by:
- Laying hardware cloth under mulch
- Adding sharp gravel at the perimeter
- Using castor oil granules as deterrent
Stormwater benefits add up quickly. A single mature tree with proper mulching can manage 2,000 gallons of runoff yearly. That’s smarter landscaping the natural way.
Seasonal Mulch Maintenance Made Simple
Keeping your garden healthy year-round doesn’t have to be complicated. With smart seasonal adjustments, you can maintain protection while saving time. A few timely tweaks make all the difference between constant upkeep and effortless care.
Spring Refresh: When and How to Add More Mulch
Wait until soil hits 65°F before adding your first spring layer. This prevents trapping cold moisture that delays plant growth. Use a soil thermometer—they cost under $15 at garden centers.
Four essential tools for spring renewal:
- Bow rake ($25) for spreading evenly
- Compost fork ($35) for turning old material
- Measuring stick ($5) to check depth
- Wheelbarrow ($50) for bulk materials
Regional timing guide:
| USDA Zone | Optimal Refresh |
|---|---|
| 3-5 | Late May |
| 6-7 | Mid-April |
| 8-9 | Early March |
| 10+ | Year-round light layers |
“Increase summer depth by 1 inch to reduce watering needs by 65%,” recommends the National Gardening Association.
Winterizing with Mulch to Prevent Early Spring Weeds
Proper winter coverage insulates soil down to -20°F. Apply after the first hard frost but before ground freezes solid. This timing prevents frost heave that damages plant roots.
Compare winter options:
- Organic: Straw (6-8 inch layer)
- Mineral: Gravel (2-3 inches)
- Combo: Leaves topped with evergreen boughs
Snow acts as natural insulation when paired with proper ground cover. For early bloomers like crocus, use breathable fabric instead of heavy materials. Remove winter protection gradually in spring to prevent mold.
Prevent overwintering pests by:
- Clearing old material in fall
- Avoiding thick layers near foundations
- Using cedar or cypress that repels insects
Troubleshooting Common Mulch Problems
Even the best-laid garden plans can hit snags. When issues arise with your ground cover, quick fixes restore balance without extra work. Let’s tackle two common challenges—fungal growth and pests—with simple solutions.
Preventing Mold and Fungus in Moist Mulch
Turning material every 2-3 weeks reduces fungal growth by 90%, according to horticultural studies. This simple step improves air flow while keeping nutrients available. Spot these common fungi early:
- Artillery fungus: Tiny black spots that stick to surfaces
- Slime mold: Bright yellow blobs that dry to powder
- White mold: Cotton-like growth on decaying wood
- Dog vomit fungus: Mustard-colored masses
- Mushrooms: Various species indicating decomposition
For persistent issues, try these EPA-approved alternatives:
- Cornmeal (1 lb per 100 sq ft) as natural fungicide
- Cedar oil sprays applied monthly
- Baking soda solution (1 tbsp per gallon of water)
“Proper aeration prevents 80% of mulch-related fungal problems,” notes the University of Maryland Extension. “Use a garden fork to fluff layers weekly in damp climates.”
Keeping Pests Away from Organic Mulch
Some critters see your garden as an all-you-can-eat buffet. Cedar mulch naturally repels ants and termites thanks to its aromatic oils. For slugs, maintain proper depth—they avoid dry, loose materials over 3 inches thick.
Seven plants that deter pests while looking beautiful:
- Lavender (repels moths and fleas)
- Mint (discourages ants and mice)
- Marigolds (nematodes hate their roots)
- Rosemary (keeps carrot flies away)
- Chrysanthemums (natural pyrethrin source)
- Garlic (deters Japanese beetles)
- Lemongrass (mosquitoes avoid it)
For severe infestations:
| Pest | Organic Solution | Application Timing |
|---|---|---|
| Fire ants | Orange oil drench | Early morning |
| Slugs | Iron phosphate pellets | Evenings after rain |
| Nematodes | Beneficial nematodes | Soil above 60°F |
Remember—healthy soil grows strong plants that resist pests naturally. When problems appear, these targeted fixes save time while keeping your garden thriving.
No-Till Gardening: The Ultimate Weed-Prevention Partner
Your shovel might be the reason weeds keep coming back year after year. No-till methods work with nature’s processes to create healthier soil while dramatically reducing unwanted plants. Studies show this approach cuts weed pressure by 75% compared to traditional digging.
How Avoiding Soil Disturbance Reduces Weed Seeds
Every time you turn soil, you bring buried weed seeds to the surface where they germinate. No-till keeps these dormant seeds deep underground. The USDA found layered systems suppress 90% of weeds by maintaining this natural stratification.
Healthy soil microbiota under no-till:
| Organism | Conventional Soil | No-Till Soil |
|---|---|---|
| Earthworms | 5-10 per sq ft | 15-30 per sq ft |
| Mycorrhizal fungi | Low colonization | 80-90% root coverage |
| Nitrogen fixers | Minimal activity | High activity |
Transition to no-till in five manageable steps:
- Year 1: Reduce tillage depth by half
- Year 2: Switch to broadfork aeration
- Year 3: Plant cover crops between seasons
- Year 4: Implement permanent beds
- Year 5: Adopt full no-till with mulch
Pairing No-Till with Mulch for a Weed-Free Garden
This dynamic duo creates a self-sustaining system. The mulch protects soil structure while no-till preserves beneficial organisms. Together, they can eliminate weeding in most home gardens.
Essential no-till planting tools:
- Dibber for precise seed placement
- Hori-Hori knife for transplanting
- Jab planter for larger seeds
- Compost tea brewer for soil nutrition
“No-till systems accumulate 1/4 inch of organic matter yearly through natural decomposition,” reports the NRCS Conservation Stewardship Program. “This builds drought-resistant soil that needs minimal inputs.”
For best results, integrate worm towers every 10 feet. These vertical compost systems feed roots while aerating soil naturally. Your garden will thank you with healthier plants and fewer weeds season after season.
Your Next Steps to a Low-Weed, High-Reward Garden
Ready to transform your outdoor space with smart, time-saving strategies? Start small with this 30-day plan:
Print our mulch depth guide to ensure consistent coverage. Measure with household items like soup cans or credit cards for accuracy.
Tap local resources for support:
– Extension offices offer free soil tests
– Community mulch exchanges save costs
– Recommended test kits: Luster Leaf or MySoil
Track progress with a simple worksheet. Note changes in weeding time and plant health each season. Celebrate wins—even a 10% reduction in weeds counts!
Your garden will thrive with less effort this year. One step at a time, you’ll build a lush, resilient space that works for you.


