
Transform your evenings with custom lighting that brings warmth and charm to any setting. Crafting your own decorative pieces allows you to personalize designs while saving money. Whether you’re a beginner or an experienced crafter, these projects are simple yet rewarding.
Solar-powered options make it easy to create eco-friendly solutions that brighten up patios, decks, or pathways. The soft glow enhances the atmosphere, turning ordinary nights into something special. Plus, working on these creations can be a fun activity for the whole family.
Looking for more inspiration? Explore how water features and fairy lights can further elevate your space. With a little creativity, you can design a stunning retreat right in your backyard.
Why DIY Garden Chandeliers Transform Your Outdoor Space

Soft lighting turns ordinary backyards into enchanting retreats. Whether hosting dinners or unwinding solo, the right light fixtures create a welcoming ambiance. Custom designs let you match your style while saving money.
The Allure of Ambient Lighting
A warm glow does more than brighten—it relaxes. Studies show soft illumination reduces stress and enhances social connections.
“Twinkling lights trigger a sense of calm, making outdoor spaces feel like private sanctuaries.”
Remote-controlled puck lights (from our second source) add convenience. Adjust brightness without leaving your seat.
Cost-Effective vs. Store-Bought Alternatives
Why spend hundreds when repurposed materials work beautifully? Compare options below:
| Type | Average Cost | Installation |
|---|---|---|
| Commercial Chandeliers | $300+ | Electrician required |
| DIY Solar/Battery | $50–$100 | No wiring needed |
Solar options (per our first source) cut energy bills. Plus, they’re eco-friendly. One homeowner saved $100 in just two hours by building their own.
Ready to craft your own magic? Next, we’ll explore materials.
Materials You’ll Need for Your DIY Garden Chandelier

Gathering the right materials makes crafting easier and more enjoyable. Whether repurposing old items or buying new supplies, each component plays a role in durability and style. Below, we break down essentials for a seamless project.
Essential Tools for Assembly
A few basic tools ensure precision and safety. Here’s what to keep handy:
- Drill: For creating holes in hard materials.
- Glue gun: Secures lightweight decor like beads or fabric.
- Zip ties: Ideal for fastening wires or frames.
- Wire cutters: Trim excess for a clean finish.
Creative Base Materials
Your chandelier’s foundation sets the tone. Consider these options:
- Repurposed baskets: Rustic and lightweight.
- Mason jars: Perfect for a farmhouse vibe.
- Thrifted old chandeliers: Upcycle for vintage charm.
Lighting Options Compared
Choose between solar lights or battery-operated strands. Here’s how they stack up:
| Type | Runtime | Cost |
|---|---|---|
| Solar lights | 8–12 hours/day | $15+ |
| Battery fairy lights | 24–48 hours | $10+ |
For longevity, pair solar lights with weatherproof spray. Chicken wire frameworks (from our third source) add greenery support. Safety tip: Wear gloves when handling sharp edges.
Step-by-Step Guide to Building Your Chandelier

Building your own lighting masterpiece is easier than you think. Follow these step instructions to craft a piece that fits your space perfectly. With the right tools and patience, you’ll have a functional and beautiful fixture in no time.
Prepping Your Base: Cleaning and Assembly
Start by cleaning your base material thoroughly. For metal pipes, use Krud Kutter to remove grime. If repurposing a basket, remove handles with pliers for a cleaner look.
Choose your framework:
- Gas pipe joints for industrial durability.
- Chicken wire for flexible, lightweight designs.
Attaching Lights Securely
For solar lights, hot-glue puck lights to the base for a permanent hold. Prefer fairy lights? Weave them through the wire for a twinkling effect.
“Always test lights before final attachment to avoid rework.”
Hanging Your Chandelier Safely
Consider weight distribution—lighter bases can use S-hooks, while heavier ones need ceiling anchors. Options include:
- Pergolas for shaded areas.
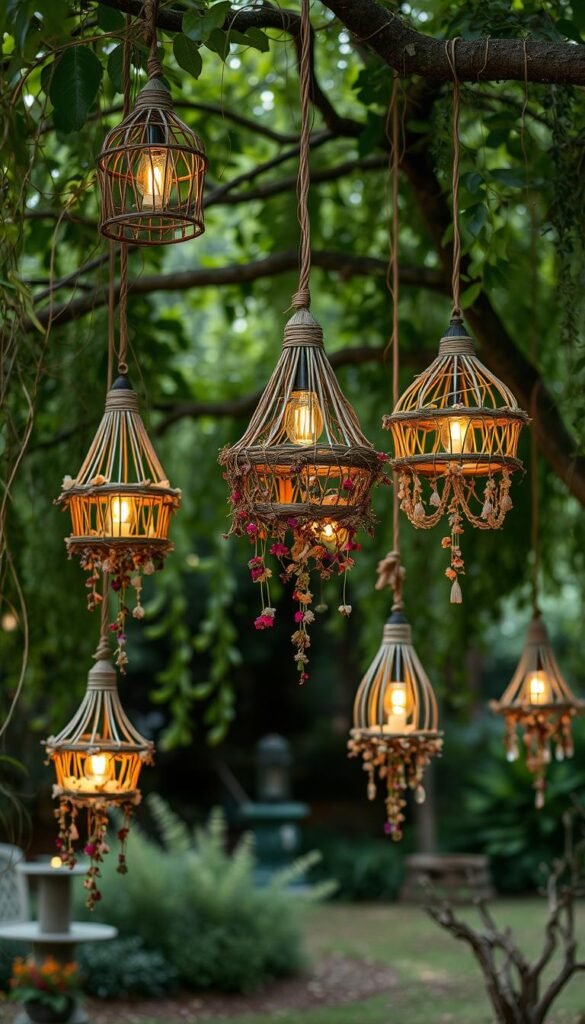
- Tree branches for a natural look.
Place remote controls in a weatherproof box if using solar lights with adjustable settings.
Creative Variations to Match Your Style

Personalize your space with unique designs that reflect your taste. Whether you prefer rustic charm or modern elegance, these ideas inspire decorations that shine. Below, explore themes to transform your outdoor chandelier into a statement piece.
Rustic Mason Jar Charm
Cluster mason jars with solar lids for a farmhouse feel. Hang them at varying heights for depth. Fill jars with dried lavender or sand for extra texture.
Tip: Use repurposed barn wood as a base for a cohesive natural look.
Elegant Wire and Crystal Accents
Thrifted chandelier parts add a personal touch. Weave wire frames with crystal beads for sparkle. Drape fairy lights through the structure for a soft glow.
Festive Seasonal Upgrades
Swap decor with the seasons. Try pinecone garlands in winter or fresh herbs in summer. Wrap fairy lights in red and green for holidays.
| Style | Materials | Best For |
|---|---|---|
| Coastal | Seashells, blue LEDs | Patios near water |
| Bohemian | Macramé, dreamcatchers | Eclectic spaces |
Quick-change tip: Use floral foam to secure fresh flowers or herbs. This way, your design stays fresh all season.
Pro Tips for Maintenance and Safety

Keep your outdoor lighting shining bright with simple upkeep tricks. Regular care prevents wear and ensures your creation stays stunning year-round. Follow these expert-backed steps to protect your investment.
Weatherproofing for Durability
Shield your chandelier from rain, wind, and sun damage. Apply silicone sealant to electrical connections to block moisture. For painted surfaces, use UV-resistant spray (per our second source) to prevent fading.
Storm prep tips:
- Remove fixtures temporarily during heavy winds.
- Use weatherproof covers if leaving outdoors.
- Clean solar panels every two weeks for peak efficiency.
Maximize Battery Life
Proper battery care keeps your glow lasting longer. Replace batteries every six months with daily use. Store extras in a dry, cool place to avoid leaks.
“Lithium batteries are safest for outdoor use—avoid alkaline in damp conditions.”
For solar lights:
- Position panels where they get 6+ hours of sunlight.
- Wipe dust off panels with a microfiber cloth.
- Troubleshoot dark spots by checking connections.
Winter storage? Disassemble delicate parts or wrap the entire fixture in burlap. With these steps, your home will stay beautifully lit the safe way.
Light Up Your Nights With Handmade Charm
Brighten your nights with handmade charm that sparks joy. A warm glow from your creation turns meals into memories and quiet moments into escapes. One host shared how their piece became the centerpiece of summer dinners—guests lingered longer under its soft light.
These projects make heartfelt gifts for family or friends who love personalized decor. Pair them with potted herbs or a handwritten care guide for extra thoughtfulness.
Always prioritize safety: keep lights away from flammable materials and check wiring monthly. Share your designs with #DIYGardenChandeliers to inspire others. Seasonal updates, like autumn leaves or spring blooms, keep the magic alive year-round.


