
Your yard holds endless potential to become a personalized retreat. With thoughtful planning and hands-on effort, you can craft functional areas that blend beauty with practicality. Hardscaping elements like pathways and patios create structure while boosting your home’s visual charm.
These upgrades don’t require expensive contractors. By repurposing materials like gravel, stone, or wood pallets, you achieve professional results on a budget. Proper drainage planning ensures your creations withstand weather while complementing existing plants and features.
Consider starting with small-scale designs. A winding gravel walkway adds rustic character, while stacked stone borders define flower beds. For those with limited space, vertical gardening structures maximize vertical real estate without crowding ground areas.
Every choice reflects your style—whether modern geometric patterns or cozy cottage vibes. These improvements not only elevate outdoor living but also increase property value. Imagine hosting gatherings on a custom patio or enjoying morning coffee beside a hand-built fence.
Ready to begin? This guide walks through material selection, layout strategies, and maintenance tips. You’ll discover how even basic tools can unlock stunning transformations that last for years.
Getting Started with Your DIY Backyard Vision
A well-thought-out vision is key to transforming your yard into a functional retreat. Start by sketching rough ideas that match how you’ll use the space—entertaining guests, growing herbs, or creating play zones. This clarity helps prioritize which elements matter most.
Next, walk through your yard with fresh eyes. Note where sunlight hits hardest, drainage issues, or existing features worth keeping. Ask yourself: “Would a pathway here improve flow?” or “Could a seating area make evenings more enjoyable?”
Consider these three factors before digging in:
- Budget: Repurpose materials like bricks or fallen branches
- Skill level: Begin with manageable tasks like edging flower beds
- Timeline: Phase projects over weekends or seasons
Local building codes often dictate fence heights or patio distances from property lines. A quick call to your city’s planning office saves headaches later. Remember, even small upgrades—like defining walkways with pebbles—add structure without overwhelming your schedule.
Finally, snap “before” photos. They’ll highlight progress and inspire future design tweaks as your outdoor oasis evolves.
Designing Your Outdoor Space for Maximum Impact

Transforming your property starts with understanding its unique personality. Let’s explore how to create harmony between new additions and what’s already thriving in your environment.
Assessing Your Landscape and Existing Features
Walk your grounds during different times of day. Notice where shadows fall and how sunlight interacts with surfaces. This reveals ideal spots for seating areas that catch morning light or afternoon shade.
Check for natural drainage patterns after rain. Low spots that collect water might need grading adjustments before adding paths. Pro tip: Use a garden hose to simulate water flow and identify problem areas.
Planning Layouts for Seamless Integration
Sketch your ideas using free apps like Home Outside or graph paper. Focus on connecting key areas – front gates to porches, or gardens to seating zones. Curved pathways often feel more inviting than rigid straight lines.
Consider these three elements for cohesive results:
- Repeat materials from existing structures (like matching fence posts to deck colors)
- Leave breathing room between features
- Use native plants as natural borders
“Good design feels discovered, not forced” – let your property’s natural flow guide decisions. With thoughtful planning, every addition will look like it’s always belonged there.
Selecting the Right Tools and Materials

Great results begin with smart gear choices. The right tools transform messy experiments into polished installations, while quality materials ensure your work stands up to foot traffic and weather.
Essential Tools for Precision Work
Start with a sturdy shovel for digging and a wheelbarrow for moving heavy loads. A 4-foot level helps create even surfaces, while a rubber mallet gently seats stones without chipping them. Don’t skip the tamper—this tool packs soil tight to prevent sinking over time.
“Invest in a good tamper early. It’s the difference between a path that lasts one season versus five years.”
Material Choices That Deliver Value
Compare options using three key factors:
| Material | Cost | Durability |
|---|---|---|
| Gravel | $ | Moderate |
| Concrete Pavers | $$ | High |
| Natural Stone | $$$ | Excellent |
| Composite | $$ | High |
Crushed stone makes an affordable base layer, while polymeric sand locks pavers in place. For edging, aluminum strips offer clean lines without rot. Remember: local stone often costs less than shipped alternatives and blends naturally with your surroundings.
Need help sourcing? Check construction surplus stores for discounted materials. Many sell unused pavers at 40% off retail prices. With these tools and smart selections, your project will look pro-grade without blowing the budget.
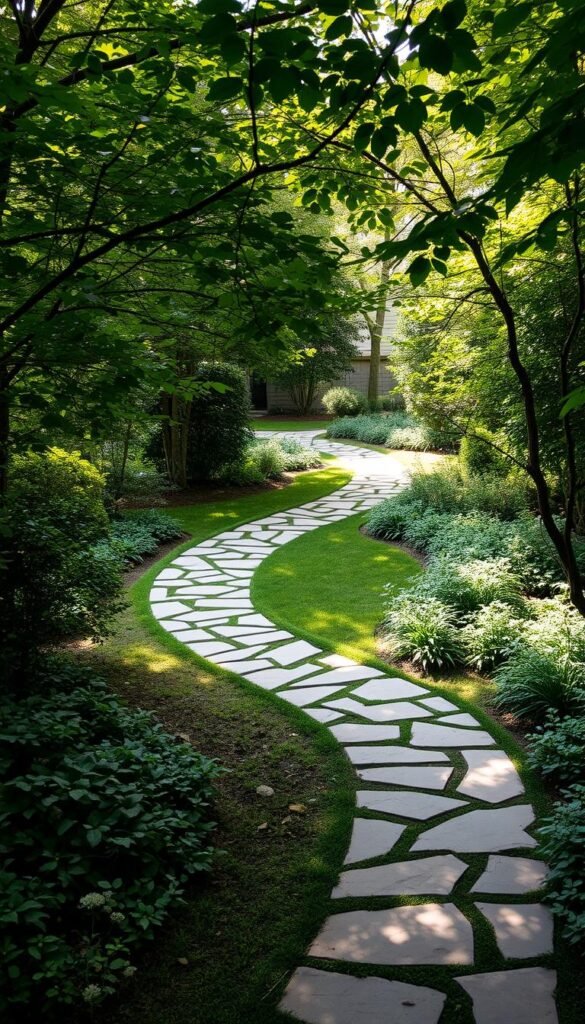
Creating DIY Pathways with Style and Function

Pathways serve as the foundation of outdoor spaces, guiding movement while adding character. Whether you prefer rustic charm or modern simplicity, two standout options deliver style and durability. Let’s explore how to bring these designs to life.
Gravel Paths: Affordable Elegance
Crushed stone offers quick installation with natural appeal. Start by marking your route using string or spray paint. Dig 4 inches deep, then line the trench with landscape fabric to block weeds. Spread gravel in 2-inch layers, compacting each with a tamper for firm footing.
Stepping Stone Walkways: Natural Flow
Flat stones create inviting trails through lush greenery. Space pieces 6-8 inches apart for comfortable strides. Dig individual holes slightly deeper than each stone’s thickness. Fill bases with sand for leveling, then set stones firmly. Top gaps with pea gravel or moss for polished edges.
Pro tip: Mix stone sizes and gravel colors to craft unique patterns. Earthy tones blend seamlessly with surroundings, while white marble chips brighten shaded areas.
Ensuring Long-Term Stability
Proper drainage prevents shifting and erosion. Slope paths 1/4 inch per foot away from structures. Use edging materials like metal strips or river rocks to contain loose stone. Replenish surface layers annually, especially after heavy rains or frost cycles.
These techniques transform basic materials into enduring features. With thoughtful preparation, your pathways will handle foot traffic gracefully while enhancing your outdoor experience for years.
Constructing a Stunning DIY Patio

Every great outdoor space deserves a gathering spot that combines beauty with durability. A stone patio offers both, becoming the heart of your yard for years to come. Let’s explore how proper groundwork transforms loose materials into a stable surface ready for laughter-filled evenings and quiet sunrises.
Proper Ground Preparation Techniques
Your patio’s longevity starts beneath the surface. Begin by outlining your area with stakes and string, creating clean edges. Dig 6 inches deeper than your stone thickness—this space holds the foundation that prevents shifting. Remove roots and rocks as you excavate to create an even base.
Layer like a pro:
- Landscape fabric blocks weeds while allowing drainage
- 3 inches of crushed gravel, compacted with a tamper
- 1 inch of coarse sand, leveled with a board
Check slope using a 4-foot level—aim for 1/8 inch drop per foot away from your home. This subtle angle directs rainwater while remaining invisible to guests. When laying stones, start from permanent structures like house walls. Tap each piece with a rubber mallet until it sits snugly in the sand bed.
Fill gaps with polymeric sand for a locked-in finish. Sweep it across the surface, then mist with water to activate the binding agents. For irregular stone shapes, this patio installation guide offers clever spacing solutions. Remember: taking time with these steps now means fewer adjustments when seasons change.
DIY Backyard Garden Projects: Building Simple Pathways, Fences, and More

Fences offer more than boundaries—they shape outdoor experiences and elevate home aesthetics. A well-designed structure provides privacy while framing your landscape like living artwork. Whether you choose classic wood panels or sleek metal designs, these features become extensions of your personal style.
Modern fencing solutions balance form and function beautifully. Consider these popular options:
- Wood: Warm and customizable, ideal for traditional homes
- Composite: Low-maintenance alternative with wood-like textures
- Metal: Industrial chic that withstands harsh weather
Strategic placement turns functional barriers into design assets. A six-foot privacy screen around your patio creates an intimate dining area, while shorter picket styles showcase flower beds. Always check local codes for height restrictions—most areas limit residential fencing to 6-8 feet.
“Measure twice, dig once. Proper post spacing ensures your structure stays straight for decades.”
Before breaking ground:
- Mark property lines precisely
- Discuss plans with neighbors
- Apply for necessary permits
With careful planning, your handmade wood or metal masterpiece adds value while reflecting your creativity. The right design transforms ordinary yards into curated outdoor galleries that impress guests and appraisers alike.
Crafting a Custom Fence for Your Outdoor Space
A well-crafted fence transforms your property into a personal sanctuary while solving practical needs. Whether you prioritize privacy or artistic expression, the right materials and patterns elevate both security and visual harmony.
Exploring Material Strengths
Wood remains a timeless choice, offering warmth and customization through stains or paints. Modern metal options bring industrial durability with powder-coated finishes that resist rust. For busy homeowners, composite materials mimic natural textures while requiring minimal upkeep.
Designs That Make Statements
Board-and-batten styles create seamless privacy with vertical boards capped by narrow battens. Horizontal slats stretch spaces visually, perfect for compact yards. Mix materials for striking contrasts—try corrugated metal panels between wood posts for rustic-meets-modern flair.
Always anchor designs with properly spaced posts set in concrete. This ensures structural integrity while letting creative design elements shine. Your finished fencing becomes more than a boundary—it’s a signature touch that boosts curb appeal and reflects your unique vision.


