
Growing plants in elevated planters offers a fresh approach to cultivating fresh produce and flowers. These structures let you control soil quality and reduce weeds while creating a tidy, organized outdoor area. Whether you’re new to this method or refining an existing setup, smart planning can turn even small yards into lush, productive spaces.
Designing an efficient arrangement starts with understanding sunlight patterns and plant needs. Most vegetables thrive with 6–8 hours of daily sun, so observe how light moves across your yard before positioning beds. Leave enough room between them for easy access—about 18–24 inches works well for wheelbarrows and kneeling.
Proper spacing prevents overcrowding and boosts harvests. Compact layouts work great for herbs and leafy greens, while vining crops like tomatoes need vertical supports. Mixing tall and short plants ensures sunlight reaches everyone without wasting square footage.
Drainage matters too. Slightly sloped setups or gravel layers under soil help avoid waterlogging. Pair functionality with beauty by adding paths lined with mulch or stone—these touches keep mud at bay while enhancing your outdoor space’s charm.
Introduction: Setting the Stage for Your Raised Bed Garden
Imagine stepping into your backyard and seeing vibrant greens bursting from organized, waist-high planters instead of fighting weeds in traditional rows. This shift from in-ground plots to structured growing spaces isn’t just trendy—it’s transformative. Rooted Garden clients often compare the change to “switching from flip phones to smartphones” for their home gardens.
Why does this method work so well? Raised beds let you skip backbreaking soil prep and jump straight to nurturing plants. Gardeners report:
- Fewer pest issues
- Earlier harvests
- Simpler weed control
One longtime grower shared:
“My tomato yield doubled the first season I switched—and I stopped losing carrots to compacted soil.”
Your outdoor space becomes a personalized ecosystem. You’ll arrange plants based on their needs, not your yard’s limitations. Sun-loving veggies get prime real estate while shade-tolerant herbs thrive in their own zones. This strategic approach turns even small areas into productive hubs.
Ready to rethink your green space? The next steps will show how smart layouts create gardens that practically care for themselves. Let’s build your blueprint for success.
Understanding the Basics of Raised Bed Gardening

Transforming your outdoor space starts with mastering the fundamentals of raised bed systems. These elevated growing spaces let you bypass common gardening headaches while boosting plant health. Unlike traditional plots, they give you complete control over your soil and growing conditions.
What Are Raised Beds and How Do They Work?
Picture a contained box filled with nutrient-rich soil sitting 6–24 inches above ground. This setup creates a customizable root zone where plants develop stronger systems. The elevated design improves drainage—water flows freely through loose soil instead of pooling around roots.
You can build these structures using wood, metal, or composite materials. Many gardeners follow our step-by-step guide to building raised beds for best results. The contained soil warms faster in spring, letting you plant earlier than in-ground gardens.
The Key Benefits of Raised Bed Gardening
These systems solve multiple challenges at once. Their height deters ground pests like slugs while reducing back strain during harvest. You’ll notice:
- Fewer weeds due to controlled soil composition
- Better moisture retention in hot climates
- Improved access for pruning and picking
Urban growers love how raised beds turn concrete patios into productive spaces. One Seattle gardener shared: “My kale thrives in beds where my old yard’s clay soil failed completely.” With proper care, these systems yield 2–3 times more produce per square foot than traditional methods.
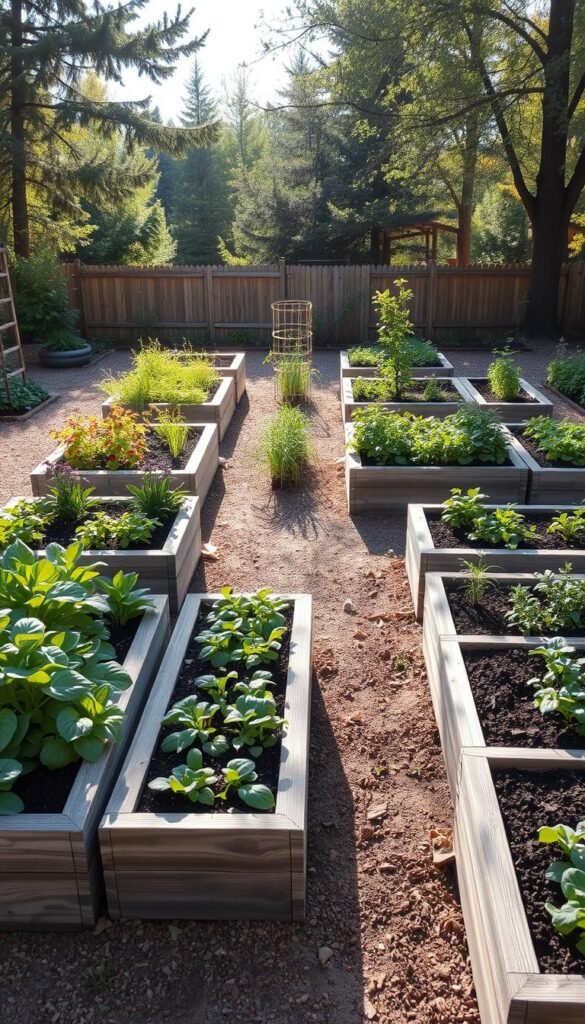
Perfecting Your Raised Bed Garden Layout: Tips for Maximizing Space

Start by measuring your available area. A 6-foot by 12-foot rectangle gives ideal proportions for two raised beds with walkways on all sides. This setup lets you reach every plant without stepping on soil—a game-changer for maintaining healthy roots.
Single isolated beds often look out of place and waste potential. Pairing structures creates balance while boosting functionality. One urban gardener noted:
“Grouping beds helped me rotate crops easily and keep tools organized between them.”
Here’s why two or more beds work better:
- Swap plant families yearly to prevent soil depletion
- Separate heavy feeders from light-nutrient herbs
- Create visual harmony through repeated shapes
Leave 18-24 inches between structures for comfortable movement. This room lets you kneel, weed, and harvest without contorting. For narrow yards, position beds lengthwise to maximize growing space while keeping paths functional.
Themed zones simplify care. Dedicate one bed to basil and parsley, another to peppers and eggplants. This layout prevents flavor transfer and makes pest control easier. Remember—your garden’s size should match your ambitions while leaving wiggle feet for adjustments each season.
Planning Your Garden Layout and Spacing Guidelines

Smart design transforms empty ground into a productive growing zone. The right measurements and pathways turn chaos into order, letting you work smarter—not harder—in your green space.
Ideal Dimensions and Bed Placement
Three to four feet wide becomes your golden rule for bed width. This lets you reach every plant without straining. Keep structures under 10 feet long—beyond that, navigating becomes tricky. One gardener found that “8-foot beds let me rotate crops easily while keeping tools within arm’s reach.”
Position structures end-to-end when possible. This creates clean lines and maximizes planting area. Leave 2-3 feet between them—enough space for kneeling pads or a small stool. Wider gaps (up to four feet) work better near compost bins or water sources.
Creating Accessible Walkways and Functional Zones
Paths matter as much as planting areas. Surround your layout with 3-foot perimeter walkways. These let wheelbarrows glide through during soil refresh days. Mulched or gravel paths prevent mudslides after summer storms.
Group beds by plant type for efficiency. Keep thirsty tomatoes near your rain barrel and drought-tolerant herbs farther out. Proper spacing:
- Reduces fungal diseases through better airflow
- Makes harvesting baskets easy to maneuver
- Allows quick access during pest patrols
Remember—your layout should grow with you. Start small, then expand as you learn what works in your unique space. Those first juicy tomatoes will prove every careful measurement was worth it.
Optimizing Sunlight Coverage and Seasonal Strategies

Sunlight dances across your yard differently each season—smart gardeners learn its rhythm. Start by mapping light patterns through spring, summer, and fall. A simple sun journal helps track where shadows fall at various times. One Oregon grower shared: “Charting light changes revealed a sweet spot I’d overlooked—my kale now thrives there year-round.”
Assessing Sun and Shade Patterns in Your Yard
Morning sun fuels photosynthesis while afternoon shade prevents heat stress. Use free apps like Sun Surveyor to visualize how structures and trees affect exposure. Microclimates matter too—south-facing walls radiate warmth in winter, while north corners stay cooler.
| Season | Sun Strategy | Crop Examples | Shade Tips |
|---|---|---|---|
| Summer | Afternoon shade | Lettuce, Spinach | Use taller plants as living umbrellas |
| Winter | Maximize light | Kale, Carrots | Clear southern exposure areas |
| Spring/Fall | Balance both | Peas, Radishes | Adjust row covers daily |
Adapting Your Layout to Seasonal Changes
Rotate mobile planters to chase light as days shorten. In July, position shade cloth over heat-sensitive crops like cilantro. Come October, shift pots to catch the sun’s lower angle. Pro tip: Leave 18″ between beds for easy seasonal adjustments.
Track how structures cast shadows—a December oak tree might block light that’s absent in June. Design with flexibility: leave space for temporary cold frames or shade tents. Your yard becomes a living calendar, with plants marking time through smart placement.
Enhancing Garden Functionality with Trellises and Containers

Transform your gardening game by looking up—and moving plants around. Vertical structures and portable pots unlock hidden potential in your setup, letting you grow smarter in limited areas.
Using Trellis Structures for Vertical Growth
Obelisk trellises turn climbing plants into space-saving superstars. Place one every 4-6 feet in your raised beds for beans or cucumbers. A seasoned grower notes: “My 8-foot bed holds three trellises—peas climb one side, squash the other.”
Position these structures along the north edge. This prevents shading while creating natural windbreaks. You’ll:
- Harvest without bending
- Improve air circulation
- Add visual height to flat layouts
The Flexibility and Benefits of Incorporating Containers
Portable pots solve sun-tracking challenges. Shift basil to catch morning rays in July, then shelter it under eaves during frost alerts. Containers work as:
- Seasonal gap-fillers between crops
- Test labs for new plant varieties
- Mobile shade providers for delicate seedlings
Pair them with permanent beds for dynamic layouts. One gardener shares:
“My moved tomatoes yielded 3 weeks earlier than bed-planted ones last year.”
Preparing the Soil: Amendments and Maintenance for Healthy Plants
Your garden’s success starts beneath the surface. Unlike traditional plots, raised beds demand precise soil management since plants can’t spread roots beyond the structure. The right blend becomes their entire world—get it right, and you’ll see explosive growth.
Mix equal parts topsoil, compost, and coarse sand or perlite. This trio balances drainage and moisture retention. One gardener found that adding crushed eggshells boosted calcium levels naturally:
“My peppers stopped getting blossom-end rot after I amended the soil this way.”
Test your soil every spring. Kits from local nurseries measure pH and nutrients. Acidic soils? Add lime. Alkaline? Mix in sulfur. These tweaks ensure your plants absorb minerals effectively.
Refresh beds annually with 2-3 inches of compost. For heavy feeders like tomatoes, work in worm castings or bone meal. If you’re planning square-foot garden layouts, tailor mixes to each section—leafy greens thrive in nitrogen-rich zones, while root veggies prefer looser sand blends.
Rotate crops to prevent nutrient theft. Follow beans (nitrogen fixers) with corn (heavy feeder), then squash (light user). This cycle keeps soil lively without chemical boosts. Come fall, plant cover crops like clover to protect and nourish your beds through winter.
Healthy soil means fewer pests and bigger harvests. Invest time upfront, and your garden will repay you with seasons of abundance.
Integrating Design Elements for a Beautiful Backyard Oasis
Your backyard becomes a living canvas when design meets functionality. Imagine kale leaves brushing against marigolds while rosemary spills over cedar edges—this harmony turns productive spaces into visual masterpieces.
Blending Practical Structure with Aesthetic Appeal
Start by choosing materials that complement your home‘s style. Rustic corrugated metal beds suit modern farmhouses, while brick-lined planters enhance traditional landscapes. One gardener shared:
“Painting my beds charcoal gray made my tomatoes pop and tied everything to our patio furniture.”
Incorporate these elements for dual-purpose beauty:
- Edible flowers like nasturtiums frame beds while repelling pests
- Herb spirals add sculptural interest to vegetable plots
- Repeating geometric shapes create rhythm across your space
Color coordination matters. Pair purple basil with yellow zinnias, or let ruby chard contrast with silver thyme. You’ll achieve landscape designs that elevate your outdoor while boosting harvests.
Pathways define your garden‘s flow. Crushed granite between beds stays mud-free, while stepping stones invite exploration. Add solar lanterns along borders for evening charm—they’ll guide nighttime harvests too.
Remember: great design works across seasons. Plant winterberry bushes for cold-weather color and ornamental grasses for fall texture. Your backyard transforms into a year-round retreat that nourishes both body and soul.
Real-Life Inspired Raised Bed Garden Design Tips
Gardens grow best when they evolve alongside your life’s seasons. One family’s journey shows how flexible designs adapt to changing needs—starting with play areas for kids and expanding into lush growing zones over years. Their backyard now balances 2,000 sq ft of central beds with shaded corners for fruit trees and cozy family spots.
Insights from Experienced Gardeners
Veterans agree: start small but plan big. “Build one bed each spring,” suggests a grower with 15 raised beds. This gradual approach lets you test layouts while keeping maintenance manageable. Many recommend:
• Placing compost bins near vegetable zones
• Using vertical frames for climbing beans
• Leaving open soil patches for kids’ sunflower projects
Creative Ways to Maximize Your Space
Turn limitations into opportunities. A Texas gardener squeezed 12 crops into 100 sq ft by stacking pots under trellises. Try these tips:
• Hang herb planters from pergola beams
• Use rolling carts between beds for mobile gardening
• Edge paths with dwarf blueberries as edible borders
Your backyard becomes a living laboratory. Mix permanent raised beds with movable containers to experiment with sun patterns. As one enthusiast notes: “Every inch works harder when you think three-dimensionally.” With these strategies, even compact areas burst with life and flavor.


