
Imagine harvesting fresh veggies from a custom-built growing area that fits perfectly in your backyard or balcony. Many plant lovers find traditional methods challenging in tight quarters, but there’s a smarter way to cultivate your green thumb. Recent studies show elevated planters can triple crop yields compared to conventional plots.
These innovative systems let you control soil quality and drainage while reducing back strain. You’ll create the ideal environment for roots to thrive, whether you’re working with a postage-stamp patio or narrow side yard. Material choices matter – untreated cedar and food-safe composites ensure lasting performance.
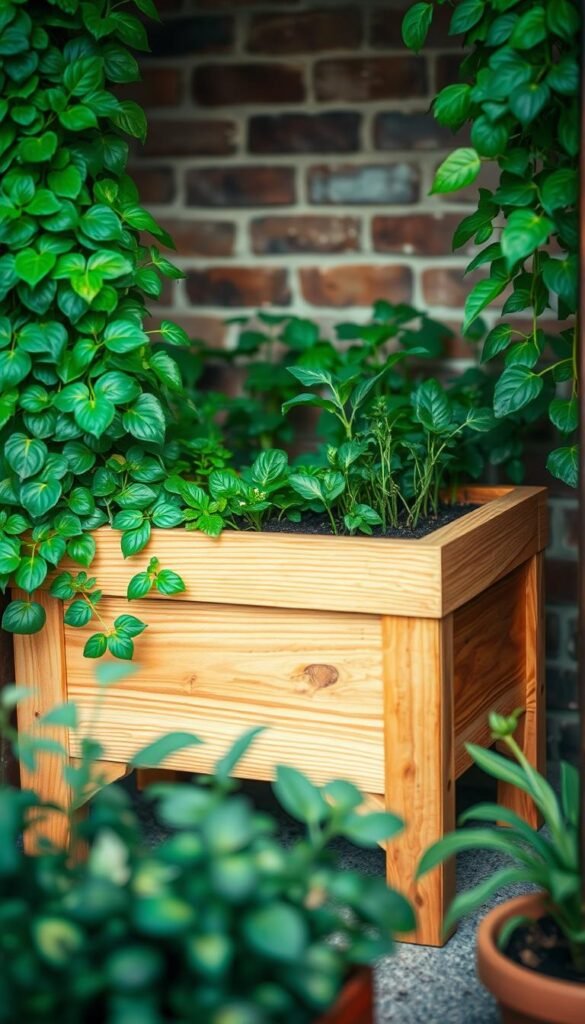
Building your own planter isn’t just practical; it’s a chance to design something uniquely suited to your needs. Custom dimensions mean every inch works harder, turning awkward corners into productive zones. Properly constructed beds prevent soil compaction and give plants room to spread out.
Urban growers particularly appreciate how these structures maximize vertical space. Stackable designs and tiered layouts multiply planting real estate without expanding footprints. Maintenance becomes simpler too – weeding and harvesting happen at waist level instead of ground level.
Ready to rethink your outdoor area? The following guide reveals practical methods to boost yields while keeping costs low. You’ll discover how strategic design choices can turn limitations into advantages, even in the most compact settings.
Introduction to Raised Bed Gardening

Urban dwellers and suburban homeowners alike are rediscovering the magic of growing their own food. Unlike traditional plots, elevated planters give you command over your soil’s health while slashing maintenance time. Studies reveal these systems require 40% less weeding, letting you focus on what matters – nurturing thriving plants.
Space-Smart Solutions That Deliver Results
Compact layouts thrive in raised setups because they prevent overcrowding. Roots dig deep into nutrient-rich soil mixes instead of battling poor drainage or contaminants common in city yards. One gardener notes: “My tomatoes doubled in size once I switched to contained beds – the difference was shocking.”
Building Your Way to Better Harvests
Constructing your own planter transforms how you interact with plants. Adjust the height to avoid back strain or size it for that awkward balcony corner. Our step-by-step construction guide shows how simple cuts and screws yield custom growing zones.
Beyond practicality, there’s pride in eating kale from a box you built. You control every detail – from wood finishes to drainage holes – creating a garden that reflects your style. It’s not just about saving space; it’s about crafting an ecosystem where plants flourish on your terms.
Benefits of Raised Bed Gardening

What makes contained growing systems so effective? Their design directly addresses common gardening challenges while amplifying nature’s strengths. Let’s explore how these structures create optimal conditions for your greens.
Root-Friendly Ground Conditions
Excess moisture becomes a non-issue with elevated setups. Loose, aerated earth lets water flow through while retaining essential nutrients. Unlike compacted ground soil, this environment prevents root rot—a leading cause of plant failure. As one urban farmer puts it: “My basil used to drown after heavy rains. Now it thrives no matter the weather.”
You’ll fill your planter with customized blends—compost, peat moss, and perlite create the perfect texture. This control means no more guessing about pH levels or contaminants. Research from Oklahoma State University confirms tailored soil mixes boost microbial activity by 60% compared to untreated ground plots.
Thriving Crops, Fewer Headaches
Healthier roots lead to sturdier stems and abundant harvests. The improved drainage and oxygen flow encourage plants to develop extensive root networks. These robust systems absorb nutrients efficiently, resulting in:
- Earlier fruiting times
- 30-50% larger yields
- Natural resistance to pests
Cool-season crops like spinach gain extra weeks of productivity since elevated soil warms faster in spring. You’ll spend less time battling weeds and more enjoying crisp salads from your backyard.
Essential Materials and Tools
Your garden’s success starts with what you build it from. Selecting quality materials ensures your growing space stays sturdy and safe season after season. Let’s break down what you’ll need to create a lasting setup.
Choosing the Right Lumber and Boards
Cedar remains the gold standard for its natural rot resistance and earthy scent. Though pricier now, it outlasts most wood types by years. Budget-conscious builders can opt for Douglas fir—it offers similar durability at half the cost.
Avoid pressure-treated lumber completely. The chemicals used to preserve these boards can seep into soil, contaminating herbs and veggies. Stick to untreated options or food-safe composites for edible gardens.
Hardware and Fastener Options
Galvanized steel screws resist rust better than standard nails. Use 3-inch deck screws for joining corners—they grip tight without splitting wood. Add L-shaped brackets every 4 feet for extra stability against soil pressure.
Here’s what to grab at the store:
- 8 cedar planks (2″x6″x8′)
- 20 galvanized deck screws
- 4 corner brackets
- 1 lb coarse gravel (for drainage)
Buying precise quantities prevents wasted materials and return trips. Measure twice, cut once—your back and wallet will thank you later.
Planning Your Garden Layout

Smart design transforms limited plots into thriving green zones. Your layout determines how efficiently plants grow and how easily you maintain them. Start by sketching your available area, noting sunlight patterns and existing structures.
Identifying the Perfect Location
Track how light moves across your space through the day. Most veggies need 4+ hours of direct sun—leafy greens tolerate shade better than tomatoes or peppers. One gardener shared: “Moving my beds 3 feet north doubled my bean harvest by catching afternoon light.”
Consider seasonal changes. A spot that’s sunny in spring might get shaded when trees leaf out. Leave room for pathways wide enough to maneuver tools—18-24 inches between beds works for most.
Spacing, Dimensions, and Sunlight Considerations
Stick to 4-foot-wide beds for easy access from both sides. This width matches standard lumber lengths, reducing cuts and waste. Depth matters too:
| Bed Depth | Best For | Root Growth |
|---|---|---|
| 6 inches | Lettuce, herbs | Shallow systems |
| 12 inches | Carrots, peppers | Full development |
Position longer beds (8-12 feet) north-to-south so plants receive even light. If expanding later, leave a lot of unused ground on one side for future beds. Our guide to square-foot gardening setups shows how to maximize yields in tight areas.
Easy DIY Raised Garden Bed Projects for Small Spaces

Transform overlooked spaces into lush growing zones with clever layouts. Narrow strip planters hugging fences create instant herb gardens, while triangular corner units turn awkward angles into salad factories. One urban grower built 8 fir beds for $225 in materials – each lasting over a decade despite recent lumber price hikes.
Tiered systems work wonders where ground space disappears. Stack planters like stairs to grow strawberries above carrots and radishes. Vertical designs boost yields by 70% in balconies, according to container gardening trials. “My three-level planter produces enough basil for pesto all summer,” shares a Brooklyn apartment gardener.
Adapt standard plans to fit unique spaces. Convert old drawers into rolling planters for concrete patios, or build L-shaped boxes around deck posts. Modular designs let you start with a single 4×4 bed and add sections as needs grow.
| Material | Cost per Bed | Lifespan | Maintenance |
|---|---|---|---|
| Douglas Fir | $60-$80 | 10-12 years | Annual sealant |
| Vinyl | $300+ | 15+ years | None |
Integrate planters into existing features for seamless functionality. Flank walkways with shallow boxes for mint and thyme, or border seating areas with colorful flower beds. Repurposed cinder blocks make instant edible borders that double as casual seating.
Step-by-Step Construction Guide

Assembling your planter box requires precision and smart techniques to ensure lasting performance. Let’s transform raw materials into a robust growing system using methods professionals rely on.
Cutting, Pre-Drilling, and Assembling Boards
Start by cutting two 2×12×8′ boards to 90″ for long sides. Use a circular saw with masking tape marking cut lines – this prevents splintering. For short ends, convert a 2×12×10′ board into 54″ segments. Pre-drill holes at board ends using a 3/32″ bit – this stops wood from splitting when screws enter.
Lay boards on a flat surface with edges aligned. Temporarily connect corners using finish nails – they hold pieces steady while positioning permanent fasteners. A carpenter’s square ensures perfect 90-degree angles before final assembly.
Securing Corners and Adding Drainage Layers
Replace temporary nails with steel deck screws for permanent joints. Drive 3″ galvanized screws through pre-drilled holes – their corrosion resistance keeps connections tight for years. Reinforce each corner with L-brackets if building deeper than 12″.
Line the base with landscape fabric before filling. This barrier stops weeds while letting water drain. Add 2″ of coarse gravel as your bottom layer – it prevents soil compaction and root rot.
| Material | Purpose | Depth |
|---|---|---|
| Landscape Fabric | Weed Prevention | Single Layer |
| Crushed Granite | Drainage | 1.5-2″ |
| Coarse Sand | Moisture Control | Optional 0.5″ |
Choosing Sustainable and Durable Materials
The foundation of a thriving garden lies in selecting materials that balance environmental responsibility with structural integrity. Your choices directly impact plant health, maintenance needs, and the ecosystem around you.
Cedar, Fir, and Alternative Wood Options
Cedar remains a top pick for its natural resistance to rot and insects. While prices have risen, its rich color and 15-20 year lifespan justify the investment for permanent installations. Budget-conscious builders often choose Douglas fir – this affordable wood lasts a decade with proper care and weathers to a rustic silver-gray.
| Material | Cost (4×8 Bed) | Lifespan |
|---|---|---|
| Western Red Cedar | $180-$220 | 15+ years |
| Douglas Fir | $90-$120 | 10-12 years |
Consider recycled plastic lumber for wet climates – it never rots and comes in various colors. Metal troughs offer another option, though they require insulation in hot regions. “My galvanized steel beds survived three harsh winters without warping,” reports a Vermont gardener.
Considerations for Non-Toxic, Long-Lasting Beds
Always verify lumber treatments – many pressure-treated wood products contain copper chemicals that can accumulate in soil. Opt for Forest Stewardship Council-certified materials to support responsible forestry. Apply plant-based oils like tung or linseed annually to preserve untreated boards naturally.
Key factors for material success:
- Check for knots and cracks when selecting planks
- Use stainless steel fasteners to prevent rust stains
- Allow 1/2″ gaps between boards for expansion
By prioritizing quality wood and eco-safe practices, you create growing spaces that nourish plants while protecting your local environment for years.
Maximizing Your Garden’s Space
Turn your limited growing area into a powerhouse of productivity with smart spatial strategies. The secret lies in working vertically and planting densely – methods that triple yields without expanding your footprint. One urban farmer reported: “My 4×8 bed now grows 18 varieties instead of 6 by using trellises and staggered crops.”
Utilizing Vertical Gardening Techniques
Climbing plants like pole beans and cucumbers thrive when given upward support. Install A-frame trellises or cattle panel arches to create living walls. These structures:
- Save 75% ground space compared to bush varieties
- Improve air circulation around vegetables
- Make harvesting easier at eye level
| Vertical Structure | Best Crops | Space Saved |
|---|---|---|
| Tomato Cage | Cherry tomatoes | 3 sq ft per plant |
| Pea Netting | Snow peas | 5 sq ft per row |
| Hanging Planter | Strawberries | 100% ground space |
Compact Planting Strategies
Raised beds let you grow plants closer than traditional rows. Try square-foot gardening – divide your bed into 1-foot grids and follow this spacing guide:
| Plant Type | Per Square | Root Depth |
|---|---|---|
| Radishes | 16 | 6″ |
| Peppers | 1 | 18″ |
| Spinach | 9 | 8″ |
Pair shallow-root crops with deep-rooted varieties in the same bed. Basil grows well beneath tomatoes, deterring pests while sharing nutrients. Rotate crops every 3-4 weeks to keep soil active – sow quick-growing arugula after harvesting carrots.
Budget-Friendly Raised Garden Bed Ideas
Who says you need deep pockets to create a thriving growing space? With strategic material choices and smart sourcing, you can build productive garden beds without overspending. Recent lumber price hikes make reclaimed wood and alternative supplies more appealing than ever—a trend savvy growers are embracing nationwide.
Affordable Material Substitutes and Sourcing Tips
Scout local construction sites for discarded lumber—many contractors gladly give away usable scraps. Online marketplaces often list free bricks or concrete blocks perfect for stacking. One gardener built eight beds using salvaged fence pickets: “I spent $40 total by repurposing materials others tossed.”
Consider these cost-effective options:
- Cinder blocks ($1.50 each) arranged in U-shapes
- Galvanized stock tanks ($120 vs. $500+ for vinyl)
- Old wine barrels cut horizontally
Managing Costs and Maximizing DIY Savings
Building your own beds saves a lot compared to pre-made systems. While commercial planters cost $300-$1,200, DIY versions using reclaimed materials often stay under $75. Home gardening ideas that won’t break the often start with phased construction—build one bed now, add others as budgets allow.
Time purchases strategically. Buy gravel in bulk during fall sales, and source soil mixes from municipal compost programs. Over five years, initial investments pay off through reduced grocery bills—one study shows $600 annual savings from a 4-bed setup.
Creative Design Ideas and Customizations
Your outdoor space becomes a canvas for self-expression when you blend practicality with personal flair. Thoughtful touches transform basic structures into eye-catching features that complement your home’s architecture. Let’s explore how finishes and material combinations elevate both function and visual appeal.
Add Natural Finishes for Aesthetic Appeal
Seal untreated wood with plant-based oils to enhance its grain while protecting against weathering. Cedar-tung oil blends deepen the wood’s reddish tones, creating warmth against green foliage. One gardener in Austin swears by this method: “My beds look like furniture pieces after three coats—guests always ask where I bought them!”
Incorporating Cinder Blocks, Bricks, or Steel Accents
Cinder blocks offer unexpected versatility as both structural elements and decorative touches. Arrange them in zigzag patterns for dynamic raised edges, or stack horizontally to create built-in benches. Their hollow centers become instant planters when filled with soil—perfect for compact herbs like thyme or oregano.
Mix materials for industrial-chic contrasts. Pair reclaimed bricks with corten steel panels, or flank wooden beds with galvanized troughs. These combinations add texture while serving practical needs—metal reflects heat for warm-season crops, while stone retains moisture in arid climates.
Your growing space should reflect what inspires you. Whether using cinder blocks for a modern edge or hand-staining boards for rustic charm, these personal touches make your setup uniquely rewarding. After all, a garden that delights the eye nourishes the spirit just as much as the soil feeds your plants.


