
Imagine growing crisp lettuce or juicy tomatoes right in your living room – no backyard required. This innovative approach to plant cultivation uses nutrient-enriched water instead of earth, letting roots absorb food directly. The method traces back to ancient Greek concepts of “water working,” but modern techniques make it accessible for anyone with windowsill space.
Why choose water over soil? These setups use 90% less water than traditional methods while producing 3x more greens in half the time. A compact one-square-meter system can yield 36 full-sized Swiss chard plants – perfect for urban kitchens or apartment balconies. You control every detail, from pH levels to nutrient mixes, ensuring ideal conditions year-round.
Best part? You don’t need expensive gear to start. Many enthusiasts create functional setups using recycled containers and basic pumps. Our friends at Gardening Rise showcase five budget-friendly projects that prove anyone can master this space-saving technique. Whether you’re growing herbs above your dishwasher or strawberries under LED lights, the possibilities are endless.
Ready to transform how you grow food? We’ll walk through the core principles of nutrient delivery, light management, and system maintenance. You’ll discover how vertical designs save 70% floor space compared to potted plants and learn why leafy greens thrive faster in water than dirt. Let’s dive into the fascinating world of roots without soil!
Understanding Hydroponic Gardening Basics

Think of hydroponics as your plants’ personal nutritionist. Instead of digging through dirt for food, their roots get VIP access to a custom cocktail of minerals dissolved in water. This approach skips the middleman (soil) entirely.
Roots Meet Resources
In water culture systems, roots either float in oxygen-rich liquid or nestle into porous materials. These setups deliver three key advantages:
| Growing Medium | Drainage | Best For |
|---|---|---|
| Coconut coir | Excellent | Seed starters |
| Rockwool | Moderate | Leafy greens |
| Perlite | Superior | Mature plants |
The magic happens in the nutrient solution. It contains all 16 essential minerals plants need, mixed in precise ratios. You control the recipe like a master chef – no guessing about soil quality.
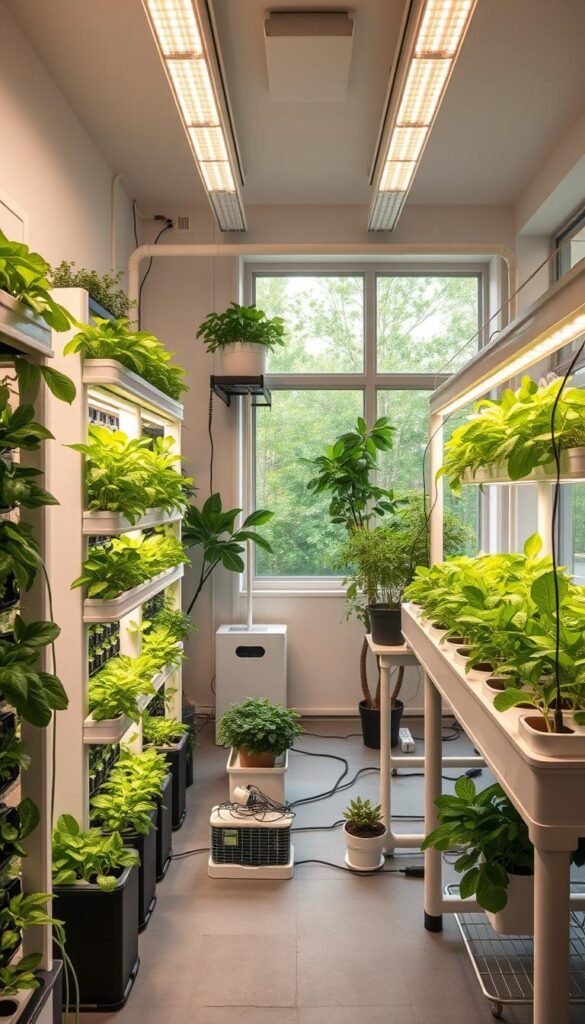
Space-Smart Cultivation
Vertical towers and wall-mounted systems let you grow upward instead of outward. A 2’x2′ area can hold 18 strawberry plants instead of 4 in pots. Roots don’t compete for space when each gets its own targeted nourishment.
Compact systems work because plants spend zero energy searching for food. Their energy goes entirely into leaf and fruit production. You’ll see faster growth cycles – some greens mature 25% quicker than in earth.
Preparing Your Indoor Space for a DIY Hydroponic System

Transforming part of your home into a thriving plant oasis starts with smart planning. You’ll want to balance practicality with growth potential – like designing a mini ecosystem where every element works together.
Choosing the Ideal Location and Lighting
Pick a spot with stable temperatures (65-75°F) and minimal drafts. Basements, spare rooms, or even closets work well. Ensure your chosen area has:
- Access to electrical outlets
- Space for vertical expansion
- Easy water source access
Lighting makes or breaks your setup. Fluorescent tubes (6500K) offer budget-friendly full-spectrum light for leafy greens. For larger operations, LEDs provide energy efficiency – they use 40% less power than HID bulbs while lasting 5x longer.
| Light Type | Cost | Best For |
|---|---|---|
| Fluorescent | $ | Starter gardens |
| LED | $$$ | Year-round growing |
Position lights 6-12 inches above plants, using timers for 18-hour daily cycles. A simple desk fan improves air circulation, preventing mold in humid environments. If you’re building your first system, this step-by-step guide covers electrical safety and space optimization tricks.
Measure your available square footage carefully. Allow 1-2 feet between grow stations for maintenance access. With proper planning, even a 3’x3’ corner can yield enough basil for weekly pesto nights!
Ditch the Soil: Beginners’ Guide to DIY Hydroponic Garden Indoor Systems

Building your own growth station requires just seven core elements. These pieces work together like clockwork to deliver nutrients while keeping roots healthy and oxygenated.
Materials and Tools Breakdown
Start with a food-grade plastic container as your water reservoir – storage bins work great. You’ll need these key items:
| Component | Purpose | Budget Option |
|---|---|---|
| Net pots | Hold plants | Recycled yogurt cups |
| Air pump | Oxygenate water | Aquarium bubbler |
| Growing medium | Support roots | Lava rocks |
Grab some vinyl tubing and an air stone from pet stores. These create bubbles that prevent root rot in your system. Nutrient solutions cost $15-$30 online – look for “pH-balanced” formulas.
Assembly Made Simple
Follow these steps for a foolproof deep water culture setup:
- Drill holes in your lid for net pots
- Connect air pump to tubing and stone
- Mix nutrients in filled reservoir
- Test water flow for 24 hours
Use rockwool cubes for seedlings – they hold moisture without drowning roots. When transplanting, gently rinse soil off roots first. Position plants 6 inches apart for proper light exposure.
Pro tip: Label reservoirs with dates. This helps track nutrient changes. Check connections weekly – loose tubing causes 40% of system failures in first-time setups.
Managing Nutrients and Environmental Conditions

Your plants’ performance depends on three dials you control: water chemistry, climate, and food supply. Get these elements working in harmony, and you’ll see leaves unfurl faster than you can say “photosynthesis.”
Balancing the Liquid Diet
Test your nutrient solution every 3 days using color-coded strips or digital pens. Most greens prefer 5.8-6.3 pH – slightly acidic like morning coffee. If levels drift, add lemon juice (to lower) or baking soda (to raise) in small doses.
| Testing Tool | Cost | Accuracy |
|---|---|---|
| Liquid test kits | $12 | ±0.2 pH |
| Digital meters | $35 | ±0.02 pH |
| pH strips | $8 | ±0.5 pH |
Keep your water reservoir between 68-72°F – think comfortable swimming pool temps. Chilly solutions slow nutrient uptake, while warm ones invite algae. Use aquarium heaters or frozen bottles for adjustments.
Refresh the liquid buffet every 10-14 days. Old solutions accumulate salts that burn roots. When mixing new batches, start with half-strength doses for seedlings. Ramp up to full strength as plants mature.
Bubbles aren’t just decorative – they oxygenate the water to keep roots pearly white. If you spot slime or brown tips, check air pump function immediately. Healthy systems should smell fresh, like rain on clean soil.
Exploring Different Hydroponic Methods and Systems
Your hydroponic journey isn’t limited to one technique—discover which system aligns with your green goals. Six primary methods offer unique benefits, from beginner-friendly setups to advanced configurations for specific crops.
Deep Water Culture Versus NFT and Flood/Drain Techniques
Deep water culture (DWC) keeps plant roots submerged in oxygen-rich liquid. It’s perfect for lettuce and costs under $50 to start. Nutrient Film Technique (NFT) uses shallow streams flowing through tubes—ideal for basil and mint. Both methods require minimal space but differ in maintenance: DWC needs weekly checks, while NFT demands daily monitoring.
Ebb and flow systems (also called flood/drain) work like tidal patterns. They flood roots with nutrients before draining—excellent for peppers and tomatoes. This method uses 30% less water than traditional farming while supporting larger plants.
Tips for Customizing Your System for Vegetables and Herbs
Match your crops to their ideal setup. Leafy greens thrive in DWC’s constant moisture, while herbs prefer NFT’s gentle flow. For vegetables like zucchini, use ebb and flow’s robust support. Adjust spacing: compact lettuces need 6-inch gaps, but tomatoes require 12-18 inches.
Boost yields by tweaking nutrient mixes—add extra calcium for fruiting plants. Want fresh flavors daily? Gardening Rise shares clever ways to maintain indoor hydroponic gardening systems for year-round harvests. Remember: your setup should evolve as your green thumb grows!


