
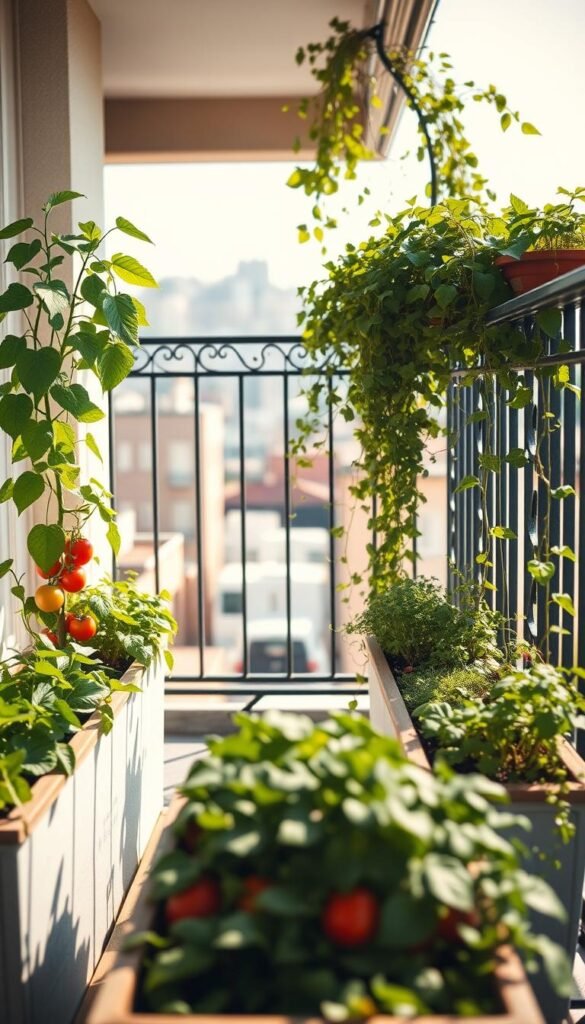
Think you need a big backyard to grow fresh veggies? My journey began with a single lima bean in a paper cup on an apartment windowsill. That humble start blossomed into a lush oasis on a 50-square-foot balcony, yielding tomatoes, crisp lettuce, and fragrant herbs year-round.
Limited square footage doesn’t mean limited potential. With smart strategies, you can harvest pounds of produce from vertical planters, hanging baskets, and compact raised beds. Your outdoor area becomes a living pantry, whether you’re nurturing patio tomatoes or rainbow chard in repurposed containers.
City dwellers across America are discovering how balcony setups slash grocery bills while boosting nutrition. Imagine plucking sun-warmed strawberries for breakfast or snipping basil for dinner – all steps from your kitchen. The secret lies in matching crops to your light patterns and microclimate.
From my initial experiments grew an 8×8 foot keyhole plot that now feeds my family. You’ll learn to maximize every inch through companion planting and space-saving layouts. Ready to transform your concrete perch into a green haven? Let’s dig into practical methods that deliver real results.
Understanding the Potential of a Small Space Vegetable Garden

Your balcony holds untapped potential for fresh harvests. With smart strategies, this overlooked area becomes a productive ecosystem. Let’s explore how to unlock its hidden value.
Why Your Elevated Plot Matters
Growing edibles on raised platforms cuts grocery costs dramatically. Those $3 basil bunches and $4 salad greens add up fast – you could save $900+ annually while enjoying pesticide-free meals. Beyond finances, tending plants reduces stress levels by 40% according to University of Washington research.
“Nurturing life in unexpected places teaches resilience – both for the garden and the gardener.”
Families discover unexpected rewards too. Kids who help water mint or harvest cherry tomatoes develop deeper food appreciation. One parent shared: “My daughter now asks for snap peas instead of chips!”
Mastering Light and Layout
Most crops need 6+ daily sun hours, but urban settings create unique conditions. South-facing spots work for heat-lovers like peppers, while east-facing areas suit leafy greens. Track shadows throughout the day using smartphone apps to identify prime locations.
Surprising fact: Reflective surfaces can boost light exposure by 20%. White walls amplify brightness for tomatoes, while shaded corners become microclimates for mint. Through space-saving layouts, you’ll grow more in 10 sq.ft than some backyard plots yield in 100.
Getting Started with Your How-To Guide

Successful urban harvests start with understanding your “why” and “where”. Before choosing a single pot, you’ll need to map out both your aspirations and physical limitations. This foundation determines whether you’ll snack on fresh arugula by month’s end or face wilted disappointment.
Defining Your Garden Goals
Ask yourself: What makes this project worth your time? A parent might prioritize kid-friendly cherry tomatoes, while a home chef needs basil within arm’s reach of the grill. Your objectives shape everything – from container sizes (5-gallon buckets for zucchini vs. 6″ herb pots) to budget allocations.
Planning Layouts and Choosing a Location
Grab a tape measure and notebook. Sketch your area’s dimensions, noting permanent fixtures like railings or AC units. Sunlight patterns dictate placement – radishes thrive in 4 hours of light, while eggplants demand 8. One urban grower shared:
“Labeling zones as ‘full sun’ or ‘shade’ helped me avoid rookie mistakes.”
Think vertically with wall planters for strawberries and overhead hooks for trailing beans. Leave 12-18 inches between containers for air circulation – crowded roots invite disease. Track your progress weekly; adjustments ensure your edible oasis evolves with your needs.
Choosing the Right Containers and Structures

Your container choices make or break your harvests. Lightweight materials and smart designs turn cramped areas into productive edible zones. The right setup prevents root rot, supports healthy growth, and lets you rearrange as sunlight patterns shift.
Utilizing Pots, Planter Boxes, and Keyhole Designs
Plastic and fiberglass containers outperform heavier options for elevated setups. They’re easier to move when storms approach and won’t crack during freeze-thaw cycles. Match pot depth to crop needs: 12-inch-deep homes for carrots, 18-inch-wide spreads for zucchini vines.
Fabric grow bags shine for herbs and greens. Their breathable walls prevent soggy roots, and handles let you rotate plants for even sun exposure. One gardener raves: “My basil doubled in size after switching to fabric pots!”
Keyhole designs work magic in tight quarters. These circular beds with central compost tubes feed plants continuously. A 48-inch plastic pool becomes a self-fertilizing station for 15+ crops – perfect for patios with concrete floors.
Maximizing Vertical Space on Balconies
Look upward when floor space disappears. Wall-mounted pockets let strawberries cascade downward, while ceiling hooks suspend tomato baskets safely overhead. Tiered stands create instant layers: mint on top, lettuce below, radishes at the base.
Repurpose household items for quirky charm. Drill drainage holes in storage bins for dwarf fruit trees, or line wooden crates with burlap for salad greens. Just ensure vertical structures can handle weight when fully watered – anchor them securely to railings or walls.
Soil, Drainage, and Watering Essentials

What’s the secret behind thriving container plants? It all comes down to three fundamentals: what’s beneath your crops, how moisture flows, and when you hydrate. Master these elements, and your elevated plot becomes a powerhouse of productivity.
Building Better Growing Foundations
Skip backyard dirt for container herbs. Premium potting mixes dry faster and prevent root suffocation. Aim for 25% air space in your soil – mix in perlite or coconut coir to break up heavy clay. One urban gardener notes: “My basil yields tripled after adding composted leaves to my containers.”
| Soil Amendment | Benefit | Best For |
|---|---|---|
| Compost | Adds nutrients | All plants |
| Perlite | Improves airflow | Root vegetables |
| Coconut coir | Retains moisture | Leafy greens |
Smart Hydration Strategies
Containers dry faster than ground beds. Check soil daily – if the top inch feels dry, water deeply. Self-watering pots with reservoirs cut maintenance by 50%. Morning watering reduces evaporation by 30% compared to midday sessions.
Expandable hoses make reaching multiple planters easier. One user shares:
“My 75-foot hose coils neatly but stretches to every corner of my setup.”
Pair with moisture crystals in soil to prevent wilt during heat waves.
How to Build a Keyhole Garden for Small Spaces
Transform your limited area into a thriving edible oasis with this circular growing system. The keyhole design lets you reach every plant easily while feeding them through built-in composting.
Step-by-Step Construction Using Low-Cost Materials
Start with a plastic wading pool for instant structure. Drill 10-15 drainage holes in the bottom using a 1/4-inch bit. Center a wire wastebasket in the middle – this becomes your compost chute that nourishes surrounding plants.
Fill the base with sticks and cardboard to improve drainage. Layer grass clippings and leaves next, then top with nutrient-rich soil. One urban farmer reported: “My 4-foot bed produces enough greens for three weekly salads!”
For permanent installations, stack cedar boards or bricks into 18-inch walls. Leave a pie-slice opening to access the center. This design works magic in tight spots – herbs grow vigorously near the compost core, while root crops thrive in the outer ring.
Maintain your self-feeding system by adding kitchen scraps weekly. The decomposing waste releases nutrients directly to plant roots. You’ll harvest fresher, more flavorful food while reducing waste – a true win-win for compact growing areas.


