
Have you ever looked at a steep, awkward hillside in your yard and wondered how to make it useful? What if that challenging space could become your most productive growing area? This approach isn’t just possible—it’s already working for homeowners across the country.
Take inspiration from a real suburban case study where a 6-foot elevation change became thriving beds for fresh produce. The secret? Strategic terracing that turns gravity from foe to friend. Instead of fighting erosion, this method creates stable platforms perfect for roots to thrive.
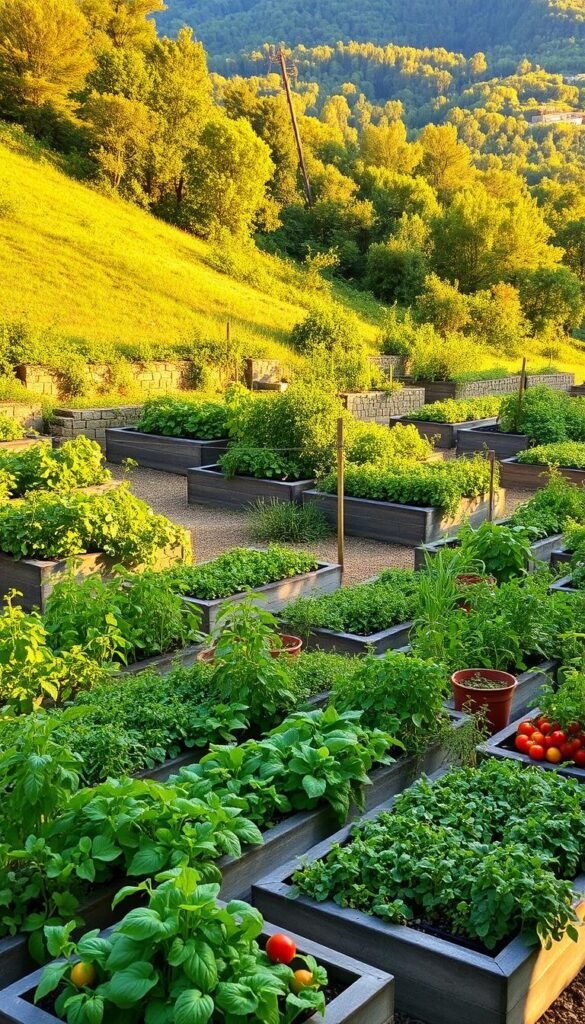
Steep terrain often gets written off as “unusable,” but that’s changing. Families are discovering how layered planting spaces eliminate dangerous mowing while boosting food production. Imagine harvesting tomatoes and herbs just steps from your front door, all while replacing high-maintenance grass with something both beautiful and edible.
This guide will show you how to assess slopes, build durable retaining structures, and select plants that love angled growing conditions. You’ll learn why sun exposure matters more than flat ground and how proper drainage prevents water runoff. Let’s turn those tricky inclines into your garden’s greatest asset.
Introduction & Benefits of Tiered Gardening

What if that tricky hillside could become your most vibrant outdoor space? Many homeowners overlook sloped areas, but these spots hold hidden potential. By reimagining steep terrain, you create functional beauty while solving landscaping headaches.
Why Reimagine Your Challenging Landscape?
Steep slopes often become wasted space – until you unlock their true purpose. Unlike flat lawns, angled ground offers natural drainage and sun exposure. Raised beds turn erosion-prone areas into stable platforms where plants thrive. You’ll ditch risky mowing sessions while gaining fresh ingredients for your kitchen.
Perks of Elevated Growing Spaces
Hillside gardening solves multiple problems at once:
- Better soil control: Contain nutrient-rich mixes exactly where roots need them
- Simpler maintenance: Tend plants at waist height without bending
- Space multiplication: Grow 2-3x more crops in the same footprint
These layered systems also deter pests naturally. Slugs struggle to climb textured walls, while proper airflow reduces fungal issues. Your harvests become easier to reach, and the cascading greenery boosts curb appeal instantly.
Planning and Designing Your Sloped Garden

Your hillside’s hidden potential begins with smart preparation. Start by observing how sunlight dances across the land – that bright spot near your patio might be prime real estate for sun-loving crops. Strategic layouts turn challenging angles into productive spaces, letting you work with nature rather than against it.
Assessing Your Site and Sunlight Exposure
Grab a spray marker and tape measure – your best friends in this phase. Track shadows throughout the day to identify full-sun zones. Steeper sections often need terraced levels, while gentler areas might only require minor adjustments. “Measure twice, dig once” becomes your mantra here.
Mapping Out Garden Beds and Pathways
Create accessible growing spaces with these essentials:
- Width matters: Keep beds narrow enough for easy reach from both sides
- Path placement: Plan 18-24″ walkways between planting areas
- Drainage routes: Angle paths slightly to guide water away from roots
Align your design with existing features like walkways or property lines. This thoughtful approach transforms awkward slopes into a cohesive growing system where every level serves a purpose. Your future self will thank you when harvesting becomes a breeze!
Terraced Vegetable Garden: Transform Sloped Yards into Tiered Growing Areas

Creating stable planting spaces on angled land begins with smart earth management. Start at your property’s lowest point near fences or property lines, working upward to maintain safe digging platforms. While machinery handles bulk earthmoving, hand tools perfect those final touches that make your space both functional and attractive.
Understanding the Basics of Terracing
Successful terracing balances cut-and-fill techniques. Remove soil from upper slopes to create flat zones, using that earth to build up lower sections. This approach maintains natural drainage while preventing erosion. Always compact each layer before adding the next – your plants will thank you later.
| Method | Best For | Materials Needed |
|---|---|---|
| Earth Berms | Gentle slopes | Soil, sod staples |
| Stone Walls | Steep grades | Fieldstone, gravel |
| Timber Retainers | Moderate angles | Treated lumber, rebar |
Soil type dramatically impacts your approach. Clay holds well but needs aeration. Sandy soils require more reinforcement. Test your earth’s composition before committing to a design.
| Soil Type | Slope Stability | Handling Tips |
|---|---|---|
| Clay | High | Add organic matter |
| Sand | Low | Use geotextile fabric |
| Loam | Medium | Compact layers |
Space terraces 3-5 feet apart vertically for easy access. Keep planting beds under 4 feet wide – you’ll harvest veggies without straining your back. Remember: A 6-foot elevation change can become multiple productive zones with proper planning!
Constructing Raised Beds and Retaining Walls

Building sturdy raised beds starts with the right foundation. Let’s break down the essentials for creating long-lasting structures that keep your soil in place while adding character to your space.
Essential Tools and Materials
Gather these items before starting:
- Wall-building essentials: Fence posts, wood boards, M8 coach bolts
- Ground prep tools: Flat spade, spirit level, post hole digger
- Drainage materials: 20mm gravel, polythene sheeting
Don’t forget protective gear – gloves and safety glasses make the work safer. A wheelbarrow saves trips moving soil and gravel across your yard.
Step-by-Step DIY Techniques
- Mark post locations using builder’s string, leaving 5-10cm gaps around each post
- Set posts on broken patio slabs for stability – check level twice before securing
- Assemble wood boards using hand clamps and coach bolts
Backfill with gravel first for drainage, then top with leftover dirt. Finish by applying wood oil to protect against moisture. “Taking time to level each layer prevents future shifting,” notes a seasoned DIYer.
This method costs 60% less than hiring pros. With basic tools and a weekend, you’ll create functional beds that last years. Remember: Proper drainage behind the wall keeps roots healthy and structures sound.
Practical Gardening Tips for Slope Management
Maintaining a thriving hillside garden requires smart strategies tailored to angled spaces. These techniques help your plants flourish while keeping your soil secure and hydrated through changing seasons.
Let Your Earth Breathe Before Planting
When filling raised beds, resist the urge to plant immediately. Fresh soil needs 2-3 weeks to settle naturally. Walk across the surface weekly to gently compact layers. Mix in compost during this waiting period to boost nutrients.
Water Smart, Not Hard
Slopes demand clever watering solutions. Install drip lines along the top of each bed, letting moisture trickle downward. Use timers to run systems early morning when water absorbs best. After heavy rain, check lower beds for pooling and add drainage gravel if needed.
Pair these methods with mulch blankets around plants. You’ll conserve moisture while preventing erosion. Remember: Healthy gardening on slopes means working with gravity, not against it.


