
Imagine stepping into your backyard to gather armfuls of fresh blooms ready for dazzling arrangements. A dedicated cutting space focuses purely on growing plants for vases, not lawn decoration. Unlike ornamental beds, these areas prioritize sturdy stems and long-lasting petals over curb appeal.
You might notice utilitarian features like support stakes or fabric paths in these working zones. These practical elements help plants thrive so you can enjoy their beauty indoors. When selecting varieties, prioritize those bred for vase performance rather than compact garden displays.
Two exceptional choices stand out for their showstopping colors and reliable harvests. One offers intricate petal patterns, while the other boasts tall spikes of blooms. Both provide exceptional value for beginner-friendly blooms that keep producing all season.
You’ll learn how their growing needs differ and why both deserve space in your productive patch. Discover how proper staking techniques and harvest timing impact your floral displays. Let’s explore what makes these varieties perfect for creating arrangements that wow guests week after week.
Getting Started with Your Cut Flower Garden

Picture a garden where every bloom is destined for your vase rather than your lawn. This is the magic of a cut flower garden – a practical paradise designed to fill your home with nature’s artwork. Unlike traditional flower beds, these spaces celebrate temporary beauty meant for harvesting.
What Makes a Cutting Garden Unique?
These gardens prioritize productivity over permanence. You’ll grow varieties chosen for their vase longevity and sturdy stems rather than landscape appeal. Rows might look sparse at ground level, but your kitchen counter will overflow with fresh bouquets all season.
Why You’ll Love This Approach
- Snip blooms guilt-free – no worrying about “ruining” your yard’s appearance
- Discover new favorites through constant experimentation
- Enjoy lower costs than store-bought arrangements
One gardener puts it perfectly:
“My cutting patch became my creative studio – alive with colors I’d never dare plant in my front yard.”
You’ll gain both a floral workshop and a personal retreat where dirt under your nails means fresh peonies on your desk tomorrow.
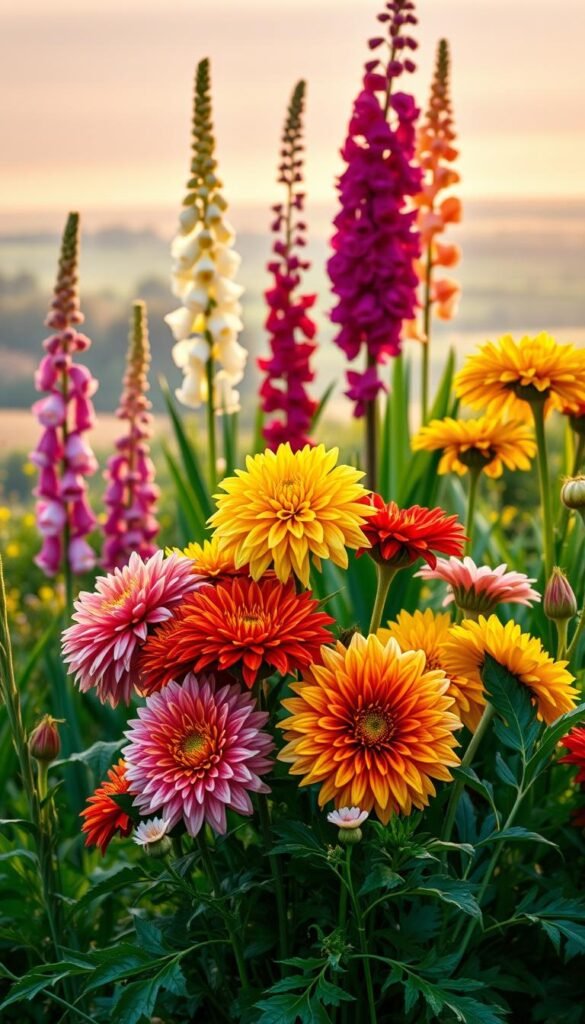
Dahlia vs. Gladiolus: Growing a Stunning Cut Flower Garden

Choosing the right blooms transforms your cutting garden from ordinary to extraordinary. Let’s explore two champions that bring distinct textures and forms to arrangements.
Signature Styles for Every Vase
One star performer dazzles with layered petals resembling fireworks. These varieties range from petite pom-poms to saucer-sized blossoms, offering endless color combinations. Their sturdy stems hold up well in water, extending vase life up to seven days.
Their vertical counterpart grows spears of funnel-shaped flowers perfect for adding architectural height. These blooms open gradually from bottom to top, creating living sculptures in your arrangements. Both thrive in full sun but demand different care strategies.
Sunlight to Soil: Growth Essentials
For earth-bound tubers, dig holes deep enough to protect against wind while allowing space for bushy growth. Space them generously to prevent overcrowding – their lush foliage needs room to breathe. Regular deadheading keeps these cut flowers producing until autumn’s first chill.
Their tall partners require deeper planting to stabilize their impressive height. Nestle their corms in nutrient-rich soil amended with compost. Stagger plantings every two weeks for continuous summer blooms.
| Feature | Compact Bloomer | Vertical Accent |
|---|---|---|
| Planting Depth | 4-6 inches | 4x corm height |
| Spacing | 2-4 feet | 4-6 inches |
| Sun Needs | 6+ hours | Full sun |
| Bloom Period | May-Frost | 7-10 weeks |
Both plant types reward careful tending with armloads of cut flowers. Rotate their positions yearly to maintain soil health and prevent disease. With proper care, you’ll create arrangements that showcase nature’s contrasting beauty – soft petals against bold spikes, delicate hues beside vibrant tones.
Designing the Perfect Layout for a Cutting Garden

Smart spatial planning turns limited areas into abundant floral factories. Your layout determines how easily you can tend plants and harvest stems while creating visual harmony. Let’s explore designs that turn every square foot into bloom-producing real estate.
Exploring Traditional, Raised Bed, and Square Foot Arrangements
The classic row system works like nature’s filing cabinet. Place tallest flowers at the north end to prevent shading. Medium-height varieties fill the middle area, while compact growers claim the front. This tiered approach simplifies watering and harvesting.
Raised beds solve multiple challenges at once:
- Elevated soil warms faster for earlier planting
- Custom widths eliminate strained reaching
- Improved drainage protects roots during heavy rains
Square foot gardening shines in small spaces. Divide beds into 1×1 grids, planting different varieties in each section. This method yields diverse flowers without overcrowding. Try pairing vertical growers with low-spread companions.
For dramatic impact, circular designs create living mandalas. Tall statement blooms anchor the center, surrounded by rings of decreasing height. This layout turns functional plots into artistic displays that neighbors will admire.
| Layout | Best For | Key Benefit |
|---|---|---|
| Rows | Large areas | Easy crop rotation |
| Raised Beds | Poor soil | Back-friendly access |
| Square Foot | Urban spaces | Maximizes diversity |
| Circular | Visual impact | Natural pest control |
One gardener shared:
“Switching to raised beds let me triple my zinnia production without knee pain!”
Your ideal flower garden layout depends on available space and personal style. Mix methods if needed – try square foot grids within raised beds. Remember: good design makes maintenance feel like play rather than work.
Preparing Your Garden Soil for Optimal Growth

Think of your garden as a five-star restaurant for plants – the quality of their “meals” determines how spectacular their performances will be. Healthy soil acts like a gourmet buffet, serving up nutrients and structure that help roots thrive.
Soil Testing and Nutrient Amendments
Start with a simple soil test kit from your local extension office. These reveal your dirt’s pH and nutrient profile. Most flowering varieties prefer a slightly acidic base (6.0-7.0 pH) – imagine it as their favorite flavor profile.
Here’s what one gardener discovered:
“Testing showed my clay soil was starving for organic matter. Adding compost transformed it into a crumbly paradise!”
Mix 2-4 inches of compost or aged manure into the top 6-8 inches of soil. This creates air pockets for roots while boosting water retention. For heavy clay areas, consider raised beds filled with loamy mix.
| Soil Type | Amendment | Benefit |
|---|---|---|
| Sandy | Compost | Retains moisture |
| Clay | Coarse sand | Improves drainage |
| Loam | Leaf mold | Maintains structure |
Proper drainage prevents root rot – if puddles linger after rain, add organic matter or create slopes. Your plants will reward you with stronger stems and longer-lasting blooms when their underground home feels just right.
Choosing and Planting the Best Cut Flowers
Your journey to vibrant bouquets begins with smart plant selection. Understanding different growth habits helps you build a garden that keeps producing stems all season. Let’s break down your options from low-commitment annuals to long-term perennial performers.
Tips for Annuals, Perennials, and Bulbs
New gardeners should start with annuals – these easy-to-grow champions deliver fast results. Zinnias and sunflowers sprout quickly from seed, blooming nonstop until frost. You’ll get maximum color with minimal effort, perfect for testing your green thumb.
Six main flower types offer varying commitment levels:
- Annuals: Single-season stars needing replanting yearly
- Hardy annuals: Frost-tolerant varieties like larkspur
- Bulbs: Reusable investments like tulips and dahlias
Cool-weather lovers like sweet peas thrive when planted early. These hardy annuals extend your cutting season into spring’s chill. Pair them with frost-sensitive varieties for continuous blooms.
Bulbs and tubers reward patience with spectacular displays. While they require proper storage over winter, their recurring blooms justify the effort. Many gardeners find these best cut flowers become worth-it showstoppers after mastering annuals.
One grower’s experience proves the strategy works:
“Starting with cosmos gave me confidence to add peonies later. Now I have blooms from May through October!”
Focus first on quick-growing annuals when planning your cutting garden. As skills grow, mix in perennials and bulbs for layered beauty. This approach builds success while keeping your vase overflowing.
Creating a Successful Planting Schedule

Timing unlocks your garden’s full potential like a conductor guiding an orchestra. Knowing when to start seeds and transplant seedlings ensures your blooms hit their peak precisely when you need them. Let’s break down the calendar magic that keeps vases filled from spring’s first warmth to autumn’s crisp days.
Understanding Frost Dates and Seed Starting
Your local frost dates act as nature’s green light for planting. The average last spring frost marks when tender plants can safely go outdoors, while the first fall frost signals harvest time. Check your USDA zone or ask neighbors when these critical season markers typically occur.
Here’s a proven framework:
- Start slow growers like delphiniums 8 weeks before last frost
- Begin medium-paced zinnias 6 weeks ahead
- Sow quick-blooming marigolds just 4 weeks prior
Hardy annuals play by different rules. These tough cookies tolerate chilly soil, letting you plant in early spring when frost still nips the air. One gardener shared:
“I sow larkspur in February snow – by May, they’re towering over later-started blooms!”
| Flower Type | Start Indoors | Transplant After |
|---|---|---|
| Slow Growers | 8 weeks pre-frost | Last frost date |
| Medium Pace | 6 weeks pre-frost | Soil 60°F |
| Quick Bloomers | 4 weeks pre-frost | Night temps 50°F+ |
Stagger plantings every 14 days for nonstop flowers blooming. Track progress using a simple spreadsheet or garden journal. Adjust dates if spring arrives early – nature’s schedule sometimes needs improvising!
Essential Garden Maintenance and Care
Your flourishing blooms need consistent care to stay vibrant and productive. Like athletes in training, plants perform best with steady support systems. Three key practices keep stems strong and petals radiant throughout the season.
Watering, Fertilizing, and Pruning Techniques
Deep watering beats frequent sprinkles. Aim for 1-1.5 inches weekly, letting soil dry slightly between sessions. Early morning hydration reduces evaporation and prevents leaf diseases.
Feed plants monthly with balanced 10-10-10 fertilizer. Overfeeding creates lush foliage but fewer flowers. For organic options, try compost tea or worm castings – they release nutrients slowly.
Prune strategically to encourage branching. Snip spent blooms just above leaf nodes using clean shears. Remove damaged leaves promptly to redirect energy toward new growth.
One gardener shares: “Rotating these tasks weekly keeps my patch thriving without overwhelm.” Consistent care transforms your plot into a self-renewing source of beauty, ready to fill vases whenever inspiration strikes.


