
You don’t need endless acres to grow fresh, flavorful produce right outside your door. With thoughtful planning, even the coziest patio or narrow backyard can become a productive oasis that keeps your kitchen stocked all season long. The secret lies in designing a system that works with your available area rather than against it.
Compact growing setups shine when you focus on efficiency. Techniques like strategic design choices help you squeeze more from every inch, whether you’re nurturing herbs in window boxes or tomatoes on a balcony. Vertical structures and staggered planting schedules turn limitations into opportunities for creativity.
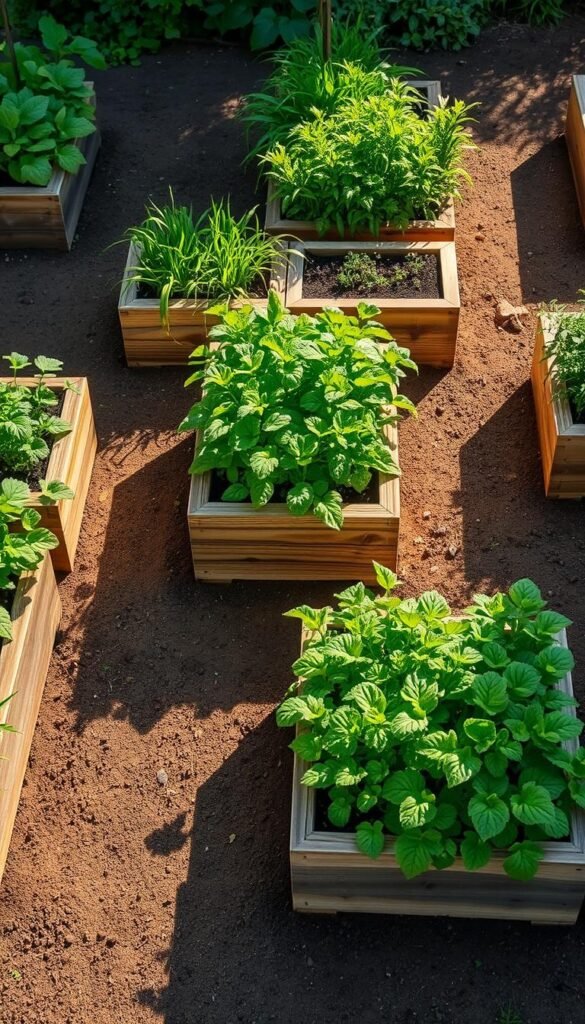
Building your growing space? Consider a step-by-step tutorial to create frames that fit your unique needs. Proper height and soil depth let roots thrive while making maintenance easier on your back. One enthusiastic grower harvested salad greens by Mother’s Day using these methods – her first attempt!
The right approach transforms challenges into advantages. Loose, nutrient-rich soil warms faster in spring, giving plants a head start. Defined boundaries slash weed growth, letting you focus on nurturing crops instead of battling unwanted guests. With clever layouts, you might even outproduce traditional plots using a fraction of the space.
Understanding the Benefits of Raised Beds in Small Spaces

Ever tried growing tomatoes where concrete outnumbers earthworms? Raised beds turn tricky spots into thriving plots. They’re like custom-made plant apartments – you control the soil quality, layout, and drainage while sidestepping ground-level headaches.
Why Raised Beds Are Ideal for Limited Areas
These elevated planters solve problems you didn’t know you had. Got compacted dirt or contaminated ground? Smart space solutions let you bypass poor conditions completely. No digging required – just build up.
Spring comes earlier here. The soil warms faster than in-ground plots, giving seedlings a head start. Roots stay cozy but never soggy thanks to improved drainage. Say goodbye to swampy zucchini roots!
Enhancing Accessibility and Soil Quality
Your back will thank you. The raised design means less bending – perfect for tender knees or ambitious crop rotations. You’re the boss of what grows here, mixing compost and nutrients without fighting existing dirt.
Pro tip: These planters work magic on driveways or patios. Maximize your potential by treating paved areas as blank canvases. Want to relocate? Just dismantle and rebuild – your garden moves with you.
Grass won’t invade your carrot patch, and weeds struggle to reach the party. You’ll spend more time harvesting basil than battling intruders. It’s gardening simplified, with better results packed into less square footage.
Small Raised Garden Beds Layout: Maximizing Yield in Limited Spaces – Planning Your Garden

Smart design starts with a tape measure and sunlight tracker. Before building anything, walk your area at different times to note where shadows fall. This reconnaissance mission ensures leafy greens won’t battle tomatoes for sunshine.
Space and Accessibility Considerations
Imagine reaching across a steaming lasagna pan – that’s your maximum arm span for tending plants. Keep paths between planters wide enough for kneeling pads and harvest baskets. A 24-inch walkway lets you pivot comfortably without crushing mint or basil.
Position planters near water spigots to avoid marathon hose dragging. One urban grower reduced watering time by 40% simply by relocating her planters 10 feet closer to the rain barrel.
Selecting the Right Dimensions for Easy Maintenance
Narrow designs win for practicality. Against walls or fences, 30-inch widths let you tend the entire surface without gymnastic stretches. Freestanding planters can stretch to 48 inches – but test your reach first with a makeshift cardboard template.
| Scenario | Max Width | Pathway Width |
|---|---|---|
| Against structure | 30 inches | 18-24 inches |
| Island planters | 48 inches | 24-36 inches |
| Corner layouts | 36 inches | 24 inches |
Long planters need mid-span reinforcements. A simple cross brace every 4-6 feet prevents wooden sides from resembling bloated rain barrels after heavy storms. Metal planters benefit from vertical stakes driven into the soil.
Leave expansion room between planters – even if you’re not ready for vertical trellises yet. That 14-inch gap could later host pole beans climbing toward the sun while shading heat-sensitive lettuces below.
Choosing Materials and Constructing a Durable Structure

What separates a thriving raised bed from a sagging mess? Your material choices determine whether your setup becomes a long-term partner or needs constant repairs. Let’s explore options that keep your plants healthy while standing up to seasons of growth.
Safe and Sustainable Materials for Your Raised Beds
Cedar and redwood lead the pack for natural rot resistance, lasting over a decade without chemical treatments. Budget-conscious growers often choose untreated pine – it’ll serve well for 3-5 years before needing replacement. Steer clear of pressure-treated wood if you’re growing edibles; even modern treatments spark debates about soil safety.
| Material | Lifespan | Cost | Best For |
|---|---|---|---|
| Cedar | 10+ years | $$$ | Long-term solutions |
| Untreated Pine | 3-5 years | $ | Starter projects |
| Galvanized Metal | 15+ years | $$ | Modern aesthetics |
| Stone | Permanent | $$$$ | Landscape integration |
Building Techniques That Ensure Proper Drainage
Your bed’s foundation matters as much as its walls. Skip solid bottoms – let plant roots access natural earthworms and drainage. For metal troughs, drill quarter-inch holes every 12 inches. Always level the ground first; uneven bases cause water pooling and structural stress.
Consider lining the bottom with hardware cloth if gophers visit your neighborhood. This mesh blocks diggers while letting water flow freely. Pair this with our square-foot gardening guide to create a system that balances beauty and productivity.
Optimizing Soil Fertility, Irrigation, and Planting Practices

The secret to thriving plants lies beneath the surface. Nourishing roots with premium growing media while delivering precise hydration creates resilient crops that outperform expectations season after season.
Creating the Perfect Topsoil and Compost Mix
Your soil mixture acts as a five-star restaurant for plant roots. Combine 70% screened topsoil with 30% mature compost for ideal texture and nutrition. Bulk purchases save money and reduce plastic waste – suppliers often deliver truckloads directly to your driveway.
Test materials before filling your planters:
“Good compost smells like forest after rain, not rotten eggs,” advises urban farmer Marissa Cole. Avoid clumpy textures or visible food scraps indicating incomplete decomposition.
Efficient Drip Irrigation and Water Management
Drip irrigation systems target thirsty roots while keeping leaves dry. This precision reduces fungal diseases and water waste by up to 60% compared to sprinklers. Most vegetables need 1″ weekly – equivalent to 0.6 gallons per square foot.
| Irrigation Method | Efficiency | Cost | Setup Complexity |
|---|---|---|---|
| Drip Lines | 90-95% | $$ | Moderate |
| Soaker Hoses | 80-85% | $ | Easy |
| Sprinklers | 50-70% | $$ | Simple |
| Hand Watering | 65-75% | $ | None |
Pair timers with moisture sensors for automated care. Check soil dampness by pushing two fingers into the mix – if it sticks slightly, your plants are content. During heatwaves, water early morning to combat evaporation.
Maximizing Yields with Vertical and Succession Planting Strategies

Think your growing space is too cramped for serious harvests? Combine vertical structures with smart scheduling to unlock hidden productivity. These methods let you harvest multiple times from the same footprint while keeping plants healthier through better air circulation.
Benefits of Vertical Gardening
Vining crops become space-saving superstars when trained upward. A 6-foot trellis of climbing peas produces the same yield as 16 square feet of bush varieties. Pole beans and cucumbers follow similar rules, freeing ground space for quick-growing companions like radishes or spinach.
Install supports early – bamboo stakes or cattle panels work best before roots establish. One gardener tripled her tomato harvest by switching to vertical strings instead of cages. “The fruits stayed cleaner and ripened faster,” she noted.
Mastering Succession Planting
Timed replacements keep your soil working year-round. Try these proven sequences:
| First Crop | Follow-Up Crop | Transition Timing |
|---|---|---|
| Peas | Bush beans | Plant beans 2 weeks before pea harvest |
| Lettuce | Cucumbers | Sow cucumber seeds when lettuce bolts |
| Spring radishes | Summer squash | Direct seed squash after radish pull-up |
Cool-season crops like spinach make perfect openers. As temperatures rise, replace them with heat-lovers like okra or basil. For continuous bean yields, stagger bush bean plantings every 14 days until midsummer.
Always prep soil between plantings with compost tea or worm castings. This refreshes nutrients without full bed renovations. With practice, you’ll develop sequences matching your climate and cravings.
Integrating Multi-Functional Features and Space-Saving Elements
Who says you can’t have beauty and bounty in tight quarters? Smart growers double their harvests by choosing elements that serve multiple purposes. A well-planned setup becomes both practical and visually appealing, turning constraints into creative opportunities.
Using Trellises, Containers, and Shelving Systems
Vertical structures like trellises transform walls into edible tapestries. Position climbing crops on the north side of your setup to prevent shading smaller plants. Pole beans or cucumbers thrive here, while compact herbs flourish below. Cattle panels or bamboo stakes offer sturdy support without blocking sunlight.
Containers paired with shelving create layered growing zones. Try strawberries in hanging planters or basil in stacked pots. This approach adds depth while keeping essentials within arm’s reach. For precision spacing, adapt a square-foot gardening layout to your shelves – it’s like having a living pantry on display.
Multi-tiered systems also simplify pest management. Companion planting thrives here – think marigolds deterring aphids near tomatoes. Rotate crops seasonally using removable trays, ensuring continuous production without replanting entire beds. Your space becomes a dynamic ecosystem where every level contributes to the harvest.


