
Creating vibrant growing spaces doesn’t require breaking the bank. Many enthusiasts discover that repurposing everyday items offers both financial and creative advantages. With construction waste topping 146 million tons annually in the U.S., your project can give discarded objects new life while saving up to 80% on setup costs.
Traditional wooden structures often demand $50-$150 for basic designs. By contrast, upcycled alternatives let you build functional planters for as little as $20. Local businesses frequently offer free materials like pallets or containers – perfect for crafting durable beds that last 5-10 years longer than store-bought versions.
This approach isn’t just about savings. Customized designs add personality to your yard that mass-produced options can’t match. You’ll also contribute to environmental protection – diverting one wooden pallet from landfills preserves 22 pounds of wood from decomposition.
Our guide walks through seven simple methods using accessible resources. Whether you’re working with concrete blocks or retired bathtubs, you’ll find techniques suited to your skill level. Get ready to cultivate your green thumb while making smart choices for your wallet and the planet.
Understanding the Benefits of Reusing Materials for Your Garden

Building a sustainable garden starts with smart material choices that benefit both your wallet and the planet. Let’s explore how repurposed resources create value beyond basic functionality.
Environmental and Budget Advantages
Every reused item cuts costs while protecting ecosystems. Repurposed wood pallets slash expenses by 50-80% compared to new lumber. That leftover concrete block behind your shed? It could outlive standard wooden beds by a decade.
Here’s why this matters:
- Each salvaged pallet prevents 22 pounds of wood from rotting in landfills
- Construction waste drops when you redirect usable items
- Pre-weathered barrels handle moisture better than untreated wood
You’re not just saving money – you’re creating lasting value. Metal containers and stone slabs often maintain their integrity for 15+ years with minimal upkeep.
How Recycled Items Elevate Outdoor Spaces
That chipped bathtub becomes a conversation piece bursting with herbs. Sun-bleached pallet wood adds rustic texture that new planks can’t replicate. Your space tells a story through materials with history.
Mix industrial pipes with vintage crates for modern edge. Arrange colorful bricks in geometric patterns. The possibilities let you craft landscapes that reflect personal style while keeping resources in circulation.
This approach transforms ordinary yards into distinctive retreats. Your neighbors might admire the creativity, but they’ll never guess how little you spent to achieve it.
Exploring Versatile Materials for DIY Raised Garden Beds

Your backyard transformation begins with selecting components that balance functionality and style. Countless everyday items can become sturdy planting spaces when approached creatively. Let’s examine seven adaptable materials that deliver both practicality and visual appeal.
Wood, Pallets, Tires, Concrete, and Metal Options
Wooden planks remain a top pick for their workability and natural look. They’re perfect for first-time builders – just secure four corners with screws. Look for untreated cedar or redwood, which resist decay better than pine.
Pallets shine as ready-made frameworks. Their slatted design promotes airflow while keeping soil contained. You’ll love how easily they convert into budget-friendly containers with minimal tools.
Don’t overlook retired tires. Their thick rubber walls protect roots from temperature swings. Stack them vertically for strawberries or lay them flat for squash vines. Concrete blocks offer similar flexibility – arrange them in spirals or terraced patterns for visual drama.
Metal brings industrial flair with unmatched durability. Galvanized troughs withstand decades of weather, while corrugated panels add texture. Pair these with stone bases for hybrid designs that merge multiple benefits.
Plastic buckets and barrels work well for mobile setups. Drill drainage holes, add casters, and you’ve got rolling planters. Mix materials freely – try metal sides with wooden corners for contrast that catches the eye.
Step-by-Step Guide to Building Raised Garden Beds from Recycled Pallets

Discover how discarded pallets can become your garden’s most valuable asset. These versatile platforms offer a sturdy foundation for growing herbs, vegetables, and flowers while keeping costs minimal. Let’s break down the process into manageable steps for guaranteed success.
Choosing the Right Pallets
Always check stamps on wooden pallets before repurposing them. Look for the “HT” mark indicating heat-treated wood, which ensures chemical-free growing conditions. Avoid pallets labeled “MB” – these contain methyl bromide residues that could harm your plants and soil.
Source pallets from local businesses rather than international suppliers. Domestic options typically have cleaner histories and fewer contaminants. Inspect each piece for oil stains, odd smells, or visible damage that might indicate prior hazardous use.
Assembling Your Planter
Start with 2-3 matching pallets. Remove protruding nails and sand rough edges using basic tools. Flip one pallet horizontally to form the base, creating natural drainage gaps between slats.
Secure vertical pallets around the edges with 3-inch screws. For extra stability, add metal brackets at each corner. Line the interior with landscape fabric to prevent soil loss while allowing water flow. Fill your new bed with nutrient-rich soil, leaving 2 inches at the top for mulch or compost.
This method creates a durable structure that lasts several seasons. You’ll enjoy fresh produce without worrying about chemical leaching or structural failures.
Designing Raised Beds with Concrete Blocks and Stones

Concrete blocks unlock endless possibilities for crafting durable growing spaces that blend practicality with artistic flair. These versatile components let you build structures that withstand weather extremes while adding geometric interest to your landscape.
Creative Block Arrangement Patterns
Break free from rectangular layouts with innovative stacking techniques. Try a keyhole pattern – arrange blocks in a circle with a slim access path to the center. This clever design lets you reach every plant without stepping on soil.
U-shaped configurations work wonders in tight spaces. Create three separate zones within one bed: full-sun veggies on the south side, shade-tolerant greens in the north, and flowers along the curves. Alternate block orientations to form built-in pockets perfect for trailing strawberries or aromatic herbs.
Sourcing Low-Cost or Free Blocks
Local construction sites often give away chipped or surplus cinder blocks – contractors save $50-$100 per pallet in disposal fees by donating them. Check neighborhood apps like Nextdoor for homeowners remodeling patios or dismantling old walls.
Masonry suppliers sell “seconds” with minor flaws at deep discounts. These blocks function perfectly in garden projects while costing 60% less than retail. Always inspect for structural cracks, but don’t worry about cosmetic imperfections hidden beneath soil.
With creative arrangements and smart sourcing, your concrete block bed becomes a long-lasting centerpiece. You’ll maximize growing space vertically and horizontally while keeping costs under $30 for most projects.
Transforming Old Bathtubs and Sinks into Unique Garden Beds

Repurposed bathroom fixtures bring unexpected charm to outdoor spaces while solving practical gardening challenges. These sturdy containers offer built-in depth for root systems and withstand decades of use with proper setup.
Essential Prep Work for Safe Planting
Start by scrubbing fixtures with a 1:3 vinegar-water mix. This removes soap scum and mineral buildup that could harm your plants. Always wear gloves when handling old plumbing components.
Remove faucets, pipes, and sharp edges using basic tools. Sand any rough spots to prevent cuts during maintenance. Claw-foot tubs need extra stability – reinforce their legs with concrete pads or metal brackets.
| Preparation Step | Benefit | Tool Required |
|---|---|---|
| Drill drainage holes | Prevents waterlogged soil | Ceramic drill bit |
| Add gravel layer | Improves root health | Landscape fabric |
| Repurpose existing drain | Directs excess moisture | Perforated pipe |
Position your converted bed in full sun for most vegetables. The porcelain surface retains heat well, creating a microclimate that extends growing seasons. For herbs or flowers, partial shade works better to prevent soil from drying too quickly.
Fill the bottom with 2 inches of gravel before adding soil. This simple step prevents root rot and keeps your plants thriving for years. Remember to check drainage holes seasonally to avoid blockages from soil compaction.
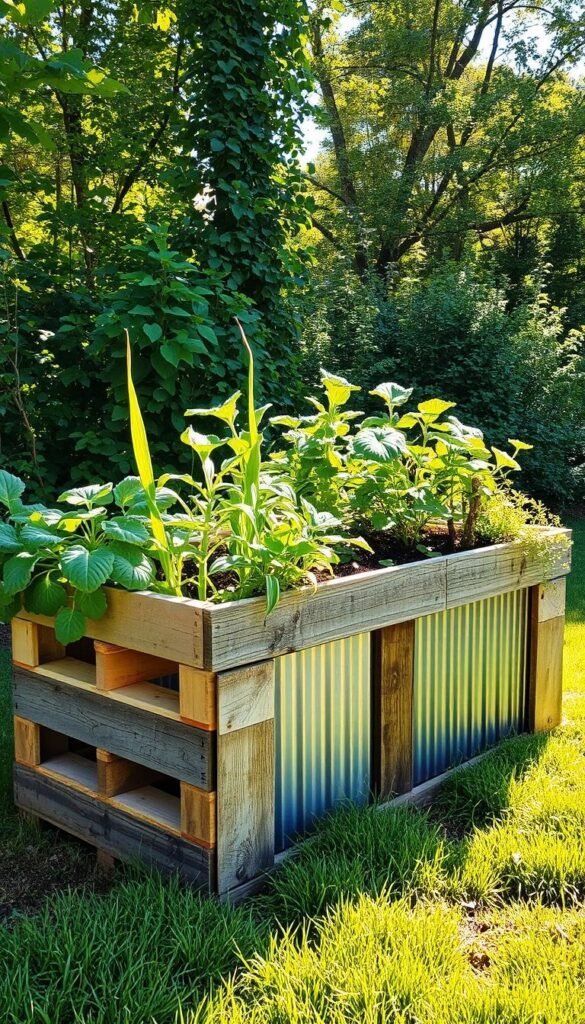
Constructing Durable Beds with Reclaimed Lumber and Metal Roofing
Building long-lasting garden structures combines resourcefulness with smart material choices. Salvaged wood and steel components offer unmatched durability while keeping costs minimal. You’ll create planting spaces that thrive through seasons without compromising style.
Effective Construction Techniques for Longevity
Reclaimed lumber shines when properly prepared. Source planks from demolition sites or online listings – many homeowners give away usable wood during renovations. Always inspect each piece for hidden nails and sand rough edges thoroughly.
Apply a natural sealant to protect against moisture. This simple step adds years to your wood’s lifespan. Pair treated planks with metal roofing panels for hybrid designs that resist rot and pests.
For metal beds, secure pressure-treated posts every three feet. Attach corrugated sheets using self-tapping screws with rubber washers. This prevents leaks while allowing slight material expansion during temperature changes.
Your finished creation will showcase both rugged charm and modern practicality. These methods ensure your growing space remains functional and attractive for decades, proving sustainability doesn’t mean sacrificing quality.


