
Starting your planting journey doesn’t require years of experience or a massive backyard. With a structured approach, you can design a thriving outdoor area that fits your lifestyle. One popular method involves building elevated planters, which offer improved soil quality and easier maintenance compared to traditional plots.
This comprehensive guide shows how to construct a durable cedar frame using basic tools. While material costs have risen slightly since the original $100 blueprint, the process remains accessible for beginners. You’ll learn to adjust dimensions for spaces ranging from compact 2’x6’ setups to roomier 4’x8’ layouts.
Why choose this method? Elevated designs reduce bending strain by 60% while creating defined zones for crops. The enclosed structure prevents soil compaction and allows precise control over drainage – crucial for healthy roots. As noted in this resource on optimized planting spaces, proper framing height (10-12″) makes routine tasks surprisingly comfortable.
You’ll discover how square-foot planning maximizes yields and simplifies crop rotation. Whether growing crisp lettuce or vibrant flowers, these techniques help you create a personalized oasis that grows with your skills. Let’s transform your outdoor area into a productive retreat that lasts seasons!
Planning Your Raised Garden Bed Project
Smart layout choices now save headaches later. Before assembling materials, focus on two critical factors: where your planting area will live and how much it should grow.
Selecting the Ideal Location
Sunlight matters most – aim for spots getting 6+ hours daily. But don’t stop there. Check water access: dragging hoses across lawns gets old fast. Level ground prevents soil washouts, though slight slopes can be fixed with terracing.
Think about convenience. Place your structure near compost bins or tool sheds. One study shows gardeners maintain plots 40% more consistently when resources sit within 15 steps.
Determining the Size and Layout
Start small if you’re testing the waters. A 4’x4′ setup feeds two people herbs and salads. Families often need 4’x8′ spaces or multiple units. Leave 2-foot walkways between beds – knee-friendly access makes weeding less chore-like.
Sketch your design first. Mark sunny zones, water sources, and potential expansion areas. Remember: it’s easier to add another box next season than to move established plantings.
Materials & Tools You Need for Your Raised Garden Bed

Quality materials and proper equipment set the stage for a long-lasting planting space. Let’s explore what you’ll need to create a functional design that blends durability with visual appeal.
Choosing the Right Wood and Alternatives
Rot-resistant lumber is non-negotiable for outdoor structures. Cedar tops the list with natural oils that repel insects and moisture. Rough-sawn 2x4s form sturdy frames, while thinner fence pickets add decorative flair to side panels.
Budget-conscious builders often select pressure-treated pine, though some avoid it near edible plants. For premium projects, redwood offers similar decay resistance to cedar. Exotic hardwoods like Ipe last decades but require specialized cutting tools.
Essential Gardening and Carpentry Tools
Your toolkit should balance precision and power. A miter saw ensures clean angle cuts for frame corners, while a circular saw handles longer boards. The dynamic duo of a drill and impact driver makes assembling joints with exterior screws a breeze.
Consider these game-changers:
- Kreg Jig for invisible pocket-hole joints
- Trim router for smoothed edges
- Tape measure with standout reach
Don’t skimp on protective finishes. Spar varnish shields wood from UV damage, while exterior-grade paint adds personality. With these tools and materials, you’ll build a planter that ages gracefully through seasons.
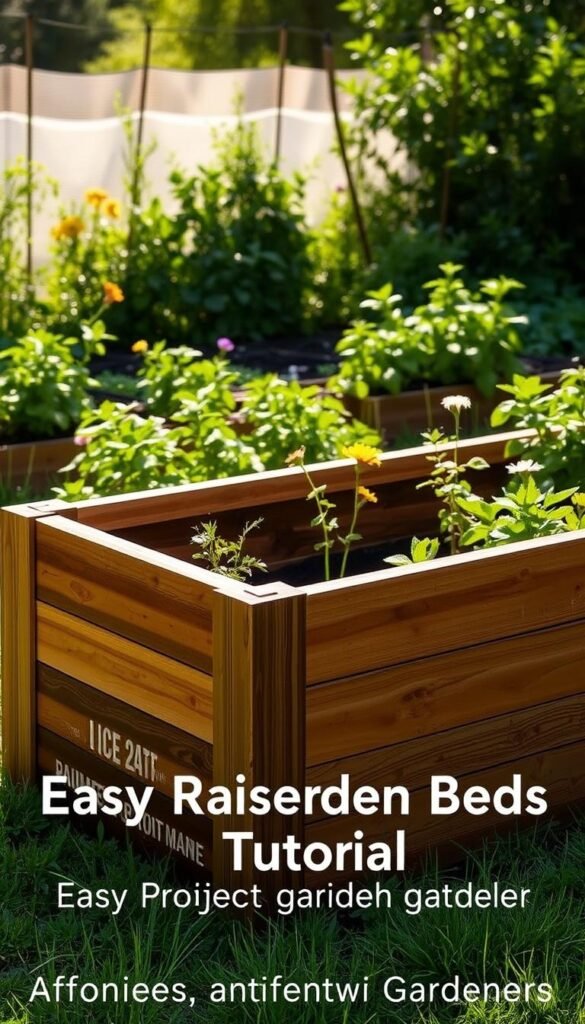
Easy Raised Garden Beds Tutorial: Quick Projects for New Gardeners

Constructing a durable planter box requires methodical planning and smart material choices. By dividing the process into clear phases, you’ll maintain momentum while ensuring professional results. Let’s explore how to balance efficiency with craftsmanship.
Step-by-Step Construction Overview
The six-phase approach keeps tasks manageable. Start by organizing your lumber and tools – this prevents mid-project scrambles. Cut all frame pieces at once using a miter saw for uniform edges.
| Phase | Key Action | Pro Tip |
|---|---|---|
| 1. Prep | Sort boards by size | Label pieces with painter’s tape |
| 2. Cut | Create frame components | Use stop blocks for repeat cuts |
| 3. Drill | Add pocket holes | Set depth collar on drill bit |
| 4. Finish | Sand & seal surfaces | Wear nitrile gloves when staining |
| 5. Assemble | Join side panels | Clamp before driving screws |
| 6. Install | Position final structure | Check level from multiple angles |
Budget Tips and Material Substitutions
Quality doesn’t require premium prices. Rough-sawn cedar offers savings if you’re willing to sand it smooth. For hidden components, use leftover fence pickets or pallet wood.
| Material | Cost | Durability |
|---|---|---|
| Rough cedar | $2.50/lnft | 15+ years |
| Planed cedar | $4.10/lnft | 15+ years |
| Pine boards | $1.80/lnft | 5-7 years |
| Composite | $6.00/lnft | 20+ years |
Spread the work over weekends – rushing leads to errors. Internal braces made from scrap wood save money without compromising strength. Remember: visible surfaces deserve your best materials, while structural pieces can mix grades.
Preparing and Finishing Your Materials

Transforming raw materials into weather-resistant garden structures begins with proper surface treatment. This phase determines how well your creation withstands rain, sun, and time while maintaining visual appeal.
Sanding and Surface Preparation Techniques
Start with rough-sawn cedar boards. Use 80-100 grit sandpaper first to remove splinters, then progress to 180 grit for a silky finish. An orbital sander saves time on fence pickets, creating uniform surfaces that highlight cedar’s natural grain patterns.
Focus on edges and corners where rough spots linger. Proper sanding ensures paint and varnish adhere evenly – skip this step, and finishes may peel within months.
Applying Paint, Varnish, and Protecting the Wood
Frame pieces need two coats of exterior latex paint. Use a roller for smooth coverage, adding a third coat on end-grain areas. For slats, spar varnish preserves cedar’s warm tones while blocking UV damage.
- Allow 4-6 hours drying time between coats
- Sand lightly with 220 grit after first varnish layer
- Check corners for drips using angled brush work
These finishing steps complement smart layout design by creating durable structures that enhance your garden’s functionality. Invest effort here, and your project becomes a lasting centerpiece rather than a seasonal fix.
Cutting and Assembling the Frame Components

Crafting a sturdy planter begins with exact measurements and smart joinery techniques. Proper preparation here determines how smoothly assembly progresses later. Let’s break down the critical steps for creating components that fit like puzzle pieces.
Mastering Board Dimensions
Start by cutting six frame pieces from cedar 2x4s. Four legs measure 34.5 inches, while two top bars need 30-inch lengths. Use a miter saw for square cuts – even 1/8-inch errors compound during assembly.
For slats, create eight 53-inch and eight 27-inch pieces. Ripping fence pickets from 6 to 4.5 inches wide requires careful table saw setup. Remove 3/4 inch from one edge first, then flip boards for final width.
| Component | Quantity | Length | Width |
|---|---|---|---|
| Legs | 4 | 34.5″ | 1.5″ |
| Top Bars | 2 | 30″ | 3.5″ |
| Long Slats | 8 | 53″ | 4.5″ |
| Short Slats | 8 | 27″ | 4.5″ |
Hidden Joinery Secrets
A Kreg Jig transforms ordinary boards into professional-grade connections. Position holes 1/2 inch from leg edges to avoid side slat interference. Each slat gets two pocket holes – this prevents twisting while allowing wood movement.
Add visual polish with a trim router. The 1/8-inch chamfer on slat fronts catches sunlight beautifully. Remember: router clockwise along edges for clean results.
| Tool | Setting | Purpose |
|---|---|---|
| Kreg Jig | 3/4″ depth | Hidden screw placement |
| Trim Router | 1/8″ bit | Edge detailing |
| Drill | #8 bit | Pilot holes |
Detailed Assembly of Side Panels and Slats

Precision assembly transforms individual components into a cohesive structure. Focus on alignment techniques that maintain clean lines while securing components firmly. This phase determines how well your planting space holds soil and resists warping over time.
Aligning and Attaching the Slats Neatly
Start by building the long sides. Attach four slats to two legs, keeping back edges flush. This creates a subtle 3/4-inch front reveal – crucial for visual consistency. Flip the pieces upside down during assembly for easier alignment.
Use wood shims to keep edges perfectly straight. Work from the bottom slat upward, spacing them evenly. A carpenter’s square ensures each piece sits perpendicular to the legs. This prevents twisting that could weaken the structure.
Secure slats with hidden pocket screws. These fasteners stay concealed inside the frame, maintaining clean exterior surfaces. Connect all four sides last, double-checking corner angles before tightening every screw.
Take your time during this step. Proper alignment now means fewer adjustments later. Your finished bed will look polished while providing years of reliable service in your outdoor space.
Installing Structural Supports for Stability
Solid supports turn your planting project from temporary to timeless. While the visible parts of your structure get attention, hidden reinforcements ensure lasting performance. Let’s explore how strategic additions prevent sagging and protect your investment.
Attaching Battens and Bottom Rails
Install three 18-inch battens (3/4″ thick) at the center of each long side. Space them evenly between the top and bottom edges to combat soil pressure. Use exterior screws to secure these braces, sinking them flush with the wood surface.
Add 27-inch bottom rails (1.5″ square) along the lower edge. These horizontal pieces strengthen the base while creating a ledge for optional weed barriers. Position them 2 inches above ground level to prevent rot from constant water contact.
Ensuring Proper Drainage for Longevity
Drill 1/2-inch holes every 12 inches along the bottom rails. This spacing allows excess moisture to escape without losing soil. For heavy clay areas, line the bed interior with landscape fabric before adding gravel.
Slope the base slightly toward one corner – a 1-inch drop over 4 feet guides water effectively. These simple steps help roots breathe while keeping your structure stable through rainy seasons and dry spells alike.


