
Smart growers know every inch of outdoor space holds potential. By creating planting zones next to existing structures, you unlock hidden opportunities for fresh produce and vibrant blooms. Elevated planters near boundary walls combine practicality with creativity, turning neglected edges into productive garden features.
Many green thumbs describe switching from traditional plots to structured growing systems as revolutionary. Improved soil control and better drainage lead to healthier plants, while the vertical support of nearby walls opens new possibilities. You’ll find these setups require less bending and weeding compared to conventional methods.
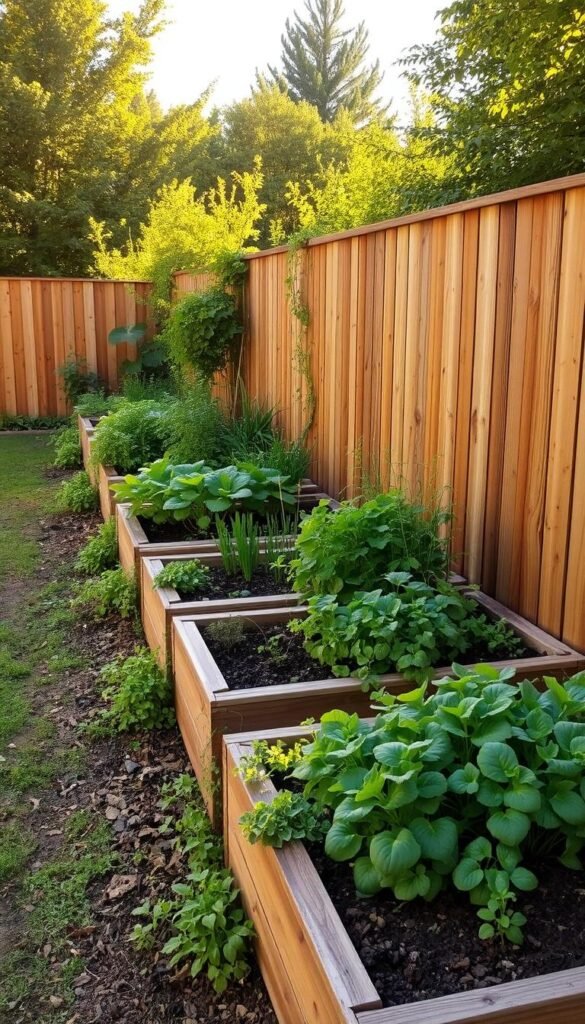
Positioning your planters strategically offers multiple benefits. Fences provide natural windbreaks and create warmer microclimates for heat-loving crops. They also serve as ready-made anchors for climbing vegetables like beans or cucumbers. For those exploring cost-effective raised bed designs, integrating them with existing structures maximizes yield without expanding your footprint.
This guide walks through smart layout planning and material selection tailored to American growing conditions. You’ll discover how to assess sun patterns, choose durable lumber, and design multi-level systems that make the most of vertical space. With proper execution, your border area can become the most productive part of your outdoor space.
Understanding the Benefits of Raised Garden Beds

Gardeners across the U.S. are discovering smarter ways to grow. Elevated planters solve persistent challenges while creating fresh opportunities for lush vegetation. Let’s explore what makes these structures so valuable for modern cultivation.
Soil That Works With You
Traditional gardens often struggle with dense clay or rocky earth. Raised beds let you bypass poor native soil completely. You fill them with ideal growing mixtures – fluffy, nutrient-rich, and quick-draining. This means roots get oxygen faster, and excess water escapes easily.
No more waiting years to improve ground conditions. Start planting immediately after building your custom garden bed using this step-by-step. Your tomatoes and herbs will thrive in the perfect environment you create.
Reclaim Every Square Inch
Those narrow strips along fences often go unused. Elevated beds turn these spaces into productive zones. Their vertical design adds growing room upward, perfect for trellised peas or flowering vines.
You’ll appreciate easier access to plants without trampling soil. The raised height reduces bending strain, making weeding and harvesting more comfortable. Defined edges keep mulch contained and pathways clear.
Early spring warmth gives crops a head start. Cool-season greens can grow longer into summer. With smart planning, your border beds might outproduce your main garden plot!
Planning Your Raised Garden Bed Project

Transforming your outdoor space starts with smart preparation. Focus on three core elements: sunlight patterns, usable area, and resource allocation. Getting these right ensures your planting zone thrives while keeping efforts manageable.
Assessing Your Garden’s Layout
Watch how light moves across your fence line through the day. Leafy greens need 4-6 hours of sun, while tomatoes demand 8+ hours. Use a sun-tracking app or mark shadows hourly to find prime spots.
Measure carefully before cutting materials. Beds narrower than 4 feet let you tend plants without stepping on soil. Leave 18-inch walkways for kneeling pads or harvest baskets.
Setting a Practical Budget and Timeline
Material costs vary widely – cedar lasts longer than pine but costs 3x more. Salvaged bricks or composite boards offer middle-ground options. Remember, soil fills 30% of most project budgets.
Break tasks into phases if weekends are limited. Day 1: build frames. Day 2: install supports and add soil. For quick wins, try a square-foot gardening layout in smaller sections first.
Sketch your plan on grid paper, noting downspout locations and gate swings. Strong preparation prevents “I’ll fix it later” compromises that drain time and money.
Designing Raised Garden Beds Along a Fence

Your boundary line holds untapped gardening potential when approached creatively. Thoughtful layouts transform simple planting areas into multi-layered ecosystems that work with your property’s natural features.
Smart Layout Strategies
Position your raised bed frames directly against the vertical surface. This creates instant support for climbing vegetables like pole beans and cucumbers. Leave 6-8 inches between wooden fences and soil to prevent moisture damage.
Consider these dimensions for success:
| Plant Type | Recommended Bed Depth | Max Height |
|---|---|---|
| Leafy Greens | 12 inches | 18 inches |
| Root Vegetables | 18 inches | 24 inches |
| Climbing Plants | 12 inches | 6+ feet |
Four-foot widths let you reach all plants comfortably from pathways. Narrower 2-foot beds work well for herbs and flowers along gates or curved sections. Rotate crops seasonally – grow lettuce in spring shade, then switch to sun-loving peppers when days lengthen.
Include stepping stones every 4-6 feet for accessing the fence side. This prevents soil compaction when training vines or harvesting back-row plants. For winter protection, attach temporary cold frames to the upper fence rails.
How to Build Raised Garden Beds Along a Fence for Space Efficiency

Creating sturdy planting zones near fences requires precision and smart techniques. Follow these steps to ensure your structure withstands seasons of growth while blending seamlessly with your outdoor layout.
Step-by-Step Construction Process
Begin by marking post locations 4 feet apart at each corner. Dig holes 18 inches deep using a post-hole digger. Mix quick-setting concrete with water until it reaches oatmeal consistency – you’ll need half a bag per corner post.
| Component | Specification | Purpose |
|---|---|---|
| Corner Posts | 4×4 cedar, 4′ height | Structural anchors |
| Intermediate Posts | Every 8 feet | Prevent sagging |
| Cedar Trim | 1×6 boards | Wall framework |
| Concrete Mix | 40 lb per corner | Stabilize base |
Run mason’s string between corner posts to guide alignment. Attach horizontal cedar boards using exterior-grade screws, leaving ½-inch gaps between planks for expansion. Metal siding gets secured with self-tapping screws through pre-drilled holes.
Key Installation Tips and Best Practices
Double-check post plumbness before concrete sets. Use a 4-foot level on two adjacent sides. For sloped yards, step bed heights gradually to follow terrain.
Leave 3-inch clearance between soil and fence boards to prevent rot. Staple landscape fabric to bed interiors before adding soil – this blocks weeds while allowing drainage. Rot-resistant cedar lasts 10-15 years untreated, saving maintenance time.
Seasoned DIYers recommend completing one 8-foot section fully before moving to the next. This modular approach lets you adjust designs as needed. Your finished beds should feel rock-solid when pushed – if they wiggle, add diagonal braces between posts.
Selecting the Right Materials and Tools
Your garden’s success starts with smart choices at the hardware store. Quality components ensure your planting zones withstand weather and time while matching your outdoor aesthetic.
Balancing Cost and Longevity
Cedar and redwood lead the pack for natural rot resistance. These woods last 10+ years but cost 2-3x more than pine. Pressure-treated lumber offers budget-friendly durability, though some gardeners avoid it near edibles. Untreated pine works for short-term projects but needs replacement every 3-5 years.
Metal siding adds industrial charm. Corrugated tin creates rustic charm and often costs less when sourced secondhand. Check local marketplaces for salvaged pieces – you might snag materials for half the retail price.
Must-Have Equipment Checklist
Gather these essentials before breaking ground:
- Compound miter saw for precise lumber cuts
- Drill/driver with hex-head screws (galvanized for metal)
- Tin snips to shape corrugated panels
Don’t skimp on safety gear. Gloves prevent splinters, while safety glasses shield eyes during cutting. A sturdy tape measure ensures accurate dimensions – crucial when building a raised garden bed against fence lines.
Choose fasteners wisely. Stainless steel screws outlast nails, especially in humid climates. Invest in quality here – replacing rusted hardware mid-season frustrates even patient gardeners.
Preparing the Garden Site

Laying the groundwork correctly determines your planting zone’s longevity and productivity. Proper preparation prevents shifting frames, waterlogging, and root restrictions. Let’s transform that patch of earth into a thriving ecosystem.
Clearing and Marking Your Planned Area
Start by outlining your future garden bed with bright spray paint or wooden stakes. Match the dimensions to your fence line while keeping pathways accessible. Remove turf completely using a flat shovel – slice horizontally beneath grass roots for clean removal.
Digging forks work wonders for breaking up compacted earth. Push the tines 8-10 inches deep and rock the handle back to lift and aerate the ground. This simple step helps water penetrate and lets roots explore beyond the raised structure.
| Preparation Step | Tools Needed | Time Required |
|---|---|---|
| Marking Boundaries | Spray paint, measuring tape | 15 minutes |
| Turf Removal | Flat shovel, wheelbarrow | 1-2 hours |
| Soil Aeration | Spading fork, gloves | 45 minutes |
Ensuring a Stable and Level Foundation
Use a 4-foot carpenter’s level to check for slopes exceeding 2 inches over 8 feet. For uneven ground, build up low spots with gravel rather than digging into high areas. This preserves soil structure and drainage patterns.
Contact 811 (national utility locating service) 3 days before excavating. They’ll mark buried lines free of charge – crucial when working near property boundaries. Once cleared, tamp the soil firmly with a hand tamper to create a solid base.
Remember: A 1-inch slope across 4 feet can divert rainwater away from wooden fences. Your prepared location should feel firm underfoot yet crumble easily when scooped – the perfect balance for plant roots and structural stability.
Building Techniques and Construction Tips
Mastering construction methods transforms your vision into a lasting garden feature. Focus on precision during assembly to create planters that withstand years of growth and weather changes.
Assembling the Frame and Securing Posts
Start by verifying right angles using the 3-4-5 triangle rule. Measure 3 feet along one board and 4 feet along the adjacent side – the diagonal should span exactly 5 feet. This simple trick ensures perfectly square corners every time.
Pour concrete mix around corner posts, leaving them slightly above ground level. For intermediate supports, pack soil tightly around posts every 8 feet. This hybrid approach saves money while maintaining structural integrity.
Effective Methods for Attaching Raised Beds
Use standalone posts near existing fences rather than drilling into them. This preserves the boundary structure while creating needed support. Maintain a 3-inch air gap between wooden surfaces to prevent moisture damage.
Install horizontal boards with intentional spacing. Leave 1/8-inch gaps between cedar planks to accommodate seasonal swelling. Pre-drill screw holes at slight angles to create stronger joints that resist pulling apart over time.
| Material | Expansion Gap | Fastener Type |
|---|---|---|
| Cedar | 1/8 inch | Stainless screws |
| Composite | 1/4 inch | Weatherproof nails |
| Metal | None | Self-tapping screws |
Check alignment frequently with mason’s strings stretched between posts. Adjust components before concrete fully sets – it’s much easier to fix mistakes early. Your finished frame should feel solid when you push against any corner.
Ensuring Proper Drainage and Soil Management
The secret to lush growth lies in what you can’t see – proper drainage and rich earth. Getting these elements right protects your plants from soggy roots and nutrient shortages. Let’s explore techniques that keep roots happy and productive.
Installing Garden Fabric and Drainage Layers
Start by lining your raised garden bottom with breathable landscape fabric. This barrier blocks invasive grass and weeds while letting excess water escape. For extra protection against pooling, add 2 inches of gravel beneath the fabric in heavy clay areas.
Choose woven polypropylene fabric over plastic alternatives – it lasts 5+ years and won’t decompose. Bulk rolls save money if you’re creating multiple planting zones. Trim edges neatly where fabric meets walls for a polished look.
Choosing the Right Soil and Compost Mix
Your plants will feast on a balanced meal of 60% topsoil, 30% compost, and 10% perlite. Avoid bargain bags labeled “garden soil” – they often contain poor-quality fillers. Instead, source locally made mixes from reputable nurseries.
Test your blend by squeezing a handful. Good soil holds shape briefly before crumbling – like moist chocolate cake. Amend annually with 2 inches of fresh compost to replenish nutrients. Your veggies will thank you with bumper crops!


