
Growing vegetables shouldn’t feel like a battle against nature. Imagine nurturing your crops without constant worry about hungry insects or sudden storms. Smart barriers let you create a safe space where your plants thrive while unwanted visitors stay out.
Garden mesh fabric acts like a superhero cape for your veggies. This lightweight material lets sunshine and rain through while forming a physical shield against critters. Unlike old-school tricks like hanging CDs or sprinkling spices, this solution works day and night without fading or washing away.
Timing matters most when safeguarding seedlings. Young plants need coverage from their first moments in the soil. Leave the mesh in place year-round, only lifting it for harvesting or quick checkups. For tomatoes or squash needing pollination, open the barrier during sunny hours when bees are active.
Proper enclosure systems do more than block pests. They help control temperature shifts and reduce wind damage. You’ll see stronger growth, bigger harvests, and fewer replants—all while using fewer chemicals. Your green thumb efforts finally get the support they deserve.
Understanding the Benefits of Enclosed Raised Garden Beds

Your plants deserve a fortress, not just a fence. Smart barriers transform growing spaces into resilient ecosystems where vegetables flourish naturally. Let’s explore how these defenses elevate your gardening game.
Why Protecting Your Garden Matters
Slugs munch seedlings overnight. Birds peck ripe tomatoes. Moles tunnel through roots. Every region faces unique challenges—coastal areas battle snails, while midwestern plots fight rabbits. Without safeguards, up to 60% of crops can vanish before harvest.
Barriers act like personalized bodyguards for your greens. Fine mesh stops aphids but lets pollinators visit. Sturdy wire grids block digging rodents. Unlike sprays that wear off, physical shields work nonstop. Your kale grows taller, and beans produce longer.
The Role of Barriers in Pest and Weather Defense
Three reasons barriers outperform other methods:
- No chemicals touch your food
- Wind and hail damage drop by 80%
- Soil stays warmer for season extension
Choose materials wisely. Use 1/4-inch mesh for beetles and ½-inch hardware cloth for groundhogs. Pair these with frost blankets, and you’ll harvest spinach weeks after neighbors’ plots freeze.
Selecting the Perfect Site and Materials for Your Garden

Smart gardeners know success starts below the surface. Your growing area’s location and material choices form the foundation of every harvest. Let’s explore how to set up your plot for maximum defense and minimal headaches.
Assessing Local Pest Challenges
Start by playing detective in your yard. Track chew marks on leaves, soil tunnels, or frequent animal visitors. Chat with nearby growers about their battles – aphid swarms in spring or raccoon raids at night.
Check your property’s hot zones. Spaces near tree lines often host deer, while wet areas attract slugs. If you’re building raised beds, clear the ground first. Remove rocks and weeds to create a smooth base that helps water reach roots evenly.
Choosing Quality Hardware and Mesh Options
Not all barriers work equally. Galvanized hardware cloth lasts 5x longer than chicken wire against gnawing teeth. Use ½-inch grids to stop groundhogs, paired with ¼-inch mesh above ground for beetles.
Prioritize rust-resistant materials – they’ll handle rain and snow without flaking. For windy spots, pick heavier gauge steel. Your plants get fresh air without risking collapsed covers during storms.
Remember: Proper spacing matters more than thickness. Small gaps let air flow but keep destructive visitors out. Test materials by pressing a pencil through – if it fits, so can pests.
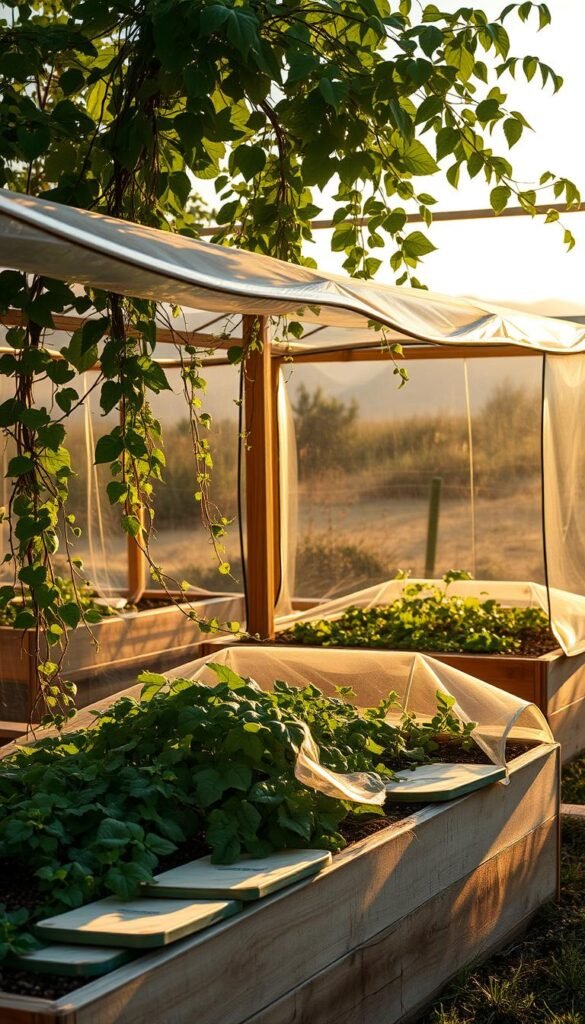
Enclosed Raised Garden Beds: Protection from Pests and Harsh Weather

Transform your growing space into a fortress with smart material combinations. The right barriers act like custom armor for your plants, adapting to local challenges while letting nature work its magic.
Incorporating Hardware Cloth and Mesh for Safety
Start by laying hardware cloth over landscape fabric before adding soil. This double-layer defense stops diggers like moles while improving drainage. Use U-shaped staples every 6 inches to secure edges tightly to bed frames.
Match mesh sizes to your pest profile:
| Mesh Type | Aperture Size | Best For |
|---|---|---|
| Fine Insect Screen | 1/16″ | Thrips, aphids |
| Standard Garden Mesh | 1/4″ | Beetles, birds |
| Heavy-Duty Wire | 1/2″ | Rabbits, groundhogs |
Understanding Cover Options for Different Climates
Your climate dictates your cover strategy. Desert gardeners use 30% shade cloth to cool plants and deter whiteflies. Northern growers rely on frost blankets that trap heat while blocking moths.
Compare popular cover types:
| Cover Type | Material | Ideal Climate |
|---|---|---|
| Bird Netting | Polyethylene | All regions |
| Shade Cloth | Woven polyester | Hot/dry areas |
| Frost Blanket | Non-woven poly | Cold/humid zones |
Rotate covers seasonally. Swap insect mesh for frost protection when temperatures drop, ensuring year-round defense without stifling plants.
Constructing a Robust Garden Bed Base and Frame
Strong gardens start from the ground up. Your plants’ success depends on what lies beneath their roots—a well-designed foundation prevents weeds, deters pests, and maintains ideal growing conditions.
Preparing the Foundation with Landscape Fabric and Cardboard
Begin with a three-layer defense system. First, lay landscape fabric across the entire bed base. This breathable barrier blocks weeds while letting water and air reach your soil. Overlap edges by 6 inches to eliminate gaps where invaders might sneak through.
Add hardware cloth above the fabric to stop burrowing animals. Finish with a cardboard layer that smothers remaining weeds and breaks down into organic matter. This approach works especially well when transitioning from traditional rows to structured growing spaces.
Attaching Your Materials Securely to the Bed
Wooden frames need heavy-duty staples every 4-6 inches along the fabric edges. For metal beds, tuck materials under the frame and pack soil around the perimeter. This creates a snug fit that resists wind and curious paws.
Check your work by gently tugging the fabric—if it stays put during a storm, you’ve nailed it. Proper installation means fewer fixes later, letting you focus on nurturing plants instead of repairing defenses.
Installing Top Frame and Covering for Ultimate Defense

Your garden’s final line of defense starts overhead. A well-built top structure lets you switch between protective layers as conditions change, keeping plants safe through every season.
Implementing Bird Netting and Shade Cloth Solutions
Build your frame using electrical conduit pipes and snap clamps. This creates a sturdy skeleton that holds covers taut. Space horizontal bars 18 inches apart—close enough to prevent sagging under heavy rain or wind.
Suspend bird netting 12 inches above your tallest plants. Secure edges with binder clips or bungee cords. This gap stops beaks from reaching through while letting you harvest easily. Pair with 40% shade cloth in summer to:
- Lower leaf surface temperatures by 15°F
- Block 90% of whiteflies and aphids
- Reduce water evaporation by 30%
Frost Covers and Their Role in Extending the Growing Season
Swap summer covers for frost blankets when nights dip below 50°F. These woven fabrics trap heat while letting 70% of light through. Drape them directly over plants or use hoops to create air pockets.
Quality frost covers add 4-6 weeks to your growing window. They’re perfect for extending the season for kale, carrots, and winter greens. Remove them on sunny days to prevent overheating, then reinstall at dusk.
Remember: Fold and store covers when not in use. Proper care ensures they’ll protect your plants for 3-5 seasons.
Enhancing Your Setup with Natural Repellents and DIY Modifications

Boost your garden’s defenses with nature’s own pest control. These clever additions work alongside physical barriers to create multiple layers of protection that confuse and deter invaders.
Using Garlic, Chili Sprays, and Marigolds
Your homemade pest spray starts with kitchen staples. Mix crushed garlic cloves, dried chili peppers, and water in a blender. Strain the liquid into a spray bottle, adding a drop of dish soap to help it stick. Apply this fiery mix around plant bases weekly to repel rabbits and crawling insects.
Marigolds serve as living bodyguards. Their strong scent masks vegetable odors, tricking pests into passing by. Plant them along bed edges in tight clusters for maximum effect. Bonus: Their bright blooms attract pollinators that help your crops thrive.
| Natural Repellent | Active Ingredient | Target Pests |
|---|---|---|
| Garlic Spray | Allicin | Aphids, rodents |
| Chili Solution | Capsaicin | Deer, squirrels |
| Marigolds | Pyrethrum | Nematodes, beetles |
Custom Frames and Adaptations for Specific Needs
Transform basic beds with simple DIY upgrades. Insert schedule-40 pipes into pre-drilled holes to create adjustable hoop frames. Drape floating row covers over these arches for instant frost protection or insect exclusion.
For climbing plants, extend frame height using electrical conduit. Add removable panels with hinged joints for easy harvesting. These tweaks let your growing space evolve with each season’s challenges.
“The best pest control systems combine physical barriers with nature’s own deterrents.”
Your creative solutions address unique challenges without compromising accessibility. Whether battling persistent insects or unexpected frosts, these modifications keep plants thriving through every growing phase.
Maintenance Strategies for a Thriving and Protected Garden
Keeping your plants healthy requires consistent care and smart adjustments. Regular checks help catch issues early, saving you time and preserving your harvests. Let’s explore how to maintain defenses while letting your greens flourish.
Seasonal Adjustments and Regular Inspections
Swap covers like you change jackets. Use lightweight mesh in spring for bugs, then switch to frost blankets when temperatures drop. Check barriers weekly for gaps—a pencil-sized hole lets in hungry rabbits.
Create a simple inspection routine:
- Test stake stability after heavy rains
- Refresh beer traps for slugs every 3 days
- Clear debris that might hide pests
| Season | Focus Area | Action Steps |
|---|---|---|
| Spring | Insect Prevention | Install fine mesh, refresh chili sprays |
| Summer | Sun Protection | Add shade cloth, increase watering |
| Fall | Leaf Management | Clear debris, check drainage |
| Winter | Frost Defense | Install row covers, mulch beds |
Long-Term Tips for Ensuring Optimal Garden Health
Mark your calendar for annual upgrades. Replace rusted hardware cloth every 3-5 years, and rotate cover types to prevent material fatigue. Keep a journal tracking pest patterns and successful deterrents.
Three keys to lasting success:
- Clean tools after each use to prevent disease spread
- Rotate crops annually to confuse soil-based pests
- Refresh mulch layers to maintain soil temperature
“A well-maintained barrier system lasts twice as long as neglected ones.”
For detailed bed care strategies, consult our essential guide to raised beds. Adjust access points as plants grow—wider aisles prevent damage when harvesting mature crops.
Wrapping Up Your Garden Strategy
Creating a thriving vegetable garden requires smart defense and adaptability. By combining physical barriers with natural repellents, you build layered protection that evolves with seasonal challenges. Quality materials like durable cloth covers and rust-resistant frames keep plants safer for years.
Your strategy shines when balancing sunlight access with pest control. Rotate row covers for frost protection in winter and shade cloth during summer heat spikes. Well-draining soil stays healthier when shielded from heavy rains, while proper spacing lets air circulate freely around plants.
Stay observant—adjust mesh sizes if new insects appear or swap fabric types when weather patterns shift. Track what works in a gardening journal to refine your approach each season. This flexibility ensures your garden bed adapts rather than struggles against nature’s surprises.
Investing time upfront pays off with fewer replants and bigger harvests. You’ll spend less energy battling pests and more moments savoring crisp beans or juicy tomatoes. With these strategies, your green space becomes a resilient haven where plants thrive on your terms.


