
Growing fresh vegetables shouldn’t feel like a battle with nature. If hungry visitors keep nibbling your hard work, you’re not alone. This guide shares practical ways to safeguard your plants while maintaining harmony with local wildlife.
Understanding animal habits is the first step to success. Creatures often explore areas that offer easy meals, but simple adjustments can make your space less inviting. You’ll learn how to create barriers that blend functionality with aesthetics, keeping your greens thriving.
No need for expensive contractors or complex setups. Many effective methods use materials you already own or can find locally. From temporary shields to permanent structures, options exist for every skill level and budget.
By combining smart design with nature-friendly practices, you’ll enjoy more abundant harvests without constant worry. Let’s explore how to build growing areas that stay productive while respecting the ecosystem around them.
Introduction: Why Protect Your Garden Raised Beds?

Your backyard oasis deserves to thrive without unwelcome guests. These elegant herbivores roam freely from coast to coast, treating tender greens like an open salad bar. Overnight, they can strip leaves, trample shoots, and leave your carefully nurtured crops in ruins.
Young broccoli, juicy berries, and crisp lettuce top their preferred menu. Even ornamental blooms aren’t safe. One midnight visit can undo weeks of watering, pruning, and soil preparation.
Three reasons to act now:
- Preserve your investment: Time and money poured into soil, seeds, and tools
- Prevent recurring losses: Repeat raids can destroy entire growing seasons
- Reduce stress: Constant replanting drains joy from gardening
Smart protection lets you harvest what you grow. Simple adjustments create boundaries that respect wildlife while safeguarding your hard work. With the right strategies, you’ll enjoy fresh produce instead of sharing it by default.
Every region faces this challenge. Whether you’re near wooded areas or suburban parks, proactive measures deliver better results. Start today to keep your vegetable garden productive and picturesque.
Understanding Deer Behavior and Its Impact on Your Garden

Knowing how these animals interact with their environment helps you create smarter defenses. Their feeding patterns and physical abilities often surprise new growers, but simple adjustments can turn your space into a less tempting target.
Common Deer Species in the United States
North America hosts several types that frequent residential areas. White-tailed varieties dominate eastern regions, while mule species roam western states. Both adapt quickly to suburban landscapes, often grazing near homes.
| Species | Jump Height | Active Seasons | Preferred Plants |
|---|---|---|---|
| White-tailed | 8-10 feet | Year-round | Hostas, roses, beans |
| Mule | 6-8 feet | Spring/Fall | Fruit trees, shrubs |
| Black-tailed | 5-7 feet | Summer/Winter | Berries, young saplings |
How Deer Damage Your Plants
These visitors don’t just nibble leaves – they strip bark, trample seedlings, and leave ragged cuts that invite disease. Mature bucks rub antlers on tree trunks, while herds compact soil through repeated visits.
Their feeding creates three main issues:
- Stunted growth from lost foliage
- Open wounds attracting pests
- Soil erosion near browsing areas
For effective deer deterrent methods, focus on solutions that address both their physical capabilities and feeding habits. Trim nearby brush to eliminate hiding spots, and rotate protective measures to prevent adaptation.
Essential Materials and Tools for Building Raised Beds
Smart planning and proper tools make bed construction efficient and effective. Start by gathering a detailed list of items to avoid mid-project delays. Quality materials ensure your structure withstands weather and curious visitors for years.
For the frame, six 4″x4″x8′ wood posts create a sturdy base. Pair them with nine 5/4″x6″x8′ decking boards for walls. Cedar resists rot naturally, though its higher price might stretch your budget. Pressure-treated lumber offers a money-saving alternative.
Hardware matters as much as wood. Stock up on 3″, 2″, and 1 1/4″ decking screws for layered connections. T50 staples secure netting tightly, while gate latches and hinges keep access points secure. Garden netting should stretch 25 feet long and stand 4 feet tall—metal options last longer but cost more than plastic.
Your tool arsenal needs precision and power:
- Circular saw for straight cuts
- Power drill with multiple bits
- Clamps to hold pieces steady
- Tape measure for accurate spacing
Don’t skimp on safety glasses or a carpenter’s square. These products prevent errors and injuries. With every item checked off your list, you’ll build faster and smarter.
Step-by-Step Guide for Assembling Your Raised Garden Bed

Building your own growing space combines practicality with creative problem-solving. With organized steps and attention to detail, you’ll create a sturdy structure that withstands seasons of use. Let’s break down the process into manageable phases.
Preparing Your Materials and Work Area
Clear a garage floor or similar flat surface for assembly. Lay out your cut pieces: six 4″x4″x5′ posts, decking boards in 8′ and 3′ lengths, and 1″x4″ support strips. Group identical components together to simplify construction.
Make sure your workspace allows flipping the frame during assembly. Leave three feet of clearance on all sides. Gather tools like clamps, a power drill, and carpenter’s square within easy reach.
Cutting and Building the Framework
Start with the short sides. Position two 4×4 posts parallel, three feet apart. Connect them using 5/4″x6″ decking boards, spacing screws evenly. Repeat for the second short side.
Attach longer decking boards to form the bed’s length. Pre-drill holes to prevent wood splitting, especially with hardwoods. Check each joint for squareness using your carpenter’s square before tightening screws completely.
This methodical approach ensures professional results. Your finished frame will provide reliable protection while blending seamlessly into outdoor spaces.
Building the Framework: Tips and Techniques for Durability

Constructing a sturdy base sets the stage for long-lasting garden protection. Start by lining up two 4×4 posts parallel to each other, keeping them exactly three feet apart. This spacing creates optimal stability for your frame while accommodating standard planting widths.
Secure three 3-foot decking boards across the bottom using 3″ screws. Place a 1×4 board along the top edge to lock the structure into shape. Always make sure components stay square with a carpenter’s square – even slight angles weaken joints over time.
Follow this essential checklist:
- Pre-drill holes to prevent wood splitting
- Use two screws per connection point
- Match screw lengths to material thickness
| Step | Screw Length | Material Thickness | Purpose |
|---|---|---|---|
| 1 | 3 inches | 5/4″ decking | Bottom board attachment |
| 2 | 2 inches | 1×4 lumber | Top reinforcement |
| 3 | 1 1/4 inches | Trim pieces | Decorative finishes |
This method ensures your product withstands weather changes and soil pressure. Rushing through this step often leads to wobbly frames – patience here saves repair work later. Properly built structures require minimal maintenance while delivering years of reliable service.
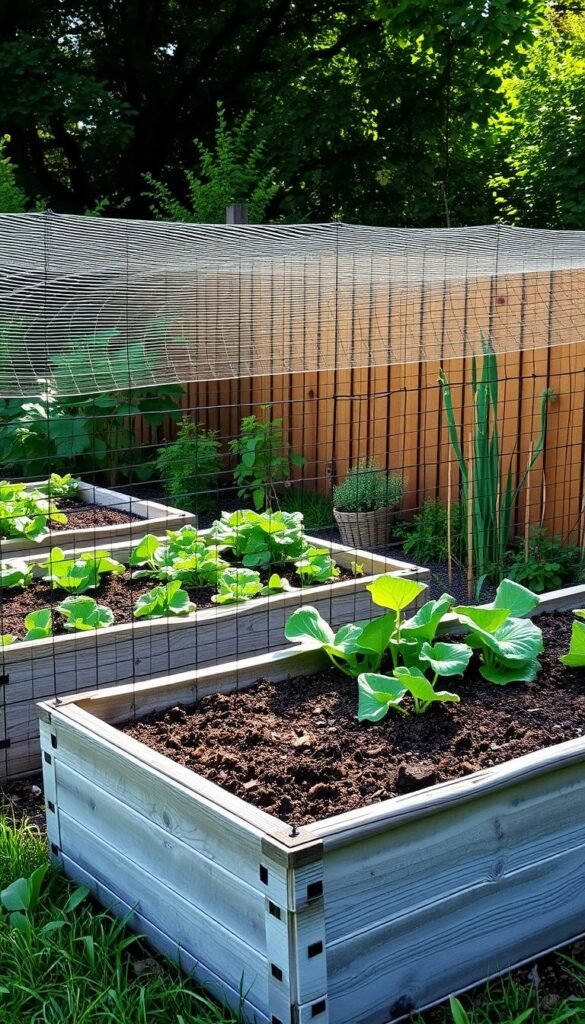
Securing Your Raised Beds with Mesh Covers and Netting

Protecting your plants doesn’t require complex systems—sometimes the right barrier makes all the difference. Flexible yet sturdy materials create invisible shields that let sunlight and rain through while keeping hungry visitors out.
Choosing the Right Garden Netting
Pick materials based on your climate and budget. Plastic netting works well for temporary setups, while galvanized metal options withstand harsh weather for years. Consider these factors:
- Grid size: 1” openings block small pests, 2-3” spaces deter larger ones
- Color: Green blends with foliage, metallic reflects light to confuse animals
- Durability: UV-resistant coatings prevent sun damage
| Type | Lifespan | Best For |
|---|---|---|
| Polyethylene | 2-3 years | Seasonal use |
| Steel mesh | 5+ years | Permanent installations |
Proper Installation Techniques
Grab a partner and staple gun for this teamwork project. Stretch the material tightly between posts to eliminate sagging spots. Overlap sections by 6 inches at seams for full coverage.
Anchor the bottom edge with landscape pins or bury it 3” deep. This stops clever critters from lifting the barrier. Check tension weekly—weather changes can loosen products over time.
Deer Proof Garden Raised Beds: Mesh Covers, Fences, and Other Solutions
Smart growers know the best defense combines multiple strategies. Imagine your plants shielded by overlapping systems that work day and night. Start with lightweight netting stretched over hoops – it lets rain through but blocks curious nibblers.
Pair this with a fence that serves dual purposes. Use it to support climbing vegetables while creating a visual boundary. For extra security, angle the top outward to discourage jumping. This approach keeps your raised garden accessible for watering yet uninviting to visitors.
Consider these three elements for success:
- Height adjustments for seasonal plant growth
- Quick-release fasteners for easy harvesting
- Ground anchors to prevent digging under barriers
| Barrier Type | Lifespan | Maintenance | Best Paired With |
|---|---|---|---|
| Polyethylene netting | 2-3 seasons | Monthly tension checks | Motion-activated lights |
| Metal mesh panels | 5+ years | Annual rust treatment | Perimeter fencing |
| Floating row covers | 1 season | Biweekly inspections | Scent deterrents |
Rotate your protection methods every few months. Animals adapt quickly, but changing tactics keeps them guessing. Combine physical barriers with occasional noise makers for maximum effect.
Your garden bed deserves this level of care. With thoughtful planning, you’ll create a thriving space that respects nature’s balance while protecting your harvest.
Designing Effective Fences and Gate Mechanisms
A well-built entrance point makes daily access effortless while keeping wildlife at bay. Start by crafting gates slightly wider than tall – this proportion resists warping and supports added weight from protective netting. Precision measurements here prevent frustrating adjustments later.
Constructing Strong, Durable Gates
Cut two 41-inch and two 39-inch 1×4 boards to form a square frame. Connect them with 2-inch screws at each corner, checking for perfect 90-degree angles. Reinforce the structure with diagonal braces arranged in an X pattern – this simple step triples durability against sagging.
Attaching Hinges, Latches, and Supports
Mount heavy-duty hinges to vertical posts using rust-resistant screws. Position them 6 inches from the top and bottom edges for balanced movement. For smooth operation:
| Component | Purpose | Installation Tip |
|---|---|---|
| Adjustable latch | Prevents accidental openings | Align with center post |
| Gate stop | Reduces hinge strain | Place 1″ behind closed position |
| Shims | Ensures even gaps | Use during post mounting |
Test the gate’s swing before final tightening. A properly aligned system moves silently and closes securely – crucial for consistent protection. Apply weatherproof sealant to wooden parts annually to maintain your fence’s integrity through seasons.
Integrating Natural Barriers and Deer Repellent Plants
Blending beauty with practicality creates landscapes that naturally discourage unwanted visitors. Strategic planting choices offer year-round protection while enhancing your yard’s visual appeal. Let’s explore how to use nature’s own defenses to safeguard your greens.
Planting Thorny Shrubs for Natural Defense
Sharp-leaved bushes serve as living fences. Forsythia’s dense branches form impenetrable barriers, while juniper’s prickly foliage deters curious noses. Blackberry brambles double as productive borders – their sweet berries reward you as their thorns protect nearby plants.
Using Scent-Based Repellents in Your Garden
Strong aromas confuse foraging animals. Lavender and rosemary release oils that mask the smell of vulnerable crops. For extra protection, crush thyme leaves or rub garden sage along bed edges to refresh their potent fragrance.
Pair these natural solutions with low-maintenance flowers like yarrow or moss phlox. These hardy blooms resist nibbling while stabilizing soil. Together, they create layered defenses that keep your space productive and picturesque.


