
Does your yard have uneven ground that feels impossible to cultivate? Sloped spaces can become your greatest gardening asset with the right approach. By transforming tricky hillsides into productive growing areas, you’ll unlock fresh potential in land that once seemed unusable.
Terracing steep areas creates flat planting zones that prevent soil erosion and improve water management. This method lets you grow vegetables, herbs, and flowers where traditional gardening fails. You’ll gain precise control over soil quality while making maintenance easier—no more awkward bending or sliding tools on inclines.
Many gardeners find sloped landscapes actually boost plant health through natural drainage and sun exposure variations. These microclimates let you grow diverse crops in one space. With smart planning and standard materials like 2×12 lumber, you can build sturdy planting areas that last for seasons.
This guide will show you how to create efficient growing spaces on hills without complex engineering. You’ll learn practical techniques for managing water flow, maximizing sunlight, and choosing plants that thrive in elevated conditions. Let’s turn that challenging slope into your most productive garden area yet.
Understanding Your Sloped Landscape

Working with sloped ground offers unique gardening opportunities when approached strategically. Start by evaluating your ground composition and how water moves across the area. This knowledge helps create stable planting zones that work with nature rather than against it.
Assessing the Grade and Soil Conditions
Measure your slope’s steepness using a 4-foot level and wooden stakes. Steep slopes (over 30 degrees) often need reinforced walls – concrete structures work best here, built 24-28″ thick with double-layer construction. For gentler inclines, simple timber frames usually suffice.
Test your soil by digging 12″ deep samples. Squeeze handfuls to check drainage:
- Sandy soil crumbles quickly
- Clay forms dense balls
- Loam holds shape briefly then breaks apart
| Slope Type | Wall Thickness | Soil Movement | Best Use |
|---|---|---|---|
| Steep (>30°) | 24-28 inches | High | Concrete retaining walls |
| Shallow ( | 6-8 inches | Low | Timber raised beds |
Identifying Natural Drainage Patterns
Watch how rainwater flows during storms. Look for:
- Worn paths where water collects
- Bare patches indicating erosion
- Moss growth showing damp zones
Redirect problematic runoff using swales or French drains. Position raised beds across the slope’s contour to slow water movement and keep nutrients in place. This level approach prevents topsoil loss while feeding plant roots.
Planning and Designing a Level Gardening Space

Transforming sloped land into functional growing zones starts with smart spatial organization. Begin by identifying flat areas or gradual inclines where you can establish stable planting zones. Focus on spots that balance practicality with plant needs.
Choosing the Right Location
Prioritize areas receiving 5-7 hours of daily sunlight. Watch how shadows move across your yard throughout the day. Ideal spots often sit:
- South-facing for maximum sun exposure
- Near water sources for easy irrigation
- Accessible from multiple sides for maintenance
Leave room for future expansion—a gently sloped grassy area works best. Test drainage by pouring water on potential sites. Soil that absorbs moisture within 10 minutes prevents root rot.
Sketching Your Garden Layout
Use string lines and stakes to map bed placements. Align planting areas with existing structures like fences or pathways. This creates visual harmony and simplifies measurements.
| Bed Size | Accessibility | Material Cost |
|---|---|---|
| 4×6 ft | Easy reach from all sides | $45-$65 |
| 4×8 ft | Requires stepping stones | $60-$85 |
Design 3-foot-wide pathways between beds for wheelbarrow access. Follow natural contours to reduce excavation. Sketch multiple layout options before finalizing—this prevents costly changes during construction.
Raised Garden Beds on a Slope: Terrace Solutions for Challenging Terrain

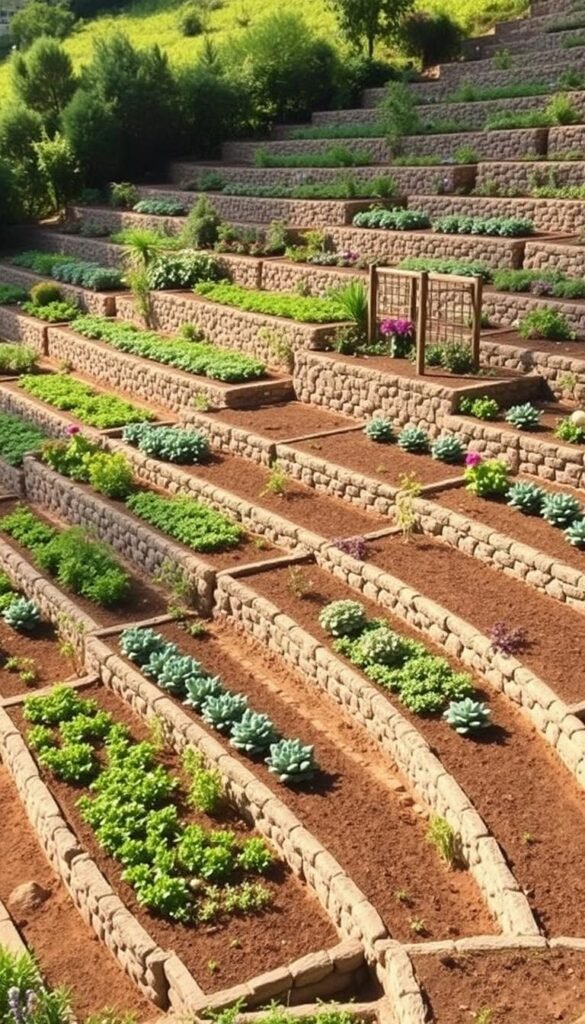
Transforming steep landscapes into lush gardens requires smart elevation management. Terraced designs turn problematic inclines into organized planting zones. By combining level ground creation with vertical stacking, you create ideal conditions for diverse crops.
- Cut-step systems carved directly into hillsides
- Modular raised platforms using interlocking frames
- Retained earth systems with integrated drainage
Material choice makes or breaks your construction. Consider these options:
| Material | Best For | Cost | Durability |
|---|---|---|---|
| Timber | Gentle bed slopes | $ | 5-8 years |
| Stone | Natural aesthetics | $$$ | 20+ years |
| Concrete Blocks | Steep raised bed slopes | $$ | 15 years |
| Steel | Modern designs | $$$$ | 25+ years |
Proper terracing stops 80% of soil loss compared to untreated slopes. Each level ground section acts as a water catchment, reducing irrigation needs. You’ll gain distinct growing zones—sun-loving plants up top, shade-tolerant varieties below.
Smart designs balance practicality with visual appeal. Curved edges soften angular layouts, while mixed materials add texture. Remember: your construction should enhance the land’s natural flow, not fight against it.
Step-by-Step Construction and Material Selection
Ready to tackle your slope transformation? Smart preparation separates successful projects from frustrating ones. Let’s break down what you’ll need to create sturdy, long-lasting planting areas.
Gathering Tools and Supplies
Start with these essentials:
- Measuring tools: Tape measure, 2-foot level, string line
- Earth movers: Square spade, round point shovel, wheelbarrow
- Woodworking gear: Circular saw, cordless drill, sawhorses
Don’t skimp on safety – gloves, goggles, and steel-toe boots prevent accidents. A mallet helps seat boards snugly, while combination squares ensure perfect 90-degree angles.
Selecting Lumber, Soil, and Other Materials
Choose wood wisely for outdoor use:
| Material | Cost | Lifespan |
|---|---|---|
| Cedar | $$$ | 12-15 years |
| Pressure-Treated Pine | $$ | 7-10 years |
| Composite | $$$$ | 25+ years |
For soil, mix 60% topsoil with 40% compost. You’ll need about 1.5 cubic yards per 4×8-foot bed. Order 10% extra to account for settling. Use galvanized screws – they resist rust better than standard options.
Pro tip: Buy 15% more boards than your plans require. This lets you select the straightest pieces and account for cutting errors. Local lumber yards often offer better quality than big-box stores for similar prices.
Leveling Techniques and Retaining Wall Options

Proper foundation work ensures your planting zones stay even and productive for years. Start by clearing debris and marking boundaries with stakes every 3 feet. This creates visual guides for maintaining straight edges and uniform depth.
Using Gravel and Leveling Sand for a Solid Base
Dig 4-6 inches below your planned bed height. Spread crushed gravel evenly, then top with 1 inch of coarse sand. Compact layers with a hand tamper until firm – this prevents shifting over time.
Check level across all sides using a 4-foot carpenter’s tool. Adjust low spots by adding sand under corners. Secure 2×4 stakes at each corner, driving them 10″ deep for stability. These anchors keep frames square during soil filling.
Comparing Wood, Concrete, and Steel Methods
Material choice impacts durability and maintenance needs. Consider your slope’s steepness and local weather patterns when selecting:
| Material | Best Use | Installation Ease | Lifespan |
|---|---|---|---|
| Wood | Gentle slopes | Moderate | 5-8 years |
| Concrete | Steep grades | Complex | 15+ years |
| Steel | Multi-directional slopes | Easy | 20+ years |
Galvanized steel systems snap together but limit customization. Wood allows creative shapes – perfect for square-foot garden layouts. Always seal wooden corners with waterproof adhesive to prevent rot.
For complex slopes, combine methods. Use concrete footings under steel frames where ground shifts occur. Check levels weekly during first-month settling – adjust blocks as needed under low corners.
Enhancing Functionality and Longevity in Your Garden

Your sloped garden can become more productive each season with smart care. Focus on systems that work with your landscape’s natural features while protecting your hard work. Let’s explore ways to keep your plants thriving and structures stable for years.
Integrating Smart Watering and Planting Strategies
Drip irrigation outperforms sprinklers on slopes—it delivers water directly to roots without washing away soil. Pair it with moisture sensors to prevent overwatering. For vegetables needing consistent hydration, position them mid-slope where water naturally collects.
Boost poor drainage with a 3:1 mix of compost and peat moss. One gardener transformed clay soil in two years by adding 6 inches of this blend annually. “The difference in tomato yields was night and day,” they reported.
Maintaining Stability and Long-Term Upkeep
Inspect bed supports each spring. Look for:
- Wood rot at ground contact points
- Shifting gravel bases
- Clogged drainage channels
Refresh soil nutrients every 6-8 weeks during growing seasons. For warm climates, consider square-foot gardening techniques to maximize space. Install 4-foot-wide pathways between beds for easy access—wide enough for wheelbarrows but narrow enough to prevent erosion.
| Task | Frequency | Tools Needed |
|---|---|---|
| Soil Testing | Yearly | pH meter |
| Wall Inspection | Spring/Fall | Level, mallet |
| Mulch Refresh | Seasonal | Wheelbarrow |
Add windbreaks using tall crops like corn or sunflowers. They protect delicate plants while creating microclimates. With these strategies, your garden beds will yield better harvests while requiring less corrective work over time.
Wrapping Up Your Terrace Garden Build
You’ve reached the finish line of your slope transformation! Secure your raised bed walls by adding cross-spanners every 4 feet. Use aluminum bars buried 3 inches below the soil surface—they’ll prevent outward bowing while staying hidden from view.
Fill your beds with a 50/50 mix of topsoil and compost. Rake it level with the top boards, then water thoroughly to test drainage. Expect some settling—this creates space for mulch additions next season.
Trim stakes flush with your bed tops for clean lines. Start planting with shallow-rooted greens like lettuce or herbs near the edges. Save deeper areas for tomatoes or peppers where roots need more room.
Snap photos of your setup before planting—they’ll help track changes over time. Set calendar reminders to check wall supports each spring and refresh soil nutrients every 6 weeks during growing months.
Your once-tricky slope now offers perfect drainage and sun exposure. Enjoy easier harvesting and healthier plants thanks to smart elevation. This project doesn’t just grow vegetables—it grows confidence in tackling any landscape challenge!


