
If bending over or kneeling in the dirt leaves you sore, there’s a better way to enjoy growing fresh herbs and vegetables. Elevated gardening setups let you tend to your greens without straining your back or knees, offering a practical solution for anyone with mobility concerns. Whether you’re managing a small patio space or a larger backyard, these systems adapt to your needs.
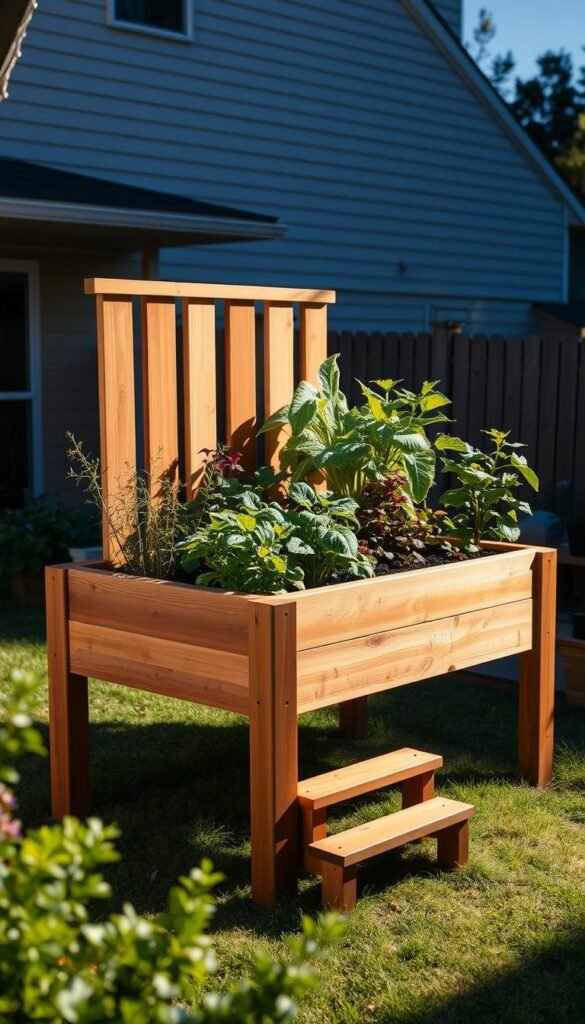
Standard designs often sit 12–18 inches high, but many gardeners now prefer frames reaching 24–36 inches. This extra height means less bending and easier access for wheelchair users. You’ll find options tailored to your height, too—shorter frames work well for petite gardeners, while taller builds accommodate those over six feet.
What makes these setups stand out? They combine practicality with long-term comfort. A well-built structure lasts years, and how to build a raised bed properly ensures ideal soil depth for healthy roots. Many who start with basic designs later upgrade to taller versions after experiencing the ease of watering, weeding, and harvesting at waist level.
Beyond comfort, elevated growing spaces simplify pest control and improve drainage. You’ll spend less time battling weeds and more time enjoying your thriving plants. It’s no wonder this approach has become a favorite among both new and seasoned gardeners seeking a pain-free way to connect with nature.
Introduction to Raised Garden Beds

For gardeners tired of battling poor soil, raised beds offer a fresh start with customizable growing conditions. These structures let you bypass compacted clay, rocky earth, or nutrient-deficient dirt by creating a tailored environment for your greens. With complete control over soil composition, you can mix in compost, peat moss, or perlite to match your plants’ exact needs.
One major perk? Superior drainage. Unlike traditional plots, elevated setups prevent water from pooling around roots—a common issue in heavy clay soils. Your vegetables and herbs get consistent moisture without drowning, reducing the risk of root rot.
Another advantage lies in weed management. The contained space minimizes invasive grasses, letting you focus on nurturing your crops. Beginners love this method because quality bagged soil means instant planting—no waiting to amend poor ground.
Want even better results? Adjust fertilizer blends or pH levels precisely as seasons change. This flexibility leads to healthier plants and bigger harvests, whether you’re growing tomatoes or basil. It’s why many start with one bed and expand their setup year after year.
Planning Your DIY Raised Garden Bed

A successful growing setup starts with smart placement and sizing. Before grabbing your tools, take time to map out where your plants will thrive and how you’ll maintain them comfortably.
Assessing Your Garden Space and Sunlight
Walk through your yard at different times to note sunlight patterns. Most vegetables and herbs need 6-8 hours of direct sunlight daily. Avoid shaded spots near trees or buildings—these work better for shade-loving greens like spinach.
Check the ground slope and drainage. Flat areas prevent water runoff, while slightly elevated spots reduce soggy soil risks. Leave enough room between structures for easy access—about 2 feet of walking space around the bed.
Determining the Ideal Bed Dimensions
Measure your available area and consider arm reach. A 4-foot width lets you tend to plants from both sides without stepping into the soil. Depth matters too: 6-12 inches suits shallow-rooted greens, while tomatoes need 18+ inches.
Height impacts comfort. While 6 inches works for starters, 24-30 inches eliminates bending for many gardeners. Match the size to your crops—compact herbs need less space than sprawling squash vines.
Remember: Smaller beds simplify maintenance, while larger ones boost harvests. Start modestly, then expand as you learn what fits your routine and space.
Designing for Accessibility and Comfort

Creating a garden that works with your body starts with smart design choices. The right setup lets you nurture plants without sacrificing comfort, whether you’re dealing with stiff joints or limited mobility. Focus on two key factors: ergonomic support and personalized dimensions.
Ergonomic Considerations for Back and Knee Relief
A 12-inch bed reduces bending by half compared to ground-level gardening. But if you want to stand while planting or pruning, aim for 24–30 inches—this puts soil level near your hips. Your spine stays neutral, and knees avoid repetitive stress.
For seated gardeners, 36-inch frames let you roll right up to the edge. Pair this with narrow widths (3–4 feet) so tools and plants stay within easy reach. Test different heights using temporary stacks of bricks or boards before committing.
Customizing Bed Height for Your Needs
Measure from the floor to your wrist when standing relaxed—this spot is ideal for hand-intensive tasks. Most find 15–18 inches works for light weeding, while deeper-rooted crops need 24+ inches. Need flexibility? Building raised beds with modular tiers allows adjustments as your needs change.
Remember: Higher beds require more soil but pay off in long-term comfort. Start with one section at your ideal height, then expand as you discover what feels best for your back and routine.
Choosing the Right Materials and Tools

Quality materials and the right tools make all the difference in constructing a long-lasting gardening setup. Let’s break down what you’ll need to create a structure that withstands weather changes and supports healthy plant growth for years.
Essential Tools for Construction
Start with these must-have items for building success:
- Cutting tools: A compound miter saw ensures precise angles, while a circular saw handles straight cuts
- Fastening gear: Drill/driver combos secure screws faster than manual tools
- Measuring essentials: Tape measures and rafter squares keep your frame level and square
- Soil prep helpers: Shovels, spading forks, and garden rakes simplify ground preparation
Don’t forget safety glasses and gloves—splinters and metal filings are no joke!
Material Options: Wood, Metal, and More
Wood remains the top choice for its natural look and affordability. Cedar and redwood resist rot naturally but cost more. Pine, fir, or hemlock offer budget-friendly options but need replacement sooner.
Modern pressure-treated lumber uses EPA-approved copper compounds instead of arsenic. Research shows these treatments pose minimal risk to edible plants when properly sealed.
Alternative materials bring unique benefits:
- Metal kits: Galvanized steel lasts decades and resists warping
- Composite boards: Recycled plastic-wood blends require zero maintenance
- Concrete blocks: Ideal for permanent installations in windy areas
Choose based on your budget, climate, and whether you’re growing flowers or food crops.
Building Your Raised Garden Bed: A Step-by-Step Guide

Ready to roll up your sleeves? Constructing your own planter box combines practical benefits with DIY satisfaction. Let’s break down the process into manageable stages, ensuring your project stays on track from start to finish.
Site Preparation and Layout
Clear the ground where your structure will sit. Remove grass and weeds using a shovel or sod cutter, creating a 6-inch buffer around the planned area. This prevents invasive roots from creeping into your bed later.
Mark corners with stakes and string, then check for levelness. If the ground slopes, dig shallow trenches to stabilize the frame. For a 4×6-foot setup, leave 2 feet of walking space on all sides.
Assembling the Frame Carefully
Cut lumber to size using a miter saw—six 6-foot boards for length and six 3’9” pieces for width. Pre-drill holes to prevent splitting, then secure corners with 3-inch galvanized screws. Double-check diagonal measurements to ensure square corners.
Attach 10.5-inch support posts every 2 feet along the inner walls. This reinforcement prevents bowing when filled with soil. Need visual guidance? Our step-by-step raised bed construction guide shows proper techniques.
| Tools | Materials | Purpose |
|---|---|---|
| Miter Saw | Cedar Boards | Precise cuts |
| Drill/Driver | Galvanized Screws | Secure joints |
| Level | Landscape Fabric | Weed barrier |
| Shovel | Soil Mix | Foundation |
Position the completed frame over prepared ground, adding landscape fabric to block weeds. Enlist help for this step—larger structures become heavy once assembled. For creative space-saving ideas, explore vertical gardening solutions that complement your new setup.
Optimizing Bed Height for Easier Plant Care
Adjusting your growing setup’s elevation can transform how you interact with your green space. While depth matters for root development, vertical positioning affects everything from pest control to your physical comfort. Let’s explore how choosing the right elevation creates a smoother gardening experience.
Why Elevation Makes a Difference
Higher setups create a natural barrier against weeds. Most invasive grasses struggle to climb through 12+ inches of fresh soil. You’ll spend less time pulling unwanted sprouts and more time nurturing your crops.
Small animals like rabbits face tougher access to elevated harvests. A 24-inch frame puts lettuce and strawberries safely out of reach. This built-in protection reduces the need for fences or netting.
Tasks like pruning become effortless when soil sits near hip level. No more crouching to inspect leaves or harvest tomatoes. Your joints will thank you after long sessions tending your greens.
But there’s a trade-off: deeper structures require more soil. A 36-inch frame needs triple the dirt of a 12-inch version. You’ll also lose touch with native earth nutrients that shallow-rooted plants typically access.
| Height | Pros | Cons |
|---|---|---|
| 12″ | Less soil needed | More bending required |
| 24″ | Comfortable standing work | Moderate soil cost |
| 36″ | Wheelchair accessible | High soil volume |
Match your structure’s elevation to your primary crops. Deep-rooted veggies like carrots thrive in taller setups, while herbs do well in shallower ones. Test different heights with temporary containers before building permanent frames.
Selecting Soil, Irrigation, and Fertilization Options
The foundation of a thriving garden lies beneath the surface—your soil and water systems. Get these elements right, and you’ll see stronger growth, better yields, and fewer headaches throughout the season.
Building the Perfect Soil Mix
Start with a 50/50 blend of bagged raised bed soil and compost. Premium mixes often contain perlite for drainage and worm castings for nutrients. Avoid separating your added soil from the native soil below—roots will naturally reach downward for extra minerals and moisture.
Calculate your needs using this simple formula:
- Length × Width × Depth (in feet) ÷ 27 = Cubic yards needed
For small spaces, consider low-maintenance flowers that thrive in shallow soil. Always test pH levels—most vegetables prefer 6.0–7.0.
Smart Watering Solutions
Drip irrigation outperforms sprinklers by delivering water directly to roots. The Garden in Minutes Grid system lets you customize layouts with snap-together tubing. Install lines before planting to avoid damaging established crops.
| Method | Water Efficiency | Installation Ease |
|---|---|---|
| Drip Tape | 90% | Moderate |
| Soaker Hose | 85% | Easy |
| Hand Watering | 60% | Simple |
Add a timer to maintain consistent moisture levels. Morning watering reduces evaporation and prevents fungal issues.
Enhancing Functionality with Fill Techniques
Getting the most from your growing space starts with smart filling strategies. New setups often lose 15-30% of their depth as materials compact over time. Planning for this natural process ensures your greens always have room to thrive.
Strategies for Filling and Topping Off
Start by placing coarse materials like branches or corn stalks at the bottom. These create air pockets while reducing soil needs by up to 40%. Add a 2-inch layer of shredded leaves next—they’ll break down into nutrients while preventing sudden level drops.
Always fill your bed to the brim initially. Fresh soil settles dramatically, especially after watering. Leaving 1-2 inches empty might leave plants shaded as the surface sinks below the frame edges.
| Material | Cost | Decomposition Time | Best Use |
|---|---|---|---|
| Sticks | Free | 2-3 years | Deep beds |
| Shredded Leaves | Free | 6 months | Medium layers |
| Compost | $$ | Immediate | Top 6 inches |
| Straw | $ | 1 year | Winter prep |
Refresh your setup each spring with a 1-inch compost layer. This replaces lost nutrients and maintains the soil level. Pair this with fall top-offs using aged manure or leaf mold for year-round productivity.
Need help creating the perfect foundation? Our soil preparation guide shows how to balance drainage and fertility from the ground up. Remember: proper layering today means fewer surprises tomorrow!
Managing Weeds, Critters, and Plant Spacing
Maintaining a thriving growing space involves more than just soil and sunlight—it’s about smart defense strategies. Elevated setups naturally reduce common gardening headaches, but a few extra steps will keep your greens flourishing all season.
Smart Weed Defense Tactics
Start by lining the beds with wide-mesh hardware cloth. This blocks invasive roots while letting earthworms aerate the soil. You’ll spend less time pulling unwanted sprouts and more time enjoying your harvests.
Forget strict row spacing rules. Arrange plants closer together since you can access all sides easily. Leave enough room for mature growth—tomatoes need 18 inches, while lettuce thrives at 6-inch intervals.
Strategic layouts prevent overcrowding. Place taller crops like beans on the north side to avoid shading shorter herbs. Rotate plants yearly to maintain soil health and confuse pests.
Healthy spacing reduces disease risks and deters critters. Pair these methods with regular soil checks, and your setup becomes a low-maintenance oasis. Fewer weeds mean happier roots and bigger yields!


