
Imagine crafting a tiny, self-contained universe that brings fantasy to life. With a glass container and everyday materials, you can design a captivating ecosystem that thrives with minimal effort. This whimsical blend of nature and creativity transforms any space into a pocket of wonder.
The magic lies in combining practical DIY techniques with artistic flair. You’ll learn to build a sealed environment that protects delicate elements while maintaining its charm. Whether placed on a shelf or patio, your creation becomes a focal point that sparks joy and curiosity.
Proper sealing methods ensure longevity, shielding your miniature landscape from dust and humidity. Customize themes, textures, and tiny accents to reflect your style—no two designs are alike. The process balances simplicity with innovation, making it ideal for crafters of all skill levels.
By the end, you’ll master waterproofing and airtight closures that keep your project vibrant. This hands-on endeavor not only beautifies your home but also offers a relaxing escape into imagination. Ready to start? Let’s bring that enchanted vision to life.
Gathering Supplies and Setting Up Your Workspace

Your journey begins by collecting essential tools and materials. Hunt for clear glass pieces at thrift stores or garage sales—mixing bowls, salad plates, or fish tanks work best. Look for shapes that stack easily to form layered designs. Mismatched sizes often create unexpected charm, so embrace unique combinations.
Choosing the Right Glass and Containers
Prioritize transparent glass with smooth edges for easy assembly. A large bowl makes an ideal base, while smaller plates add height. Test how pieces nest together before purchasing. Avoid cloudy or scratched items—they’ll obscure your finished project’s details.
Assembling Your Materials: Moss, Pebbles, and More
Gather preserved moss for texture and colorful pebbles for drainage. Use GE silicone sealant instead of basic glue—it withstands humidity without yellowing. Keep safety gloves and paper towels nearby when applying adhesives. Store delicate figurines in a separate box until placement.
Set up outdoors or near an open window for ventilation. Spread newspaper over your work surface to catch spills. Organize everything within reach to maintain creative flow as you build.
Planning Your Enchanted Miniature Garden

Crafting a miniature world requires both creativity and strategy. Before reaching for adhesives, lay out all elements to test their harmony. This dry-run phase helps spot overcrowding and ensures each piece contributes to your story.
Sketching Your Design and Layout
Start with rough sketches to map focal points. Place taller structures toward the back to maintain visibility of smaller details. Leave breathing room between components—this prevents visual clutter and supports air circulation.
Consider vertical layers for depth. A winding pebble path or tiny bench can guide the eye through the scene. Use temporary props like cotton balls to simulate plant placement before finalizing.
Considering Moisture, Drainage, and Airflow
Your foundation determines long-term success. Follow this guide for optimal layering:
| Layer | Material | Purpose |
|---|---|---|
| Base | Pebbles | Prevents waterlogging |
| Middle | Activated charcoal | Filters odors |
| Top | Volcano-shaped soil | Encourages root growth |
This setup works similarly to patio container gardening, where drainage is key. Slope soil away from glass edges to manage condensation. Leave gaps between decorative rocks for moisture evaporation.
Fairy Garden Terrarium: Sealing a Little Enchanted Realm Under Glass

A single gap can turn your creation into a foggy mess. Proper closure techniques make the difference between a thriving display and a failed experiment. Let’s explore how to lock in magic while keeping problems out.
Why Impermeable Barriers Matter
Your glass structure needs complete protection. Even pin-sized openings let water vapor sneak in, creating condensation that clouds views. Over time, trapped moisture encourages mold growth beneath decorative elements.
Quality silicone acts like an invisible shield. It expands and contracts with temperature changes without cracking. This flexibility prevents air leaks that could dry out plants or distort tiny accessories.
Mastering Adhesive Application
Start by cleaning glass edges with rubbing alcohol. Cut the silicone tube nozzle at a 45° angle for better control. Apply continuous beads—thick enough to squeeze slightly when pressed.
Work in sections of 6-8 inches. You’ve got about 10 minutes to adjust pieces before the sealant sets. Press layers together firmly, wiping excess with a damp cloth. Let joints cure for 30 minutes before moving.
Pro tip: Test your seal by lightly misting edges after curing. Bubbles mean trouble spots need resealing. Address leaks immediately for lasting results.
Step-by-Step Assembly and Decoration

Building your miniature ecosystem feels like conducting a symphony—every element must work in harmony. Start by preparing your workspace with all components laid out. This organized approach lets you focus on crafting a balanced layout that breathes life into your vision.
Arranging the Base with Pebbles and Soil
Pour pebbles into your container until they form a 1-inch layer. This foundation mimics the drainage systems used in compact patio designs, preventing root rot. Mix potting soil with water until it clumps lightly—add sand for better airflow. Scoop this blend over the stones, leaving space for decorative elements.
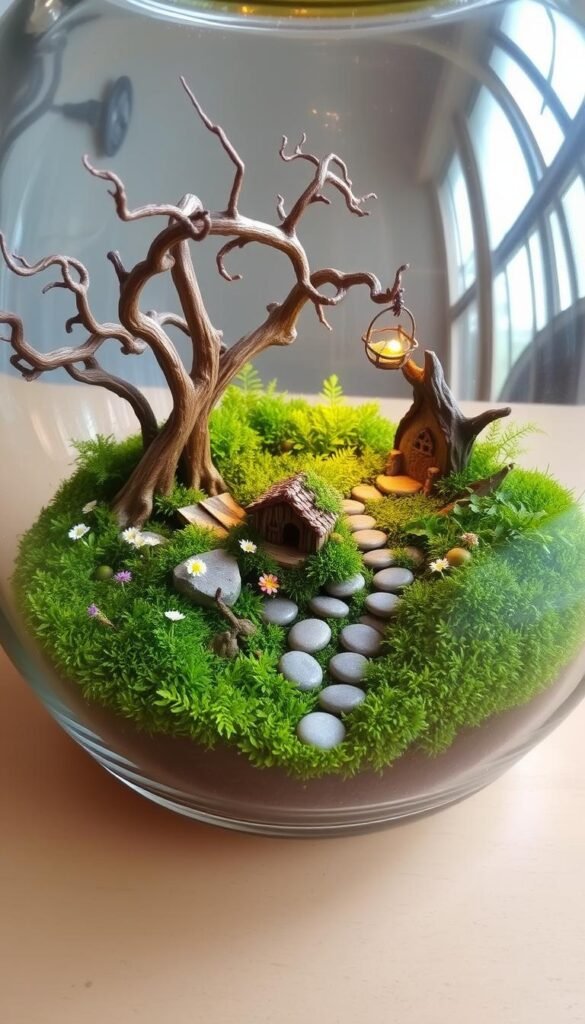
Placing Plants, Succulents, and Fairy Accents
Position taller succulents near the back and trailing varieties up front. Tuck a silica packet under your moss layer to combat fogging. Press figurines gently into the soil, using toothpicks to adjust tiny accessories. Leave gaps between pieces for future growth.
Securing Each Piece and Allowing Proper Drying Time
Apply silicone adhesive to the base of delicate items before setting them in place. Work in zones, letting each section cure for 20 minutes. Resist moving anything until the sealant turns translucent—this ensures stability. Test the dome fitment before final attachment to avoid last-minute adjustments.
Seasonal Adaptations and Long-Term Care

Keeping your miniature ecosystem thriving through changing seasons requires smart planning and simple tweaks. By matching plant needs to your container type and location, you create a self-sustaining display that evolves beautifully over time. Rotate decorative accents and monitor environmental shifts to maintain balance.
Customizing for Seasonal Themes
Swap tiny accessories quarterly to reflect nature’s cycles. Try miniature pumpkins in fall or pastel eggs in spring. Pair decorations with compatible plants—ferns for rainy seasons, air plants for summer heat. This table shows easy combinations:
| Season | Materials | Plant Pairings |
|---|---|---|
| Winter | Frosted berries, silver pebbles | Moss varieties |
| Spring | Miniature blossoms, bird figurines | Baby tears |
| Summer | Shell fragments, beach glass | Succulent cuttings |
Maintenance Tips for Effortless Beauty
Position your creation where it gets morning light but avoids afternoon glare. Check weekly for condensation patterns—tiny droplets mean ideal humidity. If walls stay dry for two days, add a teaspoon of water at the base.
Over years, prune overgrown stems using angled tweezers. Wipe dust off glass with a microfiber cloth to keep views crystal clear. With these steps, your sealed display becomes a lasting source of wonder.
Your tiny ecosystem becomes a living work of art with thoughtful finishing touches. Add polished stones around plants to frame their shapes, or drape preserved vines over edges for depth. These final details turn careful planning into visual harmony that evolves daily.
Maintain balance by rotating decorations as your plants grow. A quick weekly check keeps leaves dust-free and soil moist. Share photos of your project—friends might spot hidden charms you’ve missed!
This hands-on craft blends creativity with science, teaching patience through subtle changes. Over months, watch roots spread and moss thicken, proving your sealed environment thrives. Adapt lighting or accents as seasons shift outdoors, keeping the display fresh year-round.
Now step back and admire. Your pocket-sized world offers calm moments amid busy days. Let it inspire new ideas or simply remind you that magic thrives in small, sustainable forms. Ready for another? Each build deepens your skills—and wonder.


