
Imagine transforming forgotten yard treasures into miniature worlds bursting with charm. Creating a fairy garden lets you craft a tiny ecosystem that sparks creativity and brings nature closer to home. These whimsical displays turn everyday items—like cracked planters or weathered birdbaths—into enchanting focal points for your outdoor space.
Repurposing old garden accessories isn’t just eco-friendly—it’s a chance to breathe new life into objects with sentimental value. Picture a chipped birdbath becoming a lush, layered landscape where moss creeps over tiny pathways and miniature flowers bloom. Projects like these blend artistry with sustainability, offering a fresh take on flea market finds while reducing waste.
This hands-on activity invites all ages to collaborate, making it perfect for family bonding. Kids learn about plant care and design, while adults enjoy the therapeutic process of building something magical. You’ll start by assessing your piece’s condition, then plan themes ranging from woodland retreats to sparkling enchanted realms.
Your finished creation evolves with the seasons, becoming a living artwork that grows more captivating over time. Whether placed on a patio or nestled among flower beds, it’s guaranteed to spark conversations and ignite imaginations.
Gathering Materials and Tools
Your fairy garden journey begins with hunting for materials that tell a story. Start by raiding your craft drawers and garage—you’ll be surprised how everyday objects become magical items with a little creativity. The key is balancing practicality with whimsy while keeping costs low.
Essential Supplies for Upcycling
Build your toolkit with versatile materials that serve multiple purposes. Polymer clay lets you craft tiny mushrooms or garden signs, while popsicle sticks become charming fences. Don’t forget drainage stones and fast-drying soil—they keep plants healthy in shallow containers.
| Material | Use | Budget Tip |
|---|---|---|
| Polymer clay | Custom accessories | Buy multi-packs |
| Plastic containers | Mini ponds | Reuse food packaging |
| Bottle caps | Fairy tables | Collect soda caps |
Where to Find Budget-Friendly Items
Dollar stores offer tiny figurines and craft supplies perfect for DIY projects. For unique finds, try repurposing vintage items from thrift stores. Aluminum cans become watering cans, while champagne tops transform into gazing balls.
Mix new and recycled elements for depth. Check garden centers for discounted succulents and moss. Your finished collection should reflect both resourcefulness and imagination.
Understanding the Upcycling Process

Every discarded object holds a secret story waiting to be told through creative reuse. When you transform forgotten items into fairy garden elements, you’re not just crafting decorations—you’re rewriting their purpose. This method turns cracked teacups into cozy cottages and broken tiles into winding pathways, proving ordinary materials can fuel extraordinary ideas.
Exploring the Benefits of Reuse
Repurposing materials teaches you to see value in what others overlook. A study by the EPA reveals 12% of landfill waste comes from yard debris and containers—items easily converted into garden art. By choosing this DIY approach, you:
- Cut waste while designing one-of-a-kind features
- Develop problem-solving skills by adapting materials creatively
- Save money using existing resources instead of buying new
Your project becomes a conversation starter, blending sustainability with personality. As one gardener noted:
“Handmade details make spaces feel alive—like your garden whispers tales only fairies know.”
This practice also connects you to timeless traditions. Decades ago, families repaired and reused out of necessity. Today, it’s a way to honor craftsmanship while reducing your environmental footprint. Each choice—like using bottle caps as stepping stones—adds layers of meaning to your outdoor sanctuary.
Assessing Your Birdbath for Upcycling

Before diving into your creative project, take time to evaluate your piece’s potential. Start by identifying its materials—porous options like terra cotta may need sealing to handle soil weight. Metal or stone bases often work better, offering stability for layered designs.
Check for cracks or weak spots that could worsen under moisture. Even small fractures might expand when filled with dirt, so consider repairs using waterproof sealant. As noted in this guide to transform an old birdbath, structural integrity ensures your creation lasts through seasons.
Measure the basin’s depth—shallow spaces suit succulents, while deeper ones accommodate root systems. Pair plant choices with your garden’s sunlight patterns. A sunny patio spot might host drought-tolerant species, while shaded areas favor mossy landscapes.
Consider placement early. Will your fairy scene become a focal point near pathways or a hidden treasure among flowers? Proper drainage matters too—drill holes if needed, or layer pebbles beneath soil. For more ideas on repurposing vessels, explore these budget-friendly containers.
Finally, clean thoroughly to remove debris. A sturdy base and smart prep let your vision flourish without surprises. Now you’re ready to build a tiny world that sparks joy!
Planning Your Fairy Garden Layout

A magical fairy garden starts with smart spatial storytelling. Begin by sketching your vision on paper, noting where each element will live as plants grow and accessories settle. This roadmap prevents overcrowding and ensures every tiny detail shines.
Design Tips for Optimal Space Usage
Think like a landscape architect working in miniature. Place taller greenery like dwarf conifers toward the back of your garden, creating depth. Low-growing thyme or moss make perfect front-row groundcovers. Use this table to guide your plant placement:
| Plant Type | Placement | Purpose |
|---|---|---|
| Succulents | Back third | Vertical interest |
| Miniature hostas | Middle layer | Texture contrast |
| Irish moss | Foreground | Fairy “lawns” |
Balancing Nature and Decor
Your design should feel alive, not cluttered. Leave space between accessories for plants to breathe—a tiny bench here, a pebble path there. As one gardener advises:
“Let your fairy scene whisper its story through gaps between leaves and decorations.”
Mix silver-toned sage with purple lobelia for color harmony. Always keep mind your location’s sunlight—shade-loving ferns won’t thrive in blazing afternoon heat. With thoughtful planning, your miniature world becomes an evolving masterpiece.
Upcycling a Birdbath into a Fairy Garden Centerpiece

Ready to turn that unused basin into a thriving miniature paradise? Start by scrubbing your piece with mild soap and water. This removes grime and gives plants a clean slate. For stubborn algae, mix vinegar and baking soda—it’s eco-friendly and effective.
Next, grab your drill. Create small holes in the basin’s base using a masonry bit for stone or ceramic. Proper drainage prevents root rot and keeps your garden healthy. If cracks appear during drilling, patch them with waterproof sealant.
Layer pebbles or broken clay pots at the bottom. This step lets excess water escape while keeping soil in place. Fill the basin halfway with fast-draining potting mix. Leave two inches of space for plants and decor.
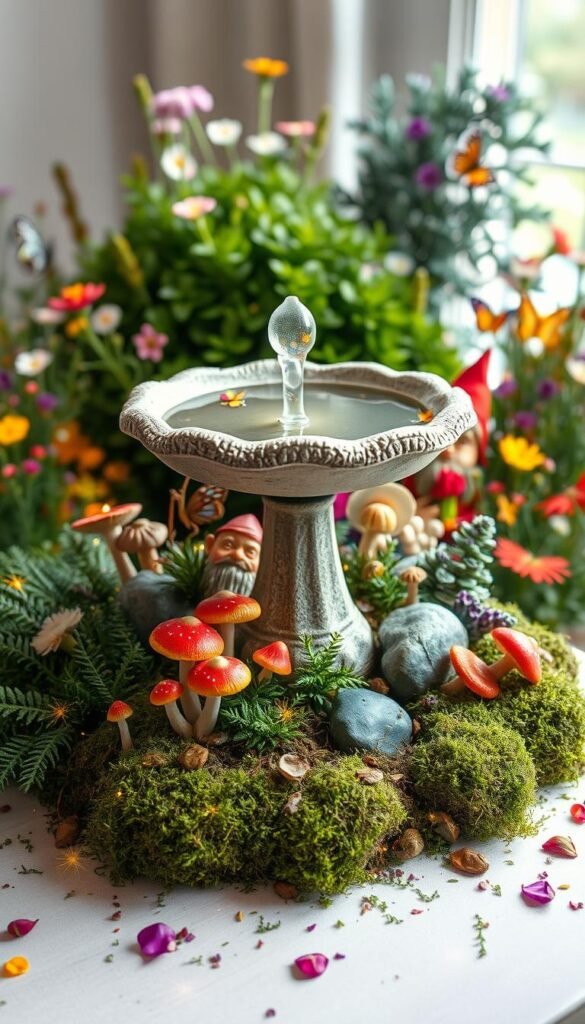
Choose compact plants like sedum or creeping thyme. Their shallow roots thrive in limited depth. Arrange them first, then add whimsical touches—tiny mushrooms or a pebble path. Finish by positioning your creation where it gets morning sun but avoids harsh afternoon rays.
“A well-prepared base lets magic bloom season after season,” notes Oregon gardener Mia Torres.
Your transformed birdbath now becomes a living sculpture. Water lightly and watch your DIY fairy garden evolve into a cherished outdoor feature.
Designing a Whimsical Fairy Garden Theme

Bringing magic to life starts with choosing a theme that reflects your personality. Whether you prefer a woodland hideaway or a beach-inspired oasis, your fairy garden becomes a canvas for storytelling. Begin by visualizing how colors, textures, and accessories will work together to create an immersive tiny world.
Plant Selection for Visual Harmony
Pick plants that match your theme’s mood and growing conditions. For shady areas, delicate ferns mimic miniature forests, while sun-loving sedums add rugged texture. Use this table to pair foliage and flowers:
| Plant | Color | Theme Match |
|---|---|---|
| Blue Ageratum | Purple clusters | Enchanted meadows |
| Platt’s Black | Dark foliage | Mystical contrast |
| Lysimachia ‘Aurea’ | Golden leaves | Sunlit pathways |
Accessorizing Your Miniature World
Choose decorations that amplify your theme’s magic. Natural materials like bark bridges suit rustic designs, while seashells enhance coastal vibes. Consider these ideas:
- Twig arbors draped with faux ivy
- Miniature lanterns for twilight charm
- Broken pottery mosaics as fairy patios
Color coordination ties everything together. Pair plum-hued flowers with lavender pebbles, or match golden groundcover with amber glass beads. As California gardener Elena Ruiz suggests:
“Let your accessories hint at unseen fairy adventures—a tiny ladder leaning against a tree stump invites curiosity.”
Your theme evolves as plants grow, so leave space for future additions. With thoughtful planning, your garden becomes a living storybook that sparks imagination with every glance.
Creating DIY Fairy Garden Accessories
Personalized touches elevate your miniature scene from cute to captivating. Crafting your own decorations lets you match every detail to your theme while keeping costs low. With simple materials and imagination, you’ll build pieces that feel authentically magical.
Crafting Miniature Furniture and Structures
Popsicle sticks become rustic benches or arched bridges with basic glue and paint. Layer them for Adirondack chairs or slice into thin strips for delicate fences. Polymer clay lets you mold tiny flowerpots or whimsical signs—bake them for weather-resistant durability.
Incorporating Upcycled Items for Unique Flair
Turn household trash into treasure with clever transformations. Champagne caps make bistro-style seating when glued to wire legs. Cut aluminum cans into tiny watering cans or shovels for garden accessories with industrial charm. Even broken jewelry finds new life as sparkling fairy lanterns.
Mix store-bought craft sticks with found objects for depth. A bottle-cap table paired with clay teacups creates an inviting picnic spot. Your DIY fairy garden accessories become conversation starters, blending resourcefulness with storytelling magic.


