
Imagine transforming ordinary outdoor spaces into whimsical escapes where creativity meets nature. For over a decade, crafting tiny landscapes has evolved from a summer activity for kids to a cherished hobby for adults. These pocket-sized worlds blend moss, stones, and miniature structures to spark joy in any yard.
You’ll learn how to merge these enchanted designs with your existing plants. Whether using teacups, wheelbarrows, or tucked-away corners of flower beds, the possibilities are endless. The process combines gardening skills with storytelling – perfect for those who love hands-on projects.
Why has this trend endured? It offers stress relief through tactile play and lets grown-ups reconnect with childhood wonder. As you arrange tiny benches or pebble pathways, you’re not just decorating – you’re building a sanctuary.
This guide reveals how to plan layouts that complement your garden’s natural flow. Discover maintenance tips to keep your creation thriving through seasons. We’ll also explore folklore roots that inspire modern designs, proving magic belongs in today’s landscapes.
Understanding the Magic of Fairy Gardens
Discover the secret behind crafting miniature realms that captivate hearts. These tiny landscapes draw from centuries-old traditions where people believed spiritual beings inhabited small natural spaces. Today, they merge gardening with storytelling, letting you design worlds where myth meets mulch and imagination takes root.
What Makes a Fairy Garden Enchanting
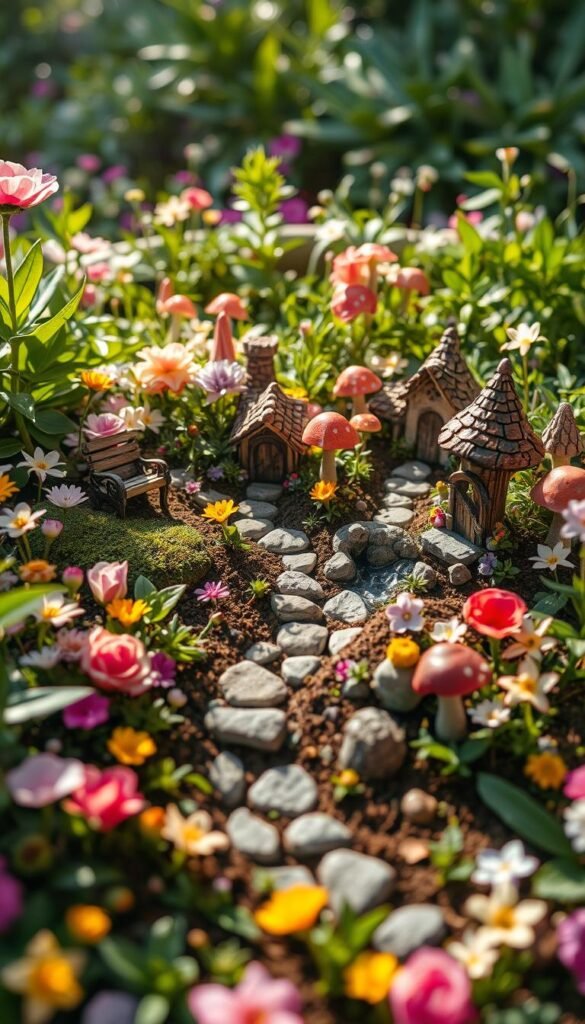
Successful designs feel lived-in. Think curling smoke from a clay chimney or moss growing unevenly near a pebble path. Your goal? Create a believable habitat where every element whispers, “Fairies were here.”
Scale matters most. A 2-inch bench beside 4-inch flowers breaks the spell. Stick to plants like thyme or sedum that stay petite. Add weathered-looking accessories to suggest age – rusted watering cans or lichen-covered stones work perfectly.
The Role of Miniatures in Creating Whimsy
Tiny bridges and lanterns act as story starters. A crooked signpost pointing toward “Mushroom Valley” invites exploration. Arrange pieces to guide the eye – place a bright blue door at the end of a winding path or hide a sleeping gnome under a fern.
These accessories transform ordinary planters into narrative spaces. A teacup tipped on its side becomes a fairy bathtub. Miniature vegetables in a wooden crate suggest a bustling market. Each detail builds a world visitors want to step into – even if they’re six feet tall.
Gathering Your Materials and Tools

Creating magical spaces starts with smart material choices. Your setup determines whether plants thrive or struggle. Let’s explore how to pick components that balance function and charm.
Selecting the Perfect Pot and Soil
Containers shape your tiny world’s personality. Broken clay pots make excellent terraced landscapes, while shallow bowls create desert scenes. For succulents, use gritty cactus mix – it prevents root rot better than standard potting soil.
| Soil Type | Best For | Drainage Level | Mix Components |
|---|---|---|---|
| Sandy Cactus Mix | Succulents | High | Sand, perlite, lava rock |
| Potting Blend | Flowering plants | Medium | Peat moss, vermiculite, compost |
Essential Tools for a Successful Build
Precision tools transform frustration into fun. Micro-pruners keep thyme bushes tidy, while angled tweezers position pebbles without disturbing soil. Keep these nearby:
- Miniature rake for creating “paths”
- Soft-bristle brush for cleaning leaves
- Needle-nose pliers for adjusting wire fences
Gather accessories before planting – scattered seashells suggest beachfront property, while acorn caps become fairy bowls. Store supplies in a divided tray to keep your garden project organized.
Building a Fairy Garden Bed: Integrating Miniature Scenes in Larger Flower Beds

Elevate your outdoor creativity using raised garden beds as natural stages for tiny wonders. These elevated spaces let you arrange delicate details without straining your back – perfect for adding charm to patios or decks.
Look for spots where your miniature scenes enhance rather than overwhelm. Frame established shrubs with tiny fences or nestle a cottage between hostas. A winding pebble path leading to your roses suddenly becomes an adventure route when flanked by fairy-sized signposts.
Scale harmony keeps the magic believable. Pair 3-inch furniture with groundcover plants like creeping thyme. Use tree stumps as “mountains” and shallow dishes as ponds. This approach helps your creations feel like organic extensions of the garden itself.
Strategic placement matters. Position scenes near seating areas where guests can discover them. Ensure easy access for watering and rearranging – hidden treasures lose appeal if buried behind overgrown bushes. With these design tips, your landscape tells stories at every turn.
Designing the Layout and Creating Levels

Crafting elevation in your tiny landscape adds drama and depth. Start by sketching your vision – mark where hills, paths, and structures will live. This blueprint helps balance empty spaces with clustered elements, making every inch purposeful.
Planning Your Garden’s Structure
Broken pottery becomes magic when repurposed. Use curved shards to build retaining walls between levels. Fill gaps with smaller pieces or rocks for a rustic look. Always test arrangements dry before securing them.
Clay-rich soil acts as nature’s glue when dampened. Press it between stacked stones to create stable terraces. This technique works wonders for winding pathways that climb through your garden like mountain trails.
Using Supports and Stairs for Multi-Level Design
Flat river rocks shine as functional decor. Angle them like steps between tiers, ensuring each “stair” overlaps the one below. This prevents erosion during rain while adding playful movement.
| Material | Use Case | Key Benefit | Pro Tip |
|---|---|---|---|
| Pottery Shards | Retaining Walls | Free Upcycling | Rough edges face inward |
| River Rocks | Stairs/Supports | Natural Drainage | Bury 1/3 into soil |
| Clay Soil | Natural Mortar | Weather-Resistant | Mix with sand for stability |
Elevation changes make small spaces feel expansive. A raised platform behind a “hill” of moss creates hidden areas for fairy doors. These layered design tricks keep eyes wandering through your creation.
Choosing the Right Plants and Accessories

Selecting plants for tiny landscapes blends science and storytelling. Your choices determine whether your creation feels like a lush forest or sunbaked desert. Let’s explore how to pair botanical stars with decorative accents that spark curiosity.
Plants That Thrive in Various Conditions
Match greenery to your local climate for easier care. In dry areas like San Diego, succulents like echeveria and sedum rule. Their fleshy leaves store water, surviving weeks without rain. Humid regions? Try Irish moss or creeping thyme – these carpet-like plants thrive in moisture.
| Climate Type | Top Plant Picks | Key Features |
|---|---|---|
| Arid | Hens and Chicks, Ice Plant | Drought-resistant, colorful foliage |
| Humid | Baby Tears, Miniature Ferns | Lush growth, moisture-loving |
| Temperate | Dwarf Cypress, Mini Roses | Seasonal blooms, compact size |
Miniatures, Rocks, and Other Decorative Elements
Accessories turn ordinary containers into enchanted spaces. A well-chosen miniature bench suggests fairies might sit there. Use river rocks as stepping stones or slate shards as castle walls. Scale matters – match object sizes to your tallest plant.
Prune regularly to maintain proportions. A ponytail palm stays petite with monthly trims. Pair flowering varieties like African violets with evergreen moss for year-round appeal. Remember: every element should whisper secrets to those who look closely.
Integrating Accessories and Decorative Details

Tiny treasures transform ordinary dirt into storybook landscapes. Your choice of accessories determines whether visitors see a forgotten fairy village or just scattered trinkets. Let’s explore how natural elements and crafted pieces work together to create convincing miniature worlds.
Enhancing with Sand, Moss, and River Rocks
Texture tells tales in your tiny realm. Coarse sand becomes desert dunes when paired with succulents, while fine white varieties mimic snowy paths. For beach scenes, mix blue shells with tan gravel – the contrast suggests waves meeting shore.
| Material | Best Use | Longevity |
|---|---|---|
| Wood Accessories | Structures | 10+ years |
| Resin Miniatures | Colorful Details | 5-7 years |
| Metal Decor | Weather-resistant Areas | 2-3 years |
Moss acts as living carpet between rocks, softening edges naturally. Press pine cones into soil as fairy stools – their scales suggest hand-carved textures. Bury river stones halfway to create stepping stones that look weathered by time.
Creative Touches: Fairy Houses, Trees, and More
Handmade miniatures add personality. Twig fences with acorn-cap gates invite playfulness. For store-bought pieces, seal painted surfaces with outdoor varnish to prevent sun fading.
Arrange elements to tell stories: Position a tiny rake beside pebble “flower beds.” Dangle bead lanterns from dwarf shrubs. Cluster blue shells around a mirror pond to mimic water reflections. These thoughtful placements make your creation feel inhabited rather than staged.
Mix materials wisely. Resin fairy doors withstand rain better than popsicle-stick versions. For seasonal flair, swap ceramic mushrooms with birch-bark sleds in winter. Your accessories should evolve like the garden itself – always hinting at unseen magic.
Step-by-Step Guide to Assembling Your Garden
Let’s break ground on your magical creation with precision and flair. Begin by selecting a container that matches your vision – shallow bowls work for desert scenes, while deep planters suit lush forests. Proper preparation ensures your tiny world thrives for seasons.
Setting the Foundation with Proper Soil and Watering
Start with a well-draining soil mix to prevent root rot. Combine two parts potting soil with one part perlite for most setups. If using succulents, swap perlite for coarse sand. Fill your container halfway, then press broken clay pots or slate pieces into the soil to create elevation.
Mist the base lightly before adding structural supports. This keeps dust down while giving moisture to early-planted greenery. Use flat river rocks as natural stairs between levels, burying each stone halfway for stability. Water gently with a spray bottle to avoid displacing soil layers.
Arranging Plants and Accessories for Impact
Place taller plants like dwarf conifers first, positioning them as background elements. Surround them with creeping thyme or moss for instant groundcover. Leave space between roots for future growth – crowded greenery competes for nutrients.
Add pathways last using fine gravel or colored sand. Tuck miniature benches near “clearings” created by low-growing foliage. Pro tip: Let your plants settle for 48 hours before accessorizing. This prevents shifted decor when watering newly added specimens.
Finish with storytelling details – a tiny watering can beside pebble “vegetables” suggests recent fairy activity. Rotate accessories seasonally to keep the scene fresh without disturbing established soil structures. Your enchanted space now invites both admiration and imagination.
Maintenance Tips for a Lasting Enchantment
Keeping your miniature wonderland vibrant requires simple routines. Seasonal care ensures tiny plants thrive while accessories stay story-ready. Balance practicality with creativity to preserve the magic year-round.
Seasonal Upkeep and Pruning Essentials
Refresh your fairy garden each spring by replacing spent soil and trimming overgrown greenery. Use sharp scissors to shape thyme bushes into cloud-like forms. For fall charm, add cold-hardy mums in containers that bloom until frost.
Check soil moisture weekly – water when the top inch feels dry. Reduce hydration in cooler months to prevent root rot. Rotate small pots monthly so trailing plants grow evenly on all sides.
Prune strategically. Remove yellow leaves promptly to maintain visual appeal. Follow container gardening tips for adjusting care as temperatures shift. A quick daily check keeps problems small, saving you time later.
With these tips, your tiny realm stays captivating through every season. Remember: magic grows best when nurtured with attention and joy.


