
Your outdoor space deserves clean lines and thoughtful design. A well-defined edge between grassy areas and planting zones keeps your landscape looking sharp while serving practical purposes. Borders act like invisible helpers, stopping mulch from scattering and grass from creeping where it shouldn’t.
Clear boundaries make maintenance simpler. You’ll spend less time trimming overgrowth or scooping soil off walkways. Edging also highlights your favorite plants, framing them like artwork in nature’s gallery. This approach creates visual balance, turning functional spaces into intentional design features.
From rustic logs to modern steel, materials matter. Options like weather-resistant stone or recycled rubber offer durability without sacrificing style. Each choice adds personality while controlling plant spread – a win for both aesthetics and practicality.
Think of edging as your landscape’s finishing touch. It pulls together colors, textures, and shapes into a cohesive display. Whether you prefer subtlety or bold statements, the right border elevates your yard from ordinary to extraordinary.
Introduction to Creative Garden Borders

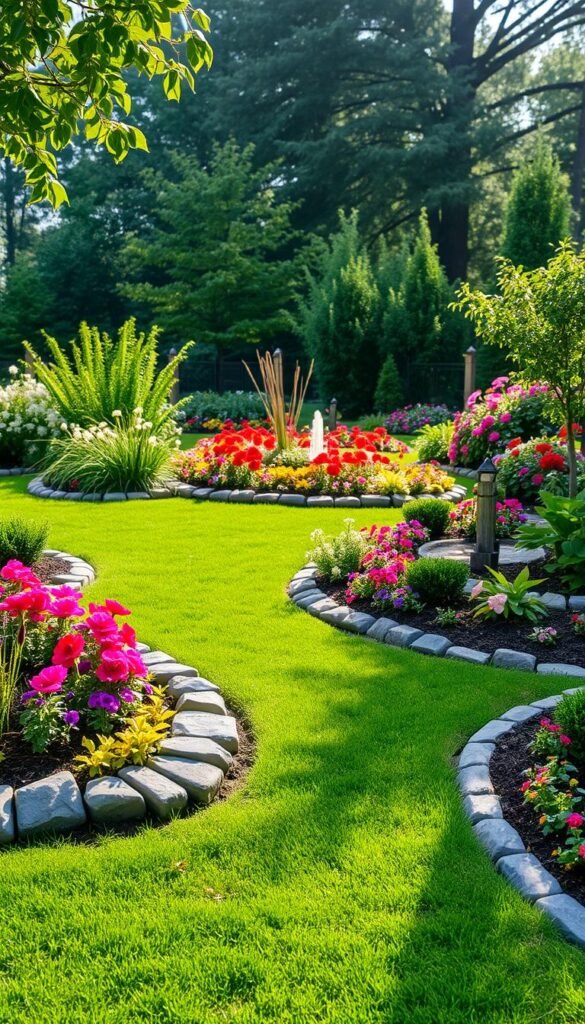
Imagine your yard as a living painting where every element has its place. Strategic edging acts like an invisible frame, transforming wild greenery into intentional design elements. This subtle touch brings order to nature’s chaos while letting your personality shine through.
Well-placed edges do more than look pretty. They create physical barriers that keep mulch in place and grass roots contained. You’ll notice fewer weeds sneaking into flower beds and less soil washing onto pathways after heavy rains.
These boundaries work with any style. Sleek metal strips complement contemporary spaces, while irregular stones feel right at home in cottage-style settings. Your choice becomes a signature detail that ties together colors and textures across your landscape.
Beyond aesthetics, quality materials protect your investment. Durable borders prevent erosion and reduce long-term maintenance. Neatly defined spaces also make mowing easier – no more guessing where turf ends and delicate plants begin.
Think of edging as your yard’s secret weapon. It elevates curb appeal while solving practical challenges, proving that smart garden solutions can be both beautiful and functional.
Creative Garden Borders Ideas for Separating Lawn and Flower Beds

Transform your landscape with borders that blend function and flair. Materials like brick, metal strips, or natural stone offer endless possibilities. Curved designs soften hard lines, while geometric patterns add modern energy. Mix materials for unexpected contrasts – try pairing smooth river rocks with rough-cut timber.
Repurpose everyday items to craft unique dividers. Bury glass bottles neck-down for a mosaic glow at sunset. Stack salvaged bricks in zigzag patterns or lay them diagonally. These solutions keep grass from invading flower beds while adding character to your space.
Texture plays a crucial role in border design. Combine smooth pavers with chunky mulch for visual depth. Introduce color through glazed tiles or painted stones along pathways. Match these accents to your home’s trim for a pulled-together look.
Multi-functional edging does double duty. Install low walls wide enough for seating between lawn areas and plantings. Tuck solar lights into stone borders for evening ambiance. Some designs even incorporate shallow troughs for seasonal herbs or succulents.
Your choice should reflect both practical needs and personal style. Formal landscapes might call for crisp steel bands, while cottage-style spaces shine with irregular flagstones. Always consider local weather patterns – choose frost-resistant materials in colder climates to prevent cracking.
Budget-Friendly Garden Edging Solutions

Smart yard upgrades don’t require deep pockets. Affordable materials and clever techniques can create crisp divisions between green spaces and planting zones. Let’s explore three wallet-friendly approaches that deliver both function and charm.
Plastic Edging and Its Easy Installation
Plastic remains the go-to option for cost-conscious homeowners. These flexible rolls withstand weather extremes while blending discreetly into landscapes. For easy install, dig a shallow trench along your desired line using a spade. Unroll the material with a helper to prevent kinks, then secure it with included spikes.
Enhance basic plastic strips by lining them with mulch or pea gravel. This trick hides the edging while adding texture contrast. “You get durability without sacrificing curb appeal,” notes a landscape designer from Better Homes & Gardens.
Glass Bottle and Hand-Edging Inspirations
Turn empty wine bottles into sparkling dividers. Bury them neck-down along pathways, spacing them 2-3 inches apart. The colored glass catches sunlight beautifully while creating a physical barrier against grass creep.
Prefer a minimalist look? Try hand-edging with a flat shovel. Cut a clean V-shaped trench between turf and beds – this DIY method requires zero materials. Maintain sharp lines by re-cutting every six weeks during growing season.
Both options prove that effective edging doesn’t need fancy supplies. With some creativity and elbow grease, you can achieve polished results on a shoestring budget.
DIY Garden Edges with Natural and Repurposed Materials

Want custom edges without store-bought supplies? Your landscape can thrive using tools you already own and materials hiding in plain sight. This approach lets you shape boundaries while embracing nature’s imperfections – perfect for those who prefer organic charm over manufactured solutions.
Hand-Edging Techniques and Tips
Grab a flat shovel or edging tool to carve crisp lines between turf and plantings. Push the blade straight down 3 inches deep, angling slightly toward grassy areas. This creates a mini trench that stops roots from crossing into flower zones. “It’s like drawing your yard’s blueprint with dirt,” says a Colorado landscaper.
Refresh these lines every spring before weeds take hold. For curved designs, lay a garden hose as your guide. Electric edgers work faster on straight paths but require steady hands – practice on less visible areas first.
Turn property finds into free dividers:
- Press salvaged bricks vertically into soil
- Weave flexible willow branches into living fences
- Stack flat stones in staggered layers
Combine elements for texture contrast. Try lining hand-cut edges with mossy logs or sun-bleached driftwood. These natural accents blend seamlessly into woodland settings while keeping mulch contained.
Let your edges evolve as plants grow. Gradually widen beds each season by recutting lines 6 inches outward. This gradual expansion maintains proportion while accommodating maturing perennials – no sudden landscape shocks.
Inspiring Stone and Brick Edging Designs
Stone and brick bring timeless structure to your landscape while offering versatile styling options. These materials create visual anchors that guide the eye through your space, blending durability with natural charm. Proper planning ensures your hard work pays off for years.
Stone Pillar and Gravel Combinations
Vertical stone pillars make bold statements when paired with gravel fills. For straight lines, use interlocking units and level the base thoroughly. Curved layouts require individual pillars spaced 12-18 inches apart – mark your pattern with spray paint first.
Gravel between pillars improves drainage and reduces weed growth. Choose crushed granite or pea gravel that contrasts with your stone color. “This combo adds dimension while keeping maintenance low,” notes a Michigan landscaping pro.
Curved Brick Garden Border Ideas
Brick’s flexibility shines in winding designs. Try these patterns:
- Soldier courses (vertical bricks)
- Basket weave layouts
- Scalloped edges using half-bricks
For smooth curves, dry-fit bricks before securing them in sand. Cut bricks at 45-degree angles where the curve tightens. This weekend-friendly project transforms basic materials into polished borders that mirror your home’s architectural lines.
Match brick hues to your exterior’s mortar or trim for cohesion. In colder climates, set bricks 1 inch below soil level to prevent frost heave. Pair with drought-tolerant plants between stones for low-upkeep beauty.
Innovative Metal and Rubber Edging Options

Modern landscapes demand solutions that balance strength with subtle elegance. Metal and rubber edging materials offer crisp definition while handling weather extremes and foot traffic. These options prove that durability doesn’t mean sacrificing style.
Weathering Steel for a Rustic Finish
Corten steel develops character over time, transforming from silver to warm rust tones. This self-protecting material forms a stable patina that resists corrosion. While installation requires precise trenching, its longevity makes the effort worthwhile.
Choose heights between 4-8 inches based on your needs. Taller panels create dramatic visual barriers for sloped areas. Pair with gravel paths or drought-tolerant plants for industrial-chic contrast.
Recycled Rubber and Pound-In Plastic Methods
Rubber edging bends around curves effortlessly while hiding mower tracks. Made from old tires, it withstands temperature swings without cracking. Pound-in systems eliminate digging – just hammer stakes through pre-cut holes.
Compare popular materials:
- Galvanized steel: Budget-friendly but prone to scratches
- Aluminum: Lightweight yet less rigid
- Recycled rubber: Flexible and eco-conscious
For quick upgrades, plastic strips with hidden spikes create instant boundaries. Their modular design lets you expand edges as your landscape evolves. Both options reduce maintenance while keeping edges razor-sharp.
Sustainable and Eco-Friendly Edging Ideas
What if your landscape could protect the planet while looking polished? Eco-conscious designs turn everyday items into functional art while reducing landfill waste. Glass bottles buried neck-down create shimmering barriers that catch sunlight, and they’re practically indestructible – a perfect match for curved pathways.
Recycled rubber products offer another earth-friendly solution. Made from shredded tires, these flexible strips withstand extreme temperatures without cracking. They’re ideal for play areas or spaces needing shock absorption.
Upcycling Materials for a Green Garden
Transform household discards into landscape heroes:
- Wine bottles arranged in color gradients
- Salvaged wood from old furniture projects
- Broken concrete chunks as modern stepping stones
Coco fiber rolls provide natural weed control while decomposing over 2-3 years. Pair them with native plants like purple coneflower or switchgrass for borders that support local ecosystems. These living edges attract pollinators while needing minimal watering once established.
For temporary divisions, try woven willow branches. This ancient technique called wattle fencing lasts 5-7 years before returning to the soil. It’s particularly useful when building raised beds that might need future adjustments.
Every sustainable choice creates ripple effects. You’ll reduce plastic waste, support biodiversity, and craft spaces that feel deeply connected to nature’s rhythms – all while keeping your yard tidy and intentional.
Incorporating Wood and Timber for Garden Borders
Wood brings warmth to outdoor spaces, blending natural texture with practical boundaries. These organic dividers soften transitions between turf and plantings while complementing various design styles. Let’s explore how different timber types can enhance your landscape’s functionality and charm.
Coastal Charm with Eucalyptus
Eucalyptus stakes create relaxed borders perfect for beachy or tropical themes. At $7 per linear foot, they’re affordable and simple to install. Drive 12-inch stakes into soil using a rubber mallet, spacing them 6 inches apart. Their silvery-gray patina develops naturally over several years, requiring minimal upkeep beyond occasional debris removal.
Timeless Appeal of Cedar
Cedar shingles offer fragrant, rot-resistant edging that withstands moderate weather. Hammer them vertically to form low fences around planting areas. While durable, keep them 6 inches from mower paths to prevent accidental damage. For longer-lasting results, pair cedar with raised bed structures that protect the wood from soil contact.
Rustic Log Solutions
Fallen branches become free, character-filled borders when cut into 18-inch sections. Bury logs halfway into the ground along curved beds for a woodsy aesthetic. Treat cuts with linseed oil to slow decomposition – this extends their lifespan to 3-5 years in moist climates. “Nothing beats the authenticity of repurposed timber,” shares a Maine arborist.
For mixed-material designs, combine vertical eucalyptus with horizontal cedar planks. Seal joints with outdoor-rated adhesive to prevent shifting. Annual inspections and touch-up treatments keep wooden edges looking sharp while protecting against insects and moisture damage.
How to Choose the Right Garden Edging Material
Finding the perfect edge for your yard starts with understanding your space’s unique needs. Begin by measuring your planting areas and noting soil types. Clay-heavy ground needs flexible materials that won’t crack during freeze-thaw cycles, while sandy soils benefit from heavier options.
Match your selection to your home’s architecture. Modern exteriors pair well with crisp metal bands, while cottage-style houses shine with irregular stones. “Your edging should whisper the same design language as your facade,” suggests a Texas landscape architect.
Consider these factors when comparing options:
- Annual maintenance time (under 1 hour vs. 3+ hours)
- Local weather patterns (extreme heat, heavy rainfall)
- Mower compatibility (hidden vs. exposed edges)
| Material | Cost per Foot | Lifespan | Install Difficulty |
|---|---|---|---|
| Steel | $4.50 | 15+ years | Moderate |
| Recycled Rubber | $2.80 | 10 years | Easy |
| Natural Stone | $6.00 | Lifetime | Hard |
Balance visual appeal with practical needs. A sleek aluminum strip might complement your gardening aesthetic but require frequent cleaning. Rough-cut timber offers rustic charm but needs yearly sealing.
Test your top choices by placing samples along potential edges. Walk the proposed lines at different times of day – morning shadows and afternoon sun can dramatically change how materials appear. This hands-on approach helps you make confident, personalized decisions.
Tips for Installing Garden Bed Edging
Proper installation transforms temporary fixes into lasting landscape features. Start by gathering your tools – a spade, mallet, and level ensure precise placement. Mark your desired path with spray paint or flour for clear visual guidance.
Essential Tools and Preparation Steps
Clear the work area of debris and trim overgrown grass. For curved designs, soak flexible materials like rubber edging in warm water first. This prevents cracking during shaping. Check local utility maps to avoid underground lines before digging.
Step-by-Step Installation Guide
Cut a 3-inch trench along your marked line using a flat shovel. Position your chosen material vertically, leaving ½ inch above ground level. Backfill with soil mixed with gravel for stability. “Compact every layer firmly,” advises a Better Homes & Gardens pro.
Test your work by walking along the edge – it should feel solid underfoot. Finish by sweeping excess dirt and watering the base to settle materials. With careful preparation and execution, your boundaries will stay crisp for seasons to come.


