
A well-defined landscape instantly elevates your yard’s appearance, turning chaotic patches into intentional designs. Whether you’re working with flower beds or pathways, strategic borders create clean lines that make your outdoor area feel organized and inviting. Best of all, achieving this polished look doesn’t require expensive store-bought solutions.
You can craft professional-quality edges using accessible resources that match your personal style. For example, creative garden edging ideas often incorporate natural stones or salvaged items, blending functionality with artistic flair. These projects not only save money but also let you repurpose materials that might otherwise go to waste.
Consider how simple elements—like weathered timber or irregular bricks—can add rustic charm or modern minimalism to your space. Many homeowners find that working with adaptable supplies allows for easy customization. Even better, choosing durable options like cedar or composite wood ensures your efforts last for years without constant upkeep.
If you’re exploring budget-friendly gardening projects, focus on designs that align with your skill level and available time. Weekend-friendly tasks, such as arranging pavers or stacking stones, deliver instant visual impact. The result? A cohesive outdoor retreat that reflects your creativity while staying practical for everyday life.
Why spend on pre-made kits when personalized touches often look more intentional? With a little planning, you’ll build borders that enhance your property’s value and curb appeal—all while keeping costs low and sustainability high.
Why Choose Inexpensive Materials for Your Garden Edging?
Why splurge on high-end products when budget-friendly alternatives deliver lasting beauty and functionality? Affordable solutions like plastic strips or upcycled glass bottles maintain crisp lines while surviving harsh weather. These choices prove you don’t need premium prices for professional results—just smart planning.
Take plastic edging, for example. It’s not flashy, but it withstands decades of foot traffic and seasonal changes. Recycled bottles buried neck-down create whimsical patterns while keeping waste out of landfills. Even hand-cut trenches with an edging shovel offer a tidy appearance that adapts as your plants grow.
The real win? You’ll free up funds for vibrant perennials or nutrient-rich compost instead of overspending on decorative borders. Low-cost options also let you test designs risk-free—swap rustic stones for geometric pavers next season without guilt.
Best part? Many wallet-friendly picks blend seamlessly with nature. Weathered stones or repurposed bricks often appear more organic than polished steel strips. Combine several materials for borders that feel curated rather than cookie-cutter, all while keeping expenses lean.
Benefits of DIY Garden Borders for Enhancing Your Landscape

Defined edges in your yard do more than just look good—they solve common landscaping headaches. By separating flower beds from lawns or pathways, you create visual order that makes your outdoor space feel intentional. Imagine crisp lines guiding the eye through vibrant plants and neatly trimmed grass—a simple upgrade with big impact.
These boundaries keep mulch and soil exactly where they belong, reducing messy spills onto walkways. No more wasting weekends raking stray gravel or repositioning rogue shrubs! Plus, clear edges make mowing easier—just follow the border for a sharp, professional finish every time.
“A well-structured landscape isn’t just beautiful—it’s an investment that grows with your property.”
You’ll love how defined zones showcase your favorite flowers while boosting curb appeal. Realtors often note that thoughtful design elements can increase home value by making yards appear low-maintenance and move-in ready. Best of all, you can tackle projects gradually—refresh one flower bed this month, another next season—while sticking to budget-friendly outdoor upgrades.
Whether you prefer curved stone paths or angular metal strips, personalized borders let your creativity shine. Each choice reflects your style while solving practical challenges—a win-win for your landscape and schedule.
Essential Tools and Materials for Your DIY Garden Project

Gathering the right supplies transforms your vision into reality without draining your wallet. Start by assessing your project scope—whether you’re outlining a small flower patch or redefining entire pathways determines your tool and material needs. Smart preparation prevents mid-project delays and keeps costs predictable.
Must-Have Tools and Equipment
A sturdy spade or edging shovel creates clean trenches for securing your design. Pair it with a rubber mallet for gently tapping wood or stakes into place without splitting. Measuring tape ensures precise spacing, especially when working with irregular shapes.
| Tool | Purpose | Cost-Saving Tip |
|---|---|---|
| Edging Shovel | Digging trenches | Borrow from a neighbor |
| Rubber Mallet | Installing stakes | Use leftover from past projects |
| Landscape Stakes | Securing borders | Buy in bulk online |
Sourcing Cost-Effective Materials
Local demolition sites often offer weathered planks perfect for a rustic look. Check salvage yards for discounted pavers or stones—many sell slightly chipped pieces at 50% off. For easy install options, eucalyptus requires minimal treatment and weathers beautifully.
“Measure twice, cut once—this applies to material calculations too.”
Always inspect secondhand wood for rot or insect damage. Rental centers provide trenching tools for large jobs, saving you from buying specialized equipment. Calculate quantities using online calculators to avoid overspending—most suppliers list coverage per unit.
DIY Garden Borders Edging Using Inexpensive Materials Like Reclaimed Wood

Transform your outdoor space by blending creativity with practicality. Thoughtful design paired with repurposed elements creates functional art that evolves with your landscape. Let’s explore how to shape these features while prioritizing longevity and eco-conscious choices.
Mapping Your Space for Success
Start by outlining your desired shape using string or chalk. Measure twice—adjust curves until they flow naturally with your yard’s contours. For curved beds, flexible garden hoses make excellent temporary guides.
- Mark buried utility lines before digging
- Account for plant growth—leave 12-18″ between edge and mature shrubs
- Use landscape spikes to secure temporary markers
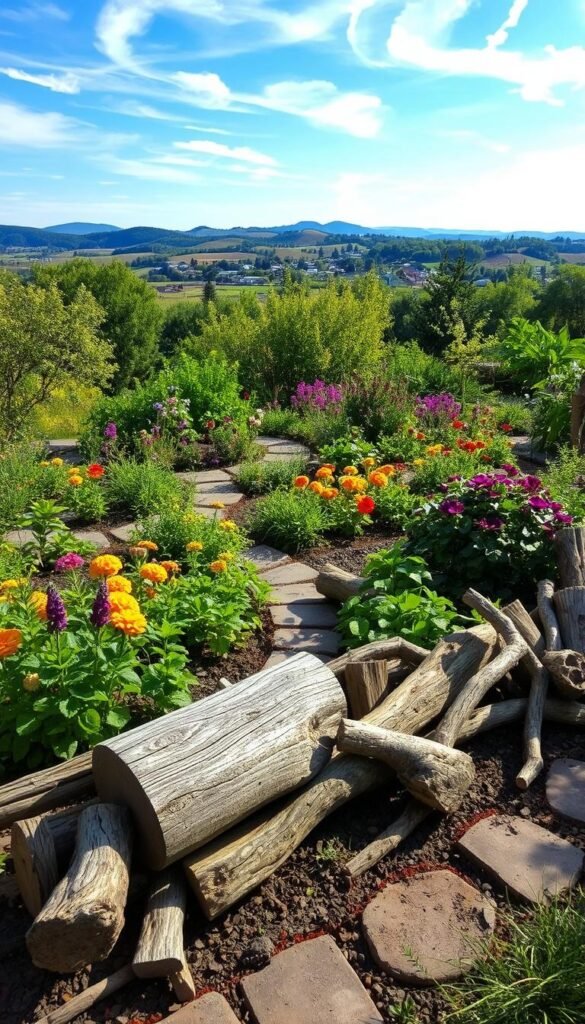
Reviving Aged Timber for Outdoor Use
Salvaged planks often need TLC before installation. Scrub surfaces with vinegar solution to remove debris, then sand rough edges. For lasting results:
- Apply food-grade linseed oil to repel moisture
- Rotate pieces annually to distribute wear
- Check joints seasonally for shifting
Pro tip: Leave slight gaps between vertical logs for drainage and root expansion. This prevents warping while letting plants breathe.
Exploring Alternative Garden Edging Options

Your landscape deserves boundaries that reflect both style and practicality. While traditional options work well, exploring unconventional materials can elevate your space while staying budget-conscious. Let’s dive into fresh approaches that balance aesthetics with functionality.
Brick, Metal, and Concrete Pavers
Brick remains a classic choice, offering flexibility in placement. Lay them flat for subtle definition or stack vertically for bold lines. Their warm tones pair beautifully with both cottage-style blooms and modern succulents.
Metal strips create crisp divisions between planting areas and walkways. Aluminum versions resist rust, maintaining sharp edges through harsh winters. For contemporary spaces, steel offers industrial flair that ages gracefully.
Concrete pavers shine in versatility—choose geometric shapes for structured patterns or irregular forms for organic appeal. Staining techniques let you match existing hardscapes, creating cohesive transitions across your property.
Creative Uses of Recycled Bottles and Plastic Edging
Turn discarded glass or plastic into vibrant borders by burying bottles neck-down. This technique adds playful color while reducing waste—perfect for whimsical cottage gardens. Pro tip: Use uniform bottle sizes for consistency, or mix hues for a stained-glass effect.
Plastic rolls provide seamless curves for intricate designs. Though installation requires trench digging, their flexibility handles sharp angles and gentle arcs effortlessly. Opt for UV-resistant types to prevent brittleness over time.
- Combine brick and metal sections for contrast
- Alternate concrete pavers with recycled elements
- Layer plastic edging behind front-row materials
Creative Garden Edging Ideas for Various Styles

Your outdoor space becomes an extension of your personality when edges mirror your aesthetic vision. Whether you crave cozy charm or sleek minimalism, the right boundary treatments tie your landscape together. Let’s explore how to align these features with your home’s character and regional influences.
Rustic, Coastal, and Modern Inspirations
For countryside appeal, split logs or woven willow branches add organic texture. These materials age gracefully, blending with wildflowers and herbs in cottage-style settings. Rough-cut timber works equally well for framing vegetable patches or winding pathways.
Coastal themes shine with bleached driftwood or seashell borders. Bury oyster shells vertically for a crisp white edge that withstands salty air. Weathered rope accents or repurposed boat cleats complete the nautical vibe.
Modern spaces thrive on contrast. Try angular steel strips framing geometric succulent beds or polished concrete dividers between gravel and lawn areas. These crisp lines emphasize architectural features while requiring minimal upkeep.
Mixing Materials for a Unique Look
Combining textures creates depth and intrigue. Pair smooth river rocks with corrugated metal for industrial-rustic fusion. Alternate brick fragments with vertical bamboo stakes to soften traditional masonry.
| Material Combo | Best For | Visual Impact |
|---|---|---|
| Stone + Corten Steel | Modern Farmhouse | Warm vs. Industrial |
| Recycled Glass + Cedar | Eclectic Spaces | Sparkle + Warmth |
| Concrete + Lavender Hedge | Mediterranean | Softened Minimalism |
Match your choices to your home’s exterior—a Tudor-style house pairs beautifully with aged brick, while mid-century modern architecture demands clean metal lines. Seasonal swaps keep things fresh: swap summer seashells for autumn-painted gourds along walkways.
Step-by-Step Installation Techniques for a Polished Garden Border
Perfecting your landscape starts with precise execution—follow these methods to achieve crisp, enduring results. Whether working with brick, timber, or metal, mastering foundational techniques ensures your efforts withstand seasons while maintaining visual appeal.
Digging the Trench and Setting the Edge
Begin by marking your layout with spray paint or a garden hose. Dig your trench 4-6 inches deep, adjusting the width to accommodate your chosen materials. Remove roots and rocks for a smooth base, then compact the soil using a hand tamper.
For curved designs, cut flexible plastic strips to your desired shape before securing. Level the trench bottom with sand when using brick or stone—this prevents shifting and simplifies alignment. Bury vertical logs 2-3 inches into the ground for natural-looking stability.
Securing Materials and Final Touches
Anchor metal strips every 12 inches using galvanized stakes driven at 45-degree angles. Backfill with soil mixed with gravel for improved drainage, tamping layers as you go. Wipe excess dirt from surfaces with a stiff brush once everything’s positioned.
- Space wooden stakes 18-24 inches apart for rigid materials
- Use rubber mallets to avoid denting metal or splitting timber
- Add mulch flush with the top edge for seamless integration
Pro tip: Spray borders with water to check drainage—puddles indicate uneven spots needing adjustment. For sloped areas, terrace the trench in stepped levels to prevent soil erosion.
Incorporating Eco-Friendly and Upcycled Materials in Your Edging
What if your landscape could protect the planet while defining your flower beds? Repurposing everyday items transforms waste into functional art, giving your yard character without compromising sustainability. Glass bottles buried neck-down create shimmering borders that catch sunlight, while painted tires add playful pops of color along pathways.
Plastic containers find new life as durable dividers between mulch and grass. For bold statements, cut rubber tires into zigzag strips or stack them vertically for tiered edging. These materials withstand harsh weather, often outlasting traditional options.
Upcycled wooden crates double as planters and boundary markers, perfect for budget-friendly container gardening projects. Old colanders planted with succulents add quirky charm to corners. You’ll reduce landfill contributions—9 million tons of metal and plastic annually—while crafting a space that sparks joy.
The best part? These creative solutions evolve with your style. Swap bottle colors seasonally or rearrange tire sections as your plants grow. Your garden becomes a living showcase of eco-conscious ingenuity, proving beauty and responsibility thrive side by side.


