
A crisp, well-defined edge gives your yard instant polish while serving practical purposes. Clear boundaries prevent grass from invading flower beds and shield delicate plants from accidental damage during lawn care. The best part? You don’t need professional expertise or a hefty budget to achieve this upgrade.
This guide focuses on accessible techniques using materials you might already have. Repurposed bricks, natural stones, or even plants can define pathways and beds with personality. For those exploring vertical gardening, many of these principles apply to creating structured yet affordable designs.
Organic options like mulch or low-growing herbs offer a softer aesthetic, while pavers deliver timeless durability. Both approaches reduce maintenance by creating obvious mowing lines—no more guessing where turf ends and blooms begin. With a few basic tools and creativity, you’ll craft borders that elevate your landscape’s appeal effortlessly.
Introduction to Creative Garden Edging
Defined edges aren’t just pretty – they’re problem-solvers for your landscape. A thoughtful border acts like a friendly traffic director, guiding eyes toward your favorite plants while keeping unruly grass in check. That subtle separation between lawn and flower beds makes maintenance easier and elevates your entire yard’s appearance.
Why Garden Edging Matters
Clear boundaries stop mulch from washing away during storms and protect delicate roots from lawnmower damage. They also create visual breathing room, letting each plant shine without competition. Proper edging can even boost property value by showcasing cared-for outdoor spaces.
Benefits of DIY Projects for Novice Landscapers
Building your own borders saves money and lets you experiment with styles. You’ll learn skills like measuring slopes and securing materials – knowledge that transfers to larger landscaping tasks. Plus, weekend-friendly timelines mean you can tackle one section at a time.
| Factor | Professional Installation | DIY Approach |
|---|---|---|
| Cost | $800-$2,500 | $120-$400 |
| Customization | Limited to catalog options | Unlimited creative control |
| Time Investment | 1-3 days | Flexible weekend hours |
Pro tip: Start with curved designs if you’re new to edging – they hide minor imperfections better than straight lines. Use a garden hose to map shapes before digging!
Key Considerations for Simple garden edges and borders DIY projects for novice landscapers

Before digging in, understanding your land’s specifics ensures edging success. Every yard has unique characteristics that influence material choices and installation methods. Start by mapping your space with a tape measure and notebook – precise measurements prevent material waste and keep costs predictable.
Understanding Your Space and Budget
Soil type dramatically impacts durability. Clay-heavy ground retains moisture, requiring materials like stone or metal that resist warping. Sandy areas pair well with flexible options like plastic edging that adapts to shifting terrain. Always check drainage patterns – low spots need solutions that won’t trap water.
Your budget shapes possibilities without limiting creativity. Free methods like trench edges work for tight funds, while recycled bricks offer mid-range charm. For long-term value, consider investing in steel or concrete. These materials withstand decades of weather with minimal upkeep.
Existing trees and irrigation lines demand special attention. Leave breathing room around roots and mark utility paths before installing borders. This prevents costly repairs and keeps your landscape healthy. Maintenance preferences matter too – wood needs yearly sealing, while gravel simply needs occasional raking.
Exploring Budget-Friendly Materials for Garden Edging

Your garden’s personality starts at its edges. The right materials blend practicality with visual harmony, transforming functional boundaries into design statements. Plastic, wood, and metal each bring distinct advantages to your landscape toolkit.
Affordable Options: Plastic, Wood, and Metal
Plastic edging wins on price and simplicity. At under $1 per linear foot, it’s ideal for first-timers. Choose between roll-style strips needing trenches or pound-in versions secured with a rubber mallet. While winter frosts might lift sections slightly, a springtime tap with a hammer fixes this quirk.
Wood offers rustic charm at $3-7 per linear foot. Cedar and eucalyptus resist rot naturally, blending seamlessly with cottage-style plantings. For modern spaces, metal edges deliver sleek lines. Aluminum stays crisp for decades, while corten steel develops a warm rust finish that complements natural landscapes.
Choosing the Right Material for Your Garden Bed
Match your selection to local weather patterns. Humid areas challenge wooden edges but suit metal alternatives. Cold climates? Plastic works but may need seasonal adjustments. Consider maintenance too – metal requires occasional debris clearing, while wood benefits from yearly sealant.
Your garden bed’s style also guides decisions. Curved layouts favor flexible plastic or thin metal strips. Straight lines accommodate sturdy wood planks or corten steel. Always test materials with a small section before committing to large installations.
DIY Brick and Paver Edging with Style

Edging with bricks or pavers creates structure while enhancing your yard’s character. These materials offer endless design possibilities, from quaint cottage charm to sleek modern lines. Their durability ensures your border remains functional through seasons while adding curb appeal.
Classic Brick Border Inspirations
Bricks bring warmth to any outdoor space. Lay them flat for a subtle old-world feel or stack vertically for height that keeps mulch contained. Reclaimed varieties develop a weathered look over time, while new bricks maintain crisp edges for formal garden styles.
Installation starts with digging a 4-inch trench. Add sand for leveling, then tap bricks into place using a rubber mallet. Spacing them tightly prevents weeds, while staggered patterns add visual rhythm. Finish by brushing sand into gaps for stability.
Modern Concrete Paver Ideas
Concrete pavers deliver contemporary flair with geometric shapes like hexagons or chevrons. Larger slabs create bold edging lines quickly, perfect for defining curved pathways. Neutral gray tones blend with minimalist designs, while colored options inject personality.
These units install similarly to bricks but require wider trenches. A 2-inch gravel base improves drainage, especially in rainy climates. Interlocking systems simplify alignment, letting you achieve a polished look without professional help. Pair with drought-resistant plants for low-upkeep garden zones.
Creative Wooden and Log Edging Ideas

Transform fallen timber into landscape treasures with organic edging solutions. Wood brings earthy textures to your outdoor spaces, creating transitions that feel intentional yet effortless. Whether using raw logs or repurposed planks, these materials let nature take center stage.
Rustic Wooden Log Solutions
Vertical log arrangements make striking borders. Bury trimmed branches 6-8 inches deep for stability, leaving 12-18 inches above ground. Horizontal layouts work well on slopes – secure logs with rebar stakes every 3 feet. Untreated wood develops silvery-gray patinas that blend with natural surroundings.
Felled trees become instant edging material. Cut trunks into 2-foot sections for circular bed borders or slice large branches lengthwise for curved pathways. These elements last 3-5 years untreated, perfect for evolving landscapes.
Upcycled Pallet Wood Inspirations
Discarded pallets offer free material for custom designs. Disassemble them using a pry bar, then sand planks smooth. Arrange boards in zigzag patterns or stack them like Lincoln logs for dimensional interest. Seal with linseed oil to triple their lifespan without compromising the raw aesthetic.
| Feature | Vertical Logs | Horizontal Logs |
|---|---|---|
| Visual Impact | Creates strong definition | Softens hardscapes |
| Installation | Requires deeper trenching | Needs anchoring stakes |
| Durability | 5-7 years treated | 3-5 years untreated |
| Best For | Cottage & woodland themes | Sloped or curved areas |
Maintenance is straightforward. Clear leaf debris between logs annually to prevent rot. For extra protection, apply copper naphthenate – a low-toxicity preservative that won’t harm plants. You’ll love how these borders mature gracefully, becoming part of your landscape’s story.
Eco-Friendly and Recycled Material Options

Turn everyday waste into landscape features that spark conversations. Repurposed items like glass bottles and rubber tires add personality while keeping materials out of landfills. These solutions prove sustainability doesn’t mean sacrificing style – your yard becomes both eco-conscious and eye-catching.
Glass Bottle and Tin Can Edging
Transform wine and soda bottles into jewel-toned borders. Bury them neck-down along pathways, spacing 2-3 inches apart for stability. Clear glass creates subtle shimmer, while blue and green varieties cast colorful shadows at sunrise. For creative patterns, alternate bottle heights or arrange them in waves.
Tin cans offer playful possibilities. Remove both ends with a can opener, then press them vertically into soil. Paint exteriors with weatherproof acrylics for pops of color. Cluster three cans together periodically to create visual rhythm – perfect for herb spirals or children’s play areas.
Recycled Tire and Rubber Techniques
Rubber edging made from old tires withstands extreme temperatures without cracking. Many products feature interlocking panels secured with ground stakes – no digging required. This recycled rubber edging bends smoothly around curves, making it ideal for circular fire pits or winding paths.
Whole tires become striking focal points when partially buried. Slice sidewalls off with a utility knife, then stack rings for raised beds. Paint them with outdoor latex for cohesive designs. Unlike traditional upcycled containers, these rubber structures last decades with zero maintenance.
| Material | Installation Ease | Durability | Best Use |
|---|---|---|---|
| Glass Bottles | Moderate | 5-8 years | Decorative beds |
| Recycled Rubber | Simple | 20+ years | High-traffic zones |
| Tin Cans | Easy | 3-5 years | Seasonal displays |
Both options reduce yard waste while adding unique textures. Rubber’s flexibility handles frost heave better than rigid materials, and glass’s smooth surface deters weed growth. Mix these elements for borders that tell your sustainability story season after season.
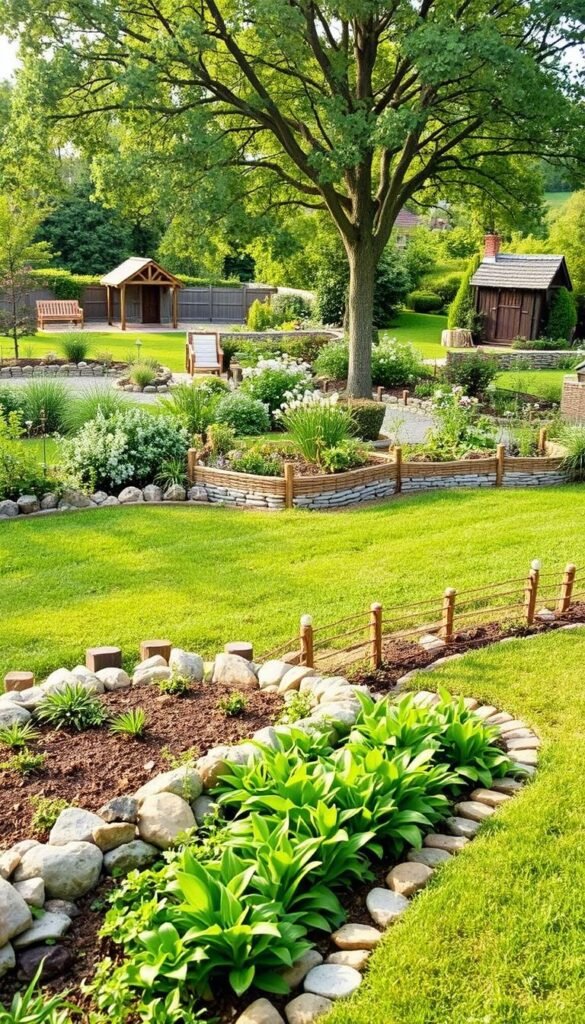
Establishing a Natural Look with Stones and Gravel
Nature provides the perfect blueprint for defining outdoor spaces with organic materials. Stone and gravel edges merge functionality with earthy textures, creating boundaries that feel both intentional and effortless. These elements work particularly well in transitional zones where cultivated areas meet wilder landscapes.
Stone Pillar Installation Essentials
Interlocking stone pillars demand precise preparation but deliver striking results. Begin by marking straight lines using string guides – curved layouts require sourcing individual units. Dig trenches 6 inches deep, adding crushed gravel for drainage before setting pillars. Secure each piece with a rubber mallet, checking alignment every 3-4 stones.
Expect this method to consume a full weekend for a 20-foot border. The payoff? A rugged natural look that withstands decades of foot traffic and weather shifts. Pair taller pillars with creeping thyme for softness against the stone’s solidity.
Mastering Gravel-Rock Pairings
Gravel offers budget-friendly texture when installed correctly. Dig 4-inch trenches along your desired path, line with landscape fabric, and secure using U-pins. Fill with pea gravel or crushed granite, raking smooth for consistent appearance. For visual depth:
- Layer larger river rocks along trench edges
- Mix gravel sizes for varied texture
- Add flagstone stepping stones every 6 feet
| Material | Installation Time | Maintenance |
|---|---|---|
| Stone Pillars | 8-12 hours | Annual weed removal |
| Gravel Mix | 3-5 hours | Biweekly raking |
These combinations create drainage-friendly borders that prevent soil erosion. The crunch underfoot adds sensory appeal while keeping plant beds neatly contained. For slopes, stabilize gravel with ground stakes every 18 inches to maintain clean lines.
Innovative Metal Edging Concepts for Long-Lasting Appeal
Metal brings sleek sophistication to landscape boundaries while promising decades of service. Its versatility shines in both rustic and contemporary settings, offering solutions that evolve with your design tastes over time.
Weathering Steel and Corrugated Metal
Weathering steel (often called corten) develops a rich rust-hued patina that blends with natural surroundings. Though installation requires precise trenching, its lifespan justifies the effort – expect 50+ years of performance. Corrugated panels add industrial flair at lower price points, bending easily around curves.
Minimalist Metal Designs for Modern Gardens
Thin steel strips create razor-sharp lines in urban gardens. Pair these with ornamental grasses for striking contrast. Aluminum options resist corrosion in coastal areas, maintaining their crisp appearance through harsh weather cycles.
Pro tip: Space metal edging 1-2 inches above soil level. This prevents mulch spillage while allowing easy mower access. For corten’s signature rust finish, let nature take its course – no sealants needed!


