
Looking to add structure and personality to your yard? Natural wood elements provide an easy way to shape your landscape while blending practicality with charm. Whether you prefer crisp painted finishes or rugged log textures, these materials let you craft clean lines that highlight flower beds and pathways.
You don’t need professional skills to create polished results. Simple techniques like sealing timber or staining logs ensure durability against weather changes. Choose colors that complement your home’s exterior – soft grays for modern looks or earthy browns for cottage vibes.
Wooden accents do more than look good. They prevent soil erosion and keep mulch in place, saving you time on maintenance. The organic warmth of these borders softens hardscapes like patios without overwhelming delicate plants.
This guide covers everything from selecting rot-resistant woods to creative layout patterns. You’ll learn how to prepare the ground, secure materials properly, and apply protective coatings for lasting beauty. Let’s turn those undefined edges into intentional design features that make your property stand out.
Introducing Creative Garden Borders

Transform your outdoor space with defined edges that blend function and style. Well-planned borders act like picture frames for your landscape, turning ordinary areas into intentional focal points. They’re not just decorative – they keep mulch where it belongs and stop grass from creeping into flower beds.
These features help organize your yard by separating lawns from planting zones. You’ll spend less time trimming edges or pulling weeds, thanks to clear boundaries. Choose curved patterns for a relaxed feel or sharp angles for modern appeal – both options guide the eye through your space.
Personalization matters. Match materials to your home’s architecture, like weathered logs for rustic cabins or sleek metal strips for contemporary designs. Even small details, like stained wood or decorative stones, add character without breaking the bank.
Landscapers often call borders “the secret sauce” of great design. They create depth and make plants pop by framing them against clean lines. Best part? You can refresh them seasonally – swap out seasonal flowers or repaint edges for instant updates.
Essential Materials and Tools for Your Edging

Material choices make or break your landscape’s polished finish. Whether you crave organic warmth or industrial sleekness, three core materials dominate outdoor projects: wood, metal, and concrete. Each brings distinct advantages to your space, from easy DIY installation to decades-long durability.
Wood, Metal, and Concrete Options
Wood offers timeless appeal and works well for curved designs. Cedar costs around $7 per linear foot and resists rot naturally. Metal strips create crisp lines – aluminum won’t rust, while steel handles heavy-duty needs. Concrete forms permanent barriers but often needs professional tools for cutting and setting.
Cedar, Eucalyptus, and Other Natural Choices
For coastal or tropical vibes, eucalyptus delivers a relaxed look. Drive stakes into soil with a rubber mallet – no special skills required. Cedar shingles add cottage charm but avoid string trimmers near them. Both woods age gracefully, blending into their surroundings over time.
Quick tip: Seal cuts on pressure-treated lumber to prevent moisture damage. Pair your materials with basic tools like gloves, a shovel, and a level. You’ll spend less time maintaining edges and more time enjoying their clean definition.
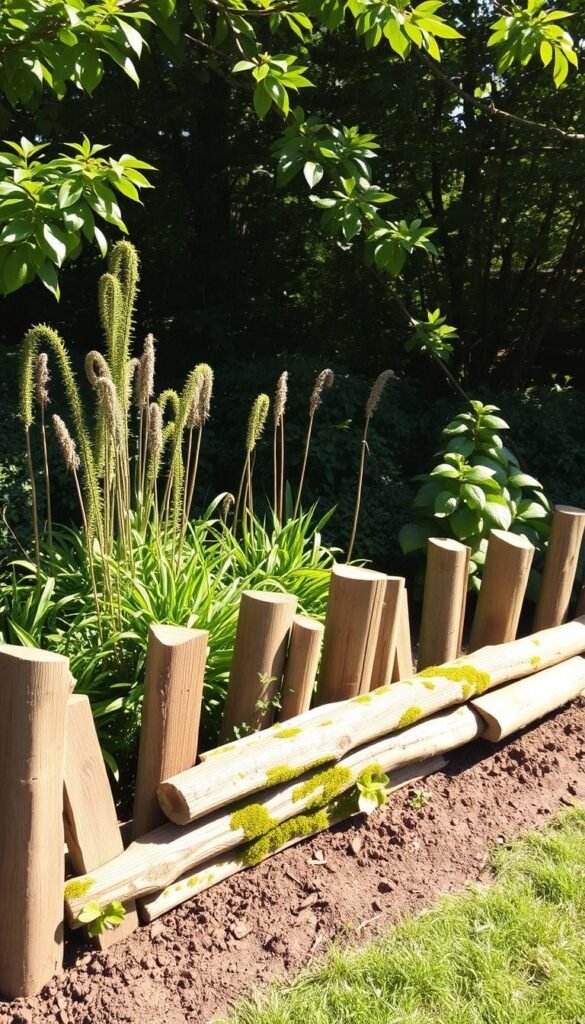
Garden borders ideas with painted timber or log edging

Define your outdoor spaces with materials that balance rugged charm and polished finishes. Whether using salvaged tree parts or custom-colored planks, these solutions transform messy edges into intentional design elements. Natural textures meet practicality in ways that elevate your landscape’s personality.
Fallen trees become design assets when sliced into sturdy barriers. Bury logs vertically along pathways to create organic dividers that last 3-5 years. This approach saves money and reduces waste – especially useful after storm damage or routine tree maintenance.
For coordinated color schemes, painted timber offers endless possibilities. Choose weather-resistant stains in slate blue or terracotta to match your home’s trim. These hues prevent fading while adding crisp definition between lawn areas and flower beds.
| Feature | Painted Timber | Natural Logs |
|---|---|---|
| Aesthetic Flexibility | Custom colors | Organic textures |
| Installation Ease | Pre-cut lengths | Minimal processing |
| Maintenance Needs | Annual touch-ups | Natural decay |
| Eco-Friendliness | Medium | High |
Mix both materials for dynamic contrasts. Try alternating stained planks with rough-hewn branches along vegetable patches. This combo highlights specific plants while keeping mulch contained during heavy rains. Best part? You can expand or rearrange sections as your planting needs change.
Eco-Friendly and Upcycled Edging Options

Turn everyday items into landscape features that protect the planet. These creative solutions reduce landfill contributions while adding distinctive character to your outdoor spaces. You’ll find three standout approaches that combine environmental responsibility with eye-catching results.
Glass Bottle and Recycled Rubber Edging
Empty wine or soda bottles become sparkling dividers when buried neck-down. Arrange amber or green glass in zigzag patterns for playful light reflections. Colored varieties work like stained glass, casting rainbow hues across your plants during golden hour.
Recycled rubber strips offer a maintenance-free option for high-traffic areas. Made from shredded tires, they flex around curves without cracking. Installation takes minutes – drive anchoring pegs with a hammer, and you’re done. Mowers glide right over them, saving you weekly trimmer battles.
Repurposing Natural Logs
Fallen branches get a second act as rustic dividers. Bury halves vertically along slopes to prevent soil erosion while creating a woodsy aesthetic. As logs decompose over 2-3 years, they enrich the earth with nutrients – a full-circle sustainability win.
For stability, choose rot-resistant oak or cedar. Leave bark intact for textured appeal, or sand surfaces for smoother edges. This approach blends seamlessly with wildflower beds or vegetable patches, delivering that sought-after natural look without store-bought materials.
Budget-Friendly DIY Garden Edging Ideas

Crafting beautiful landscape features doesn’t require deep pockets. With smart techniques and affordable materials, you can define your outdoor areas while keeping costs low. Let’s explore two approaches that balance effort and savings.
Hand Edging Techniques
Grab an edging shovel or spade to carve crisp lines between lawns and planting zones. This method creates surgical precision – slice downward at a 45-degree angle to form a shallow trench. While manual work demands muscle, the results last 12-18 months before needing refreshment.
Electric edgers speed up the process for larger spaces. One landscaping pro notes:
“Hand-cut edges give that magazine-worthy finish, but set realistic expectations – it’s a seasonal ritual.”
Pound-In Plastic and Other Inexpensive Alternatives
Flexible plastic strips offer set-and-forget convenience. Unroll sections along your desired path, then secure them with included stakes. For solo projects, choose pound-in versions – their interlocking design snaps together without trench digging.
| Feature | Roll Plastic | Pound-In Strips |
|---|---|---|
| Installation Time | 30 mins per 25ft | 15 mins per 25ft |
| Durability | 5-7 years | 8-10 years |
| Cost per Foot | $0.80 | $1.20 |
Both options block grass invasion effectively. Pair them with mulch to hide the plastic’s artificial look. Remember: enlist a helper when handling long rolls – teamwork prevents frustration!
Rustic Appeal: Wood and Log Edging Styles
Bring nature’s raw beauty into your landscape through organic materials that whisper rather than shout. These earthy elements create gentle transitions between spaces while celebrating imperfections – think knots in logs or weathered wood grain.
Natural Log Edging for a Charming Look
Transform fallen branches into functional art. Lay small-diameter logs horizontally along planting zones to frame wildflower clusters. This approach mimics forest floors while preventing soil erosion. You’ll love how morning dew clings to the bark, adding sparkle to your mornings.
Arrange pieces in staggered rows for casual appeal. Leave gaps between logs to let creeping plants weave through naturally. Over time, decomposing wood enriches the earth, creating a self-fertilizing system.
Enhancing Painted Timber for Added Warmth
Stained planks offer customizable charm without losing wood’s tactile appeal. Choose muted greens or warm ochres that mirror autumn leaves. These tones blend with surroundings while adding subtle definition.
Apply two coats of exterior-grade stain for longevity. Let the grain show through for texture – it catches sunlight beautifully during golden hour. Pair with moss-covered stones or feathery grasses to amplify the cozy vibe.
“Rustic doesn’t mean rough. It’s about honoring materials’ inherent character while serving your landscape’s needs.”
Modern Touches: Metal, Concrete & Brick Edging
Elevate your landscape with crisp, contemporary materials that redefine boundaries. These industrial-inspired options deliver sharp definition while complementing modern architecture. Perfect for structured designs, they turn functional edges into standout features.
Creating a Sleek Look with Concrete and Metal
Metal strips bring architectural precision to your outdoor spaces. Their slim profiles create invisible barriers that guide foot traffic and highlight planting zones. Choose powder-coated aluminum for rust resistance – it stays pristine through snow and rain.
Concrete walls offer permanent solutions for sloped areas. A 6-inch curb contains aggressive plant roots while adding subtle elevation changes. Though best left to pros, these installations withstand decades of wear. Pair with recessed lighting for evening drama.
Brick Wall Edging for a Classic Edge
Nothing beats brick’s timeless appeal for traditional settings. Stacked rows introduce warm red tones that soften hardscapes. Hire a mason for curved layouts – their expertise ensures stability without visible mortar lines.
| Material | Installation | Durability | Style Match |
|---|---|---|---|
| Metal | DIY-friendly | 15+ years | Modern/Industrial |
| Concrete | Professional | Lifetime | Contemporary |
| Brick | Mason Required | 50+ years | Traditional |
Pro tip: Use matching mortar for brick projects to create seamless transitions. These materials work beautifully around patios or water features, giving your space that finished look year-round.
Living Garden Edging with Plants and Shrubs
Breathe life into your landscape with living boundaries that grow more vibrant each season. Unlike rigid materials, these organic edges adapt as your plants mature, offering evolving beauty and ecological benefits. They soften hardscapes while supporting pollinators – a win for both aesthetics and nature.
Grass and Shrub Pairings for Lush Dividers
Combine ornamental grasses with compact shrubs to craft dynamic borders. Feather reed grass adds vertical drama alongside low-growing boxwoods, creating layered textures. Mix evergreen varieties with seasonal bloomers like hydrangeas for year-round appeal. This approach ensures visual interest even when flowers fade.
Play with foliage colors – burgundy heuchera leaves contrast beautifully with blue fescue blades. Stagger bloom times by planting early-bird peonies and late-summer asters. You’ll enjoy continuous color transitions that make your space feel alive.
Herb Planter Borders That Pull Double Duty
Why settle for plain edges when they can flavor your meals? Line walkways with rosemary or thyme planters that release fragrance when brushed. These aromatic herbs deter pests while defining pathways. For shaded areas, mint varieties thrive and spread quickly to form dense barriers.
Use raised wooden beds filled with basil or parsley near vegetable patches. You’ll harvest fresh ingredients while keeping soil contained. Check out creative edging solutions that blend practicality with edible beauty.
Living edges require minimal upkeep once established. A quick trim maintains their shape, and fallen leaves naturally mulch the soil. Let these green dividers become your landscape’s most dynamic feature – changing with the sun, rain, and your creative vision.


