
Your outdoor space deserves more than just a basic walkway. A carefully planned route through your yard does more than guide visitors—it shapes how you experience your property. These functional features blend practicality with creativity, turning ordinary dirt trails into inviting journeys that elevate your home’s character.
As Vermont expert Gordon Hayward explains, paths act as “visual bridges” between your house and nature. They create rhythm in your layout, whether you’re connecting a patio to flower beds or framing a secluded seating area. The right design choices can make small yards feel spacious or add structure to sprawling gardens.
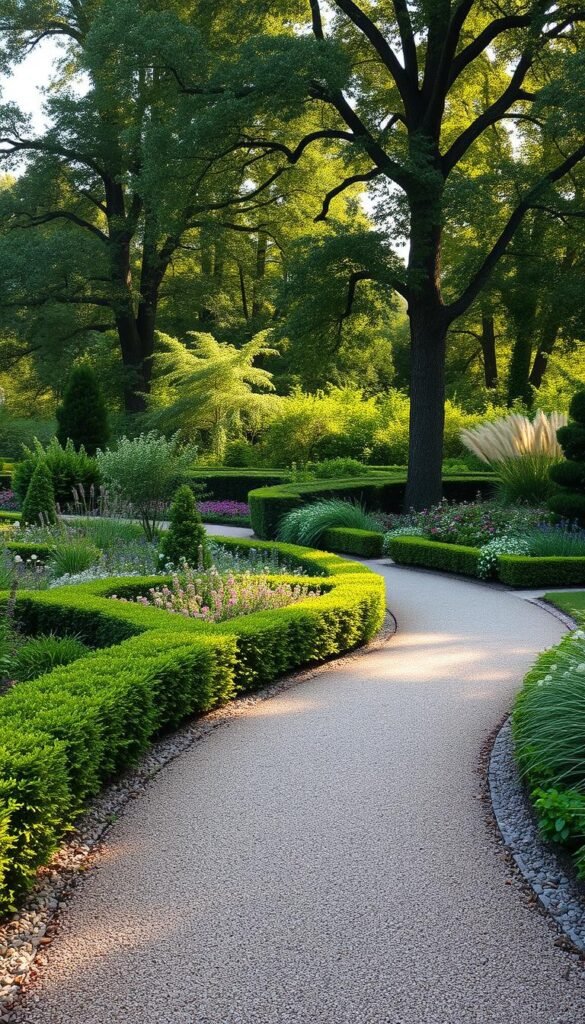
You’ll discover how materials like gravel, flagstone, or pavers influence your landscape’s personality. Wide, gently curving walkways invite leisurely strolls, while narrow stepping stones suggest adventure. Proper grading and edging prevent erosion, keeping surfaces stable through rainy seasons.
This guide simplifies the process of crafting paths that last decades. Learn to balance aesthetics with needs like wheelchair access or pet-friendly surfaces. With smart planning, your walkways will become cherished elements of your outdoor living space—not just afterthoughts.
Understanding the Importance of Garden Paths

Walkways do more than connect point A to B—they shape how you interact with your yard. Strategic path placement creates visual flow, guiding visitors while showcasing your favorite plants or architectural features. Let’s explore how different route types transform ordinary spaces into purposeful, inviting areas.
How Walkways Define Your Outdoor Space
Main routes handle daily foot traffic between your home’s entry points and key areas. These primary paths need sturdy materials like concrete or pavers. Think 4-foot widths for comfortable two-person walks.
Secondary routes branch off to hidden gems—think herb gardens or reading nooks. These narrower paths (2-3 feet wide) work well with gravel or mulch. They invite casual exploration without overwhelming your budget.
Tertiary paths are your garden’s secret passages. Meandering through flower beds or around trees, these informal trails use materials like bark chips. They create playful moments where kids hunt for hidden gnomes or you discover new blooms.
Boosting Safety and Visual Appeal
Properly built routes prevent muddy shoes and twisted ankles. Slip-resistant surfaces and gentle slopes keep walks safe during rainstorms. Solar lights along edges ensure night-time visibility.
Curved designs make small yards feel larger, while straight lines complement modern homes. Landscape architect Julie Moir Messervy notes, “A path’s rhythm should match your stride and surroundings.” Contrasting edging materials frame your walkways, directing eyes toward focal points like water features.
Smart path planning solves multiple issues—erosion control, pet runways, and defined boundaries. Durable main paths withstand heavy use, while temporary wood-chip trails let you test new layouts before committing.
Planning Your Garden Path: Assessing Layout and Function

Crafting a route through your landscape starts with smart observation. Watch where feet naturally travel—those worn patches in grass reveal preferred shortcuts. Design around these organic patterns to create routes people actually use. This approach saves time and money while preventing future trampled plants.
Mapping Movement and Practical Needs
Track daily routines: where kids chase balls, how you carry groceries, or where pets patrol. These habits determine ideal path locations. Primary walkways need durable surfaces—consider compacted gravel or pavers for high-traffic zones. Narrower secondary trails can use softer materials like wood chips near planting beds.
Evaluate your land’s unique features. Does rainwater pool near the patio? Slope your path slightly to redirect runoff. Place seating areas where afternoon shade falls naturally. Remember—existing trees and slopes aren’t obstacles but design partners shaping your route’s curves.
Harmonizing Structure with Nature
Geometric lines near your home’s foundation create clean transitions to outdoor spaces. As you move toward wilder garden areas, let curves mimic natural contours. Landscape designer Thomas Rainer suggests, “Let plants brush against walkway edges—it softens hard lines and connects built elements to living landscapes.”
Wider paths (36-48 inches) suit main routes, allowing two people to walk comfortably. Narrower 18-inch trails work in vegetable plots or flower borders. For slopes exceeding 5%, add gentle switchbacks or steps with textured surfaces. These choices blend safety with visual rhythm, making every journey through your space both practical and pleasurable.
Consider seasonal shifts when finalizing layouts. Winter snowdrifts and summer shade patterns affect usability year-round. Test temporary routes with rope outlines before committing—you’ll spot needed adjustments without costly rework.
Step-by-Step Garden Path Ideas for a Well-Defined Landscape

Effective route planning turns forgotten corners into purposeful spaces. Start by considering who—and what—needs to move through your landscape daily. A toddler’s wagon, weekend lawn equipment, or evening strolls all demand different design solutions.
Designing Your Path with Functional Elegance
Primary routes deserve 48 inches—wide enough for two people or a wheelchair. This allows 6 inches of clearance on each side when using a 36-inch mower. Secondary trails can slim to 30 inches for solo walks between flower beds.
Landscape pro Lucy Hunter advises: “Always add 12 inches beyond your widest tool’s measurement—future-you will thank you when moving bulky pots.” For tractor access, stretch to 60 inches. These dimensions prevent torn-up lawns and frustrated gardeners.
Measuring, Drainage, and Safety Considerations
A 1/4-inch slope per foot keeps water flowing away from your home. Use a 4-foot level and measuring tape—essential tools—to check grade consistency. Bury conduit during installation for later lighting adds; it’s cheaper than retrofitting.
Textured surfaces prevent slips, while rounded edges protect knees and stroller wheels. Keep safety in hand by avoiding abrupt elevation changes—create gradual transitions instead. Proper planning means your paths offer beauty today and function for decades.
Selecting Materials and Installation Techniques

Material selection shapes both the look and longevity of your landscape routes. Your surface choice impacts maintenance needs, drainage efficiency, and how well the design blends with your home’s architecture. Let’s break down popular options and proven methods to create walkways that withstand decades of use.
Comparing Hard and Soft Surface Options
Gravel offers quick installation and costs as little as $0.65 per square foot. Its loose texture allows rainwater to seep through, reducing puddles. For higher-end projects, natural stone like bluestone ($15-50/sf) adds timeless elegance but requires professional cutting.
| Material | Cost/SF | Durability | Best For |
|---|---|---|---|
| Crushed Stone | $0.65-$4 | 7/10 | Casual trails, dry climates |
| Concrete Pavers | $8-$15 | 9/10 | High-traffic areas |
| Clay Brick | $10-$20 | 8/10 | Traditional designs |
| Flagstone | $15-$50 | 10/10 | Premium focal points |
Tips for Proper Base Preparation and Installation Tools
Start by digging 6-10 inches deep—deeper for softer soils. Compact 4-8 inches of crushed stone with a plate compactor ($150/day rental). Landscape fabric prevents weeds but still lets water drain. As contractor Mia Torres advises, “Use polymeric sand between pavers—it hardens like mortar but allows flexibility.”
Essential tools include a rubber mallet for adjusting stones and a level for checking slopes. Mix materials creatively: pair gravel edges with brick centers for budget-friendly charm. Locally sourced stones often cost less and complement regional styles naturally.
Enhancing Visual Appeal with Edging, Lighting, and Plant Accents

The final touches transform functional routes into artistic statements. Thoughtful details like borders and illumination elevate your design while solving practical challenges. Let’s explore how to blend beauty with purpose through smart material choices and living accents.
Choosing the Right Edging and Fixtures
Durable borders keep gravel and stones contained while blocking weeds. Metal edging creates crisp lines for modern spaces, while brick offers traditional charm. For curved designs, flexible plastic strips bend smoothly around corners. Landscape architect Dean Hill recommends: “Install edging 1 inch above surface level to contain mulch and simplify mowing.”
| Edging Type | Cost per Foot | Durability | Best Uses |
|---|---|---|---|
| Steel | $3.50 | 15+ years | High-traffic areas |
| Natural Stone | $8 | Lifetime | Organic designs |
| Recycled Brick | $2.75 | 10 years | Traditional settings |
| Composite Plastic | $1.90 | 5-7 years | Temporary layouts |
Creative Lighting Ideas for Ambience and Functionality
Solar-powered LEDs along borders cast soft glows without wiring. For drama, uplight trees or sculptures near seating areas. Pro tip: Bury conduit during base preparation if planning future electrical fixtures. This foresight saves 75% on retrofitting costs.
Low-growing plants like lamb’s ears soften paver edges with silver foliage. Combine perennials like lavender with annuals such as sweet alyssum for cottagecore charm. These living borders prevent soil erosion while attracting pollinators. For narrow spaces, sedges add texture without overcrowding.
Layer lighting types for safety and mood. Path-level markers guide feet, while overhead string lights create festive atmospheres. Use warm-toned bulbs (2700K-3000K) to complement natural materials like stone and wood.
Maintaining Your Garden Path for Longevity
Your walkway’s beauty and function depend on consistent care. Unlike the initial installation process, ongoing maintenance adapts to seasonal changes and material wear. A little effort each month keeps surfaces safe and visually appealing for years.
Smart Upkeep Strategies
Weekly sweeping prevents debris buildup and discourages weeds. For wood or mulch surfaces, refresh layers annually to maintain their look and prevent decomposition. Address cracks in bricks or pavers immediately—loose pieces become tripping hazards and accelerate surrounding damage.
Winter demands special attention. Skip salt-based deicers that erode materials; use sand for traction instead. After thawing, check for frost-heaved stones needing resetting. Natural edges blending into lawns benefit from regular grass trimming to define boundaries clearly.
Budget time and resources for these tasks. While hardscapes need less frequent care, planning prevents costly overhauls. Your maintained path remains both practical and inviting through every season.


