
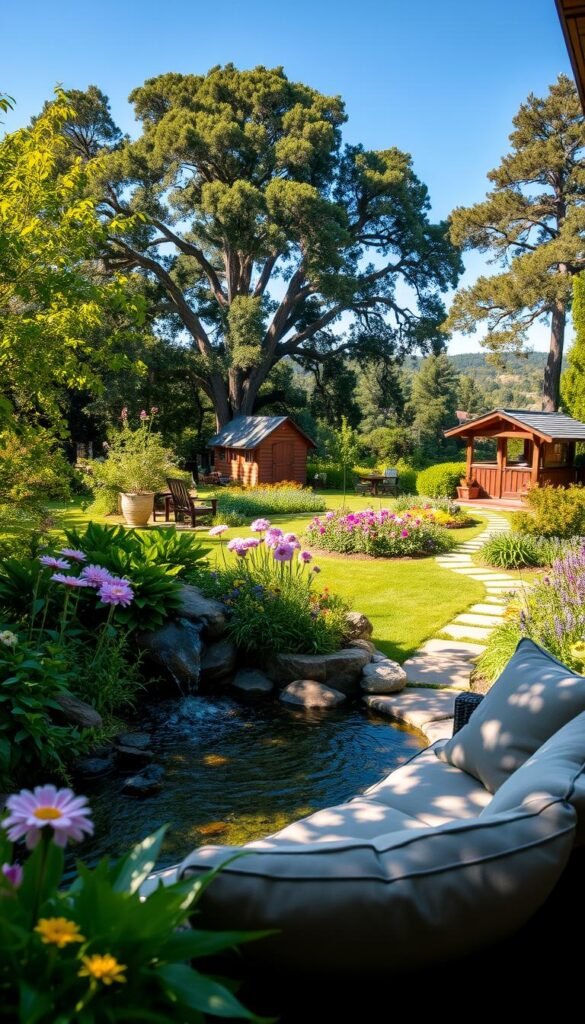
Your backyard holds untapped potential to become a calming escape right outside your door. With smart planning and creative thinking, you can craft an inviting retreat that boosts your mood and fits your financial goals. Research shows spending time in nature lowers stress and improves focus—benefits you can enjoy daily with a thoughtfully arranged outdoor area.
Natural light plays a crucial role in designing welcoming spaces. Morning sunlight streaming through trees or evening golden hour glows create instantly uplifting atmospheres. Pair this with fresh air circulation for better respiratory health—a simple upgrade that costs nothing but makes a big difference.
This guide reveals practical strategies to maximize your yard’s potential. You’ll learn how to repurpose existing materials, choose low-maintenance plants, and arrange seating areas that encourage relaxation. Even small changes like adding string lights or defining walkways can transform ordinary spaces into cherished retreats.
Beyond personal enjoyment, a well-curated outdoor zone increases property value while giving your family room to unwind. Whether you’re reading in a cozy nook or hosting weekend gatherings, these budget-friendly solutions help you create lasting memories without financial strain.
Do You Need to Spend a Fortune?

Transforming your outdoor area doesn’t have to drain your savings. Basic upgrades like mulching flower beds or building DIY seating from pallets can create noticeable changes for under $500. Even larger projects like installing a gravel pathway or planting native shrubs often stay below $3,000.
Smart planning helps stretch your dollars further. For example, bulk mulch costs 30-50% less than bagged options, while seasonal plant sales offer premium varieties at clearance prices. Focus on high-impact elements first:
| Project Type | Features | Cost Range |
|---|---|---|
| Basic Refresh | Mulch, ground cover, container plants | $500-$3,000 |
| Mid-Range Update | Small patio, flowering shrubs, pathways | $3,000-$10,000 |
Repurposing materials saves cash and adds character. Old bricks become edging, while cracked ceramics transform into mosaic accents. Pro tip: Check local marketplaces for free or discounted items like stones or lumber.
Phasing improvements across seasons lets you manage costs effectively. Start with soil preparation this spring, add perennials in summer, then build a fire pit come fall. This approach keeps your backyard evolving without financial stress.
Assess Your Backyard Space & Set Clear Goals

Mapping your outdoor area lays the foundation for smart improvements. Start by measuring dimensions with a wheel tool – it takes 15 minutes but reveals hidden potential. Sketch zones where sunlight patterns shift hourly, noting where shadows linger or afternoon glare hits hardest.
Measuring Your Space and Analyzing Sunlight
Track light exposure using free smartphone apps or old-school paper charts. South-facing spots often get full sun, while north areas stay shaded. This determines where to plant sun-loving herbs versus shade-tolerant ferns. Observe existing trees – their canopies create natural umbrellas for seating areas.
Evaluating Soil Quality and Drainage
Dig 6″ deep and squeeze a handful of earth. Sandy soil crumbles quickly, while clay forms sticky clumps. DIY test kits ($10-20) reveal pH levels – crucial for choosing plants that thrive in your ground conditions. Check drainage by pouring water into a hole: 1-2 inches per hour is ideal.
| Tool | Purpose | Pro Tip |
|---|---|---|
| Measuring Wheel | Map exact square footage | Measure twice for accuracy |
| Sunlight Tracker App | Record hourly light changes | Use for 3 consecutive days |
| Soil Test Kit | Check nutrient levels | Test multiple zones |
Slopes impact water flow – use a level tool to find natural runoff paths. Document everything with photos and notes. This blueprint becomes your roadmap for a successful backyard transformation project that works with nature, not against it.
Identifying Key Areas for Improvement

Your outdoor oasis might already contain hidden opportunities waiting to be discovered. Start by examining what’s already working – and what needs attention – before spending money on new features. This strategic approach helps you maximize existing investments while planning cost-effective upgrades.
Reviewing Existing Structures and Layout
Walk through your space like a detective. Check pathways for cracked pavers and decks for loose boards. Uneven surfaces aren’t just eyesores – they’re tripping hazards needing immediate attention. Use a garden hose to outline potential seating areas, testing different configurations without commitment.
Ask yourself key questions: Does the patio flow naturally to your grill station? Can that weathered pergola be refreshed with climbing vines? Structural soundness comes first – a wobbly railing could ruin summer gatherings. Professional inspections cost $150-$300 but prevent costly accidents later.
Prioritize changes that boost both safety and style. That cracked concrete pad? Turn it into a mosaic conversation piece. The overgrown corner? Transform it into a reading nook with salvaged chairs. By focusing on functional areas first, you’ll create a backyard that works smarter, not harder.
Back Garden Design on a Budget: Affordable Ideas for a Relaxing Retreat

Crafting an inviting outdoor sanctuary doesn’t require endless funds—just clever strategies and a dash of creativity. Start by dividing your yard into functional zones using natural dividers like potted plants or low-cost lattice panels. A dining area with repurposed furniture pairs beautifully with a fire pit zone built from salvaged bricks.
Mix hardscape and softscape elements strategically to balance costs. Gravel pathways edged with free river rocks create structure, while fast-growing vines like clematis soften fences. Pro tip: Use mulch beds shaped like organic curves to add designer flair without expensive landscaping.
| Element | Budget Option | Impact Level |
|---|---|---|
| Seating | Pallets + outdoor cushions | High |
| Lighting | Solar string lights | Medium |
| Focal Point | DIY water feature | High |
Phase your project using this timeline approach: Year one establishes main pathways and seating. Year two adds flowering perennials and accent lighting. This staggered method lets you refine your design while managing expenses effectively.
Local homeowner Sarah Thompson transformed her 500 sq ft yard using these principles. She created distinct zones for grilling and lounging using $200 worth of marketplace finds. “The tiered planters made from old tires became our favorite conversation starter,” she notes.
Budget-Friendly Landscaping Ideas
Smart plant choices and material sourcing can slash your landscaping costs without sacrificing beauty. Whether upgrading flower beds or refreshing your entire yard, strategic shopping unlocks premium results at modest prices.
Exploring Cost-Effective Plants and Seeds
Local plant swaps yield free perennials like coneflowers and hostas. Check community boards for events where gardeners trade divisions of mature plants. Seed exchanges through libraries or gardening clubs offer rare varieties for pennies.
Time purchases with nursery clearance sales. Many stores discount remaining stock by 70% in late spring and fall. Look for healthy specimens with new growth – slightly root-bound plants often thrive after transplanting.
| Plant Type | Retail Cost | Budget Alternative |
|---|---|---|
| Mature Shrubs | $25-$50 | 1-Gallon Starts ($8-$15) |
| Annual Flowers | $5-$10 per pot | Seed Packets ($2-$4) |
| Ornamental Grasses | $30-$60 | Division Splits (Free) |
Choosing Affordable Soil, Mulch, and Materials
Bulk purchases from landscaping suppliers cut soil costs by 40% compared to bagged options. One cubic yard covers 100-150 sq ft at 3″ depth. Partner with neighbors to split truckload deliveries if storage space is limited.
Municipal compost programs often offer nutrient-rich soil amendments for free. Arborist wood chips – available through local tree services – make excellent mulch that suppresses weeds while decomposing into fertile humus.
“I saved $800 last year using county compost and repurposed bricks from a demolition site,” says Portland gardener Mia Rodriguez. “Quality materials exist everywhere – you just need to look creatively.”
Calculate costs per square foot to prioritize investments. Hardy groundcovers like creeping thyme might cost more initially but eliminate future mulch expenses. This approach balances immediate savings with long-term value.
DIY Garden Beds and Upcycled Planters

Breathing new life into unused materials creates eco-friendly growing spaces that save money and reduce waste. With basic tools and creativity, you can craft functional planters while keeping materials out of landfills.
Using Recycled Materials and Reclaimed Wood
Pallet wood makes excellent raised bed frames – disassemble them using a pry bar and sand rough edges. Line the interior with cardboard to suppress weeds before filling with soil. For vertical setups, mount gutters or plastic bottles on fences to grow herbs and strawberries.
| Material | Preparation Steps | Best For |
|---|---|---|
| Reclaimed Wood | Remove nails, sand, seal with linseed oil | Raised beds |
| Plastic Containers | Drill drainage holes, paint exterior | Tomatoes, peppers |
| Old Tires | Clean thoroughly, stack for depth | Potatoes, flowers |
Turn food scraps into nutrient-rich compost using layered cardboard and yard waste. This free soil amendment boosts plant growth while reducing kitchen waste. Always check reclaimed wood for chemical treatments before growing edibles.
For container gardening, repurpose colanders as hanging planters or use dresser drawers for shallow-rooted greens. Pro tip: Construction sites often give away leftover materials – just ask permission first!
Creative Paving and Pathway Solutions
Transform your outdoor pathways into artistic features that guide visitors through your space. Many homeowners uncover hidden treasures in demolition piles and renovation sites—perfect for crafting unique walkways without overspending.
Breathing New Life Into Old Materials
Scout local construction zones and online community boards for leftover bricks or concrete chunks. These materials often cost nothing but deliver big visual impact. Pro tip: Always ask permission before collecting—many contractors happily give away extras.
Clean salvaged stones with a pressure washer to remove debris. Sort pieces by size and color for cohesive patterns. A mix of irregular shapes creates charming cottage-style paths, while uniform bricks suit formal layouts.
Lay materials over a gravel base for stability. Leave intentional gaps between stones for groundcover plants like thyme or moss. This softens edges and adds natural texture. Curved pathways draw the eye forward, making compact backyard areas feel more expansive.
Edge your walkway with solar-powered lights or drought-resistant plants. These finishing touches unify your landscaping while improving nighttime safety. With creativity and elbow grease, your pathway project becomes a functional masterpiece that elevates your entire outdoor area.


