
Transform your outdoor area into a whimsical escape where imagination takes root. Crafting enchanted trails turns ordinary corners into lively settings for tiny adventures. Picture morning light catching dewdrops on stones, creating natural glitter along winding routes that hint at secret worlds.
These miniature routes do more than guide visitors—they tell stories. A cleverly placed pebble or curved stepping stone suggests bustling activity in your tiny community. Every twist invites discovery, linking cozy cottages to hidden gathering spots or quiet reflection areas.
Design choices shape how your space feels and functions. Smooth river rocks might mark peaceful zones, while uneven slate pieces add playful energy. Seasonal updates keep the magic fresh—think autumn leaves as natural confetti or frost-kissed moss in winter.
Well-planned layouts balance charm with practicality. They create visual flow without overcrowding, letting each feature shine. Ready to start? Let’s explore how simple materials unlock endless creative possibilities.
Magical Layouts and Design Inspirations

Unlock hidden wonders in your own green sanctuary where miniature marvels await discovery. The secret lies in blending creative layouts with thoughtful placement—every nook becomes a stage for tiny tales to unfold.
Exploring the Charm of Fairy Gardens
What makes these tiny landscapes irresistible? They turn ordinary corners into interactive storybooks. A mossy stone becomes a meeting spot. A hollow log transforms into a cozy cottage. Morning dew on petals mimics glittering fairy dust, while cleverly placed pebbles hint at bustling activity just out of sight.
Your design choices shape these narratives. Curved pathways invite exploration, while miniature doors spark curiosity about unseen residents. Consider these elements when planning:
| Feature | Storytelling Potential | Visual Impact |
|---|---|---|
| Tiny bridges | Connects different zones | Adds depth perception |
| Miniature signs | Directs imagination | Creates focal points |
| Glowing stones | Suggests nighttime magic | Enhances twilight appeal |
Choosing the Right Space in Your Yard
Great designs start with smart location choices. Observe morning light patterns—areas that catch dawn rays make dew sparkle dramatically. Sloped sections create natural terraces for tiered communities. Always check drainage to protect delicate features during rain showers.
Prioritize spots visible from seating areas but still feel secluded. A space between tree roots or beside garden beds works perfectly. Remember: the best locations balance practicality with that essential sense of discovery.
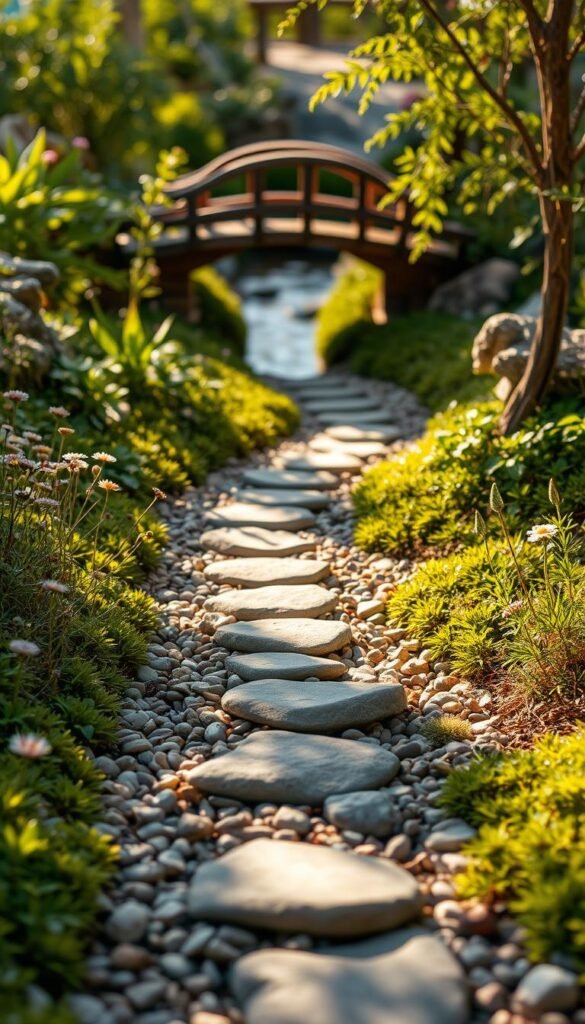
Backyard Fairy Garden Pathways: Pebbles, Stepping Stones, and Mini Bridges

Paths become portals in your outdoor storybook, where each curve whispers secrets of hidden realms. Crafting these routes transforms simple strolls into journeys where texture and scale work together to spark curiosity. Imagine tiny travelers pausing at a mossy bench or crossing a arched twig bridge over a ravine of polished glass chips.
Storytelling Through Path Designs
Your route layout acts as a map for the imagination. Combine smooth river rocks with jagged slate pieces to suggest different terrains. A cluster of quartz crystals might mark a magical energy source, while flat stones arranged in spirals could hint at ancient rituals.
Add arched twig bridges where the ground dips naturally. These crossings create visual momentum, guiding eyes (and tiny feet) toward hidden clearings. Surround them with feathery ferns or creeping thyme to soften edges.
Creating Natural Curves and Intriguing Spots
Forget ruler-straight lines—nature loves gentle bends. Use a garden hose to test flowing shapes before setting materials. Vary your path’s width from 3″ to 6″ to create resting nooks and rushing corridors.
Tuck surprises into unexpected corners:
- A miniature bench under a mushroom cap
- Glowing pebbles near a “waterfall” of blue marbles
- Cracked pottery shards forming stepping plates
Edge your trails with Irish moss or woolly thyme. These living borders blur the line between path and landscape, making magic feel spontaneous rather than planned.
Innovative Materials and Craft Techniques

Bring your miniature landscapes to life using clever material combinations that balance artistry with practicality. A complete pathway project costs just $16.57 using accessible materials from craft stores. Start with polymer clay in earthy shades—white, tan, and speckled stone-effect varieties create convincing faux pebbles.
Using Polymer Clay and Natural Elements
Mix clay’s versatility with organic textures for authentic results. Cool sticky clay in your freezer for five minutes before shaping irregular pieces. Roll different colors into varied stone shapes—no two should match. Flatten each creation slightly, then slice with a craft blade for flat undersides that glue securely.
Step-by-Step Crafting for Pebble Paths
Begin by warming clay until pliable. Create 20-30 unique “stones” using your palms and fingers. Bake according to package directions. While cooling, cut thin board into winding path shapes. Paint surfaces brown to mimic dirt. Arrange baked pebbles along the design, leaving natural gaps between stones.
Tips for Enhancing Durability Outdoors
Seal baked clay with UV-resistant spray. Use weatherproof glue when attaching stones to the base. Position your creation under eaves or in partly shaded areas to minimize direct sun exposure. Refresh protective coatings each spring to maintain vibrant colors through seasonal changes.
Store leftover clay in sealed bags to prevent drying. With these techniques, your handcrafted elements will withstand rain, snow, and curious critters while keeping their storybook charm.
Creating Enchanting Stepping Stone Effects
Elevate your outdoor space with pathways that spark wonder and guide exploration. Thoughtful placement of textured elements creates rhythm while inviting discovery. Use flat rocks to establish clear routes that feel organic rather than forced.
Designing Unique Stone Textures
Make manufactured materials look naturally weathered. Scratch surfaces with sandpaper or carve grooves using a rotary tool. Mix paint colors to mimic lichen patterns—light gray base coats with moss-green accents work well.
Vary stone sizes to match your space’s proportions. Larger pieces anchor key areas, while smaller ones create visual momentum. This approach helps young explorers navigate safely while building fine motor skills during play.
| Technique | Effect | Materials |
|---|---|---|
| Carving | Adds depth | Soft sandstone |
| Painting | Creates aging | Acrylic washes |
| Natural aging | Authentic patina | Yogurt moss mix |
Incorporating Mini Bridges for Visual Appeal
Span dips in the terrain with arched bark pieces. Balance rectangular wood slices on cork caps for rustic benches. These elements add height variation and suggest daily use by tiny residents.
Add small lanterns along bridge edges using bead caps and LED tea lights. The soft glow enhances evening safety while creating storybook charm. Position crossings where paths change direction to maintain visual flow.
Integrating Natural Elements and Lush Plantings

Breathe life into your miniature world through thoughtful greenery choices. The right plants create depth while maintaining magical proportions, turning ordinary dirt into enchanted landscapes.
Selecting Scale-Appropriate Plants
Choose varieties that stay naturally compact. Dwarf mondo grass forms perfect tufts resembling full-sized lawns. Peperomia’s coin-shaped leaves work as fairy-sized shrubs. For texture contrast, mix in clubmoss that mimics ancient forests.
Fragrant herbs add sensory magic. Creeping thyme releases earthy scents when brushed by passing “residents.” Chocolate mint leaves create sweet surprises underfoot. Always match your selections to local sun patterns and hardiness zones.
Blending Pathways with Soft Greenery and Moss
Let ground covers weave your design together. Irish moss spills over stone edges like living lace. Woolly thyme fills gaps between pebbles with fuzzy greenery. These living carpets soften hard lines while preventing soil erosion.
Revive dried sheet moss by soaking it first. Tuck damp clumps under taller specimens to create instant lawns. Position dwarf ferns near curves to frame views. This layered approach guides eyes along routes while hiding bare patches.
Remember: successful designs balance visual flow with practical growth habits. Your tiny ecosystem thrives when every plant serves both beauty and purpose in the grand miniature scheme.
Practical Assembly Tips for Your Fairy Garden

Turn practical considerations into magical foundations that withstand seasons while keeping charm intact. Smart assembly blends durability with delicate details—your creation should look effortless but stay rooted through storms.
Constructing Secure Paths and Mini Bridges
Start with a base layer of gravel or crushed stone for drainage. “A solid foundation prevents shifting during freeze-thaw cycles,” advises landscape designer Mara Li. Use weatherproof adhesives when attaching stones or bridges to surfaces.
| Material | Durability | Installation Tip |
|---|---|---|
| Resin bridges | 5+ years | Anchor with landscape pins |
| Clay pavers | 3-4 years | Set in sand base |
| Wood slices | 2 years | Seal with marine varnish |
For sandy or clay-heavy soil, mix in compost before laying paths. This improves drainage around your fairy house foundations. Create gentle slopes near door areas to direct rainwater away from delicate structures.
Landscaping Around Your Crafted Pathways
Frame walkways with low-growing herbs like Corsican mint. Leave 1″ gaps between plants and path edges for easy trimming. Use this trick to add small decorative accents later—pebble mosaics or miniature signs.
“Always test watering patterns before final planting—some groundcovers drown easily while others thirst quickly.”
Prune weekly with nail scissors to maintain scale. Position taller specimens behind fairy houses to create depth. For night magic, add small solar lights near bridges after landscaping settles.
Final Magic Touches for a Lifelong Enchanted Garden
Complete your miniature masterpiece with elements that spark joy through every season. Add tiny lanterns along curves using solar-powered beads—they’ll glow softly after sunset, creating fairy garden ideas that feel alive. Tuck polished seashells near “streams” of blue glass chips for playful texture contrasts.
Personalize your space with hand-painted stones marking special spots. Try seasonal swaps: autumn acorn caps as bowls, winter pinecone “trees” dusted with glitter. These updates keep the magic fresh while letting your garden ideas evolve naturally.
For lasting charm, layer materials like pea gravel under decorative elements. This trick prevents mud while adding crunch underfoot. Blend store-bought pieces with found treasures—twig arches or birch bark signs make visitors pause and smile.
Remember, the best fairy gardens grow with you. Let moss creep over edges and vines drape across bridges. Check out these creative crafts to add personality without breaking the spell. Soon, you’ll spot new details every time you look—proof that magic thrives where imagination plays.


