
Creating a beautiful outdoor area doesn’t require deep pockets—just smart thinking. Start by looking at everyday items with fresh eyes. That cracked teapot? Perfect for herbs. Those empty jars? Ideal seedling starters. Nature thrives when paired with imagination, not expensive supplies.
Many gardeners find success through simple swaps. Compost food scraps instead of buying fertilizer. Use rainwater collected in buckets for hydration. These small steps add up, letting you nurture plants while keeping costs low. For more inspiration, explore practical ideas that refresh your space without.
Your efforts benefit more than just your wallet. Repurposing materials reduces waste and builds healthier soil. Even limited areas bloom when you maximize vertical space with hanging containers or wall planters. Every choice becomes part of a sustainable cycle.
Remember: Great results come from working with what you have. Whether dividing existing plants or trading cuttings with neighbors, creativity fuels growth. Your personalized oasis awaits—one thoughtful project at a time.
Understanding the Benefits of Budget-Friendly Gardening

Embracing eco-friendly methods turns everyday waste into garden gold, cutting costs naturally. When you prioritize sustainability, every banana peel or coffee ground becomes a tool for growth. This approach strengthens soil, reduces reliance on store-bought products, and keeps usable items out of landfills.
Why Sustainable Practices Matter
Composting kitchen scraps creates nutrient-rich soil amendments while shrinking your trash output. A single household can divert over 200 pounds of organic waste annually through simple composting. This cycle feeds plants naturally, eliminating the need for pricey fertilizers packed in plastic.
Cost Savings and Environmental Impact
Choosing DIY solutions over commercial products saves money while protecting ecosystems. For example, rainwater collection systems reduce water bills by 50% during growing seasons in many regions. These strategies create resilient gardens that thrive with minimal financial input.
| Traditional Approach | Sustainable Alternative | Annual Savings |
|---|---|---|
| Store-bought fertilizer | Homemade compost | $80-$120 |
| Plastic seed trays | Repurposed egg cartons | $15-$30 |
| Municipal water | Rain barrel system | $50-$75 |
By adopting creative container solutions, you’ll notice improved plant health and stronger yields. These methods build self-reliance, letting you control what goes into your food while protecting local waterways from chemical runoff.
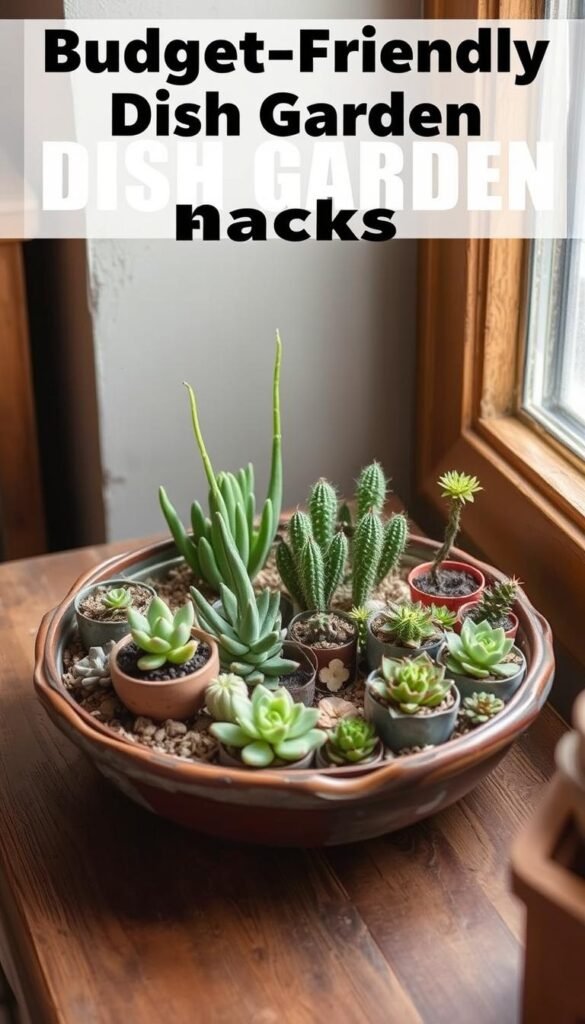
Discover Budget-Friendly Dish Garden Hacks: Recycle Materials and Save Money

Unleash creativity by giving old objects new life as plant homes. That chipped mug collecting dust? Ideal for succulents. Those empty pasta sauce jars? Perfect basil nurseries. Unexpected items become standout features when paired with greenery.
Start by hunting for candidates in forgotten corners. Consider these transformations:
| Household Item | New Purpose | Plant Match |
|---|---|---|
| Teapot | Herb display | Thyme, mint |
| Tin can | Flower pot | Pansies, marigolds |
| Glass jar | Terrarium | Ferns, moss |
| Plastic bucket | Tomato planter | Cherry varieties |
Drill three holes in each container’s base for drainage—a screwdriver and hammer work if you lack tools. Fill halfway with gravel before adding soil. This prevents waterlogged roots while letting excess moisture escape.
“The most interesting gardens reveal personality through their containers,” notes urban gardener Lila Chen. “Your choices become part of the story.”
Mix sizes and textures for visual intrigue. Cluster tiny spice jars of microgreens beside a statement piece like a retro colander bursting with strawberries. These displays spark conversations while keeping usable materials from landfills.
Your planters gain character with weather exposure—rust patterns on metal cans, sun-bleached wood tones. Unlike generic store-bought pots, these vessels develop patinas that enhance their charm season after season.
Getting Started with DIY Garden Projects

Launching your own green space begins with smart resource management. Before purchasing shiny new equipment, explore community connections. Many experienced growers enjoy mentoring newcomers and sharing surplus supplies.
Essential Tools and Resources
Build your toolkit gradually through these practical methods:
| Source | Cost Savings | Common Finds |
|---|---|---|
| Tool libraries | 100% (borrowed) | Shovels, pruners |
| Yard sales | 60-80% off retail | Rakes, gloves |
| Online swaps | Free to 50% off | Pots, watering cans |
Focus on three core items first: hand trowel, pruning shears, and durable gloves. These handle 90% of early tasks. As your skills grow, add specialty tools like soil testers or bulb planters.
Planning Your Garden Layout
Map your available area using sunlight patterns and water sources. South-facing spots suit sun-loving tomatoes, while shaded corners host mint or lettuce. Group plants with similar needs to simplify care.
Start with a 4×4 foot plot to manage time effectively. This compact space allows daily monitoring without overwhelm. Use string and stakes to outline beds before digging—this visual guide prevents costly mistakes.
“Successful gardens grow from thoughtful beginnings,” advises landscape designer Marco Torres. “Invest your energy in preparation, not expensive gadgets.”
Repurposing Household Items for Unique Garden Containers

Your home holds hidden potential for growing greenery in unexpected ways. That chipped mixing bowl? A vibrant succulent display. Those unused lunchboxes? Compact herb stations. Ordinary objects become extraordinary when paired with plants, blending function with personality.
Start by scouting your space for candidates. Metal cans work for shallow-rooted flowers, while deeper buckets suit tomatoes. Always drill holes in the bottom—a nail and hammer create quick drainage. Add gravel before potting mix to prevent soggy roots.
Unusual choices spark joy. Try retro toasters for air plants or rain boots bursting with petunias. These quirky displays become natural conversation starters. “Every container tells a story,” says gardener Elena Ruiz. “A cracked pitcher from your grandmother? Now it grows thyme she’d have loved.”
Match container size to your plant’s needs. Basil thrives in quart-sized jars, while dwarf citrus trees demand five-gallon buckets. Cluster varied heights together—stacked crates or hanging colanders—to create depth without crowding.
Your efforts do double duty. Each repurposed item reduces landfill waste while crafting features stores can’t replicate. Weather adds character over time—rusty tins develop patina, faded ceramics soften in sunlight. These evolving details make your space uniquely yours.
Creating Homemade Seed Starting Pods and Mini-Greenhouses

Transforming household trash into plant treasures starts with simple techniques anyone can master. With common recyclables, you’ll craft professional-grade growing systems that nurture seeds into robust plants. These methods slash costs while giving you complete control over early growth stages.
Crafting Seed Pods from Toilet Paper Rolls
Cut empty cardboard tubes into 2-inch segments. Fold one end inward to create a base—like closing a gift box. Fill each pod with potting mix and plant your seeds. As roots develop, the biodegradable material breaks down naturally when transplanted.
This approach eliminates plastic waste from store-bought trays. Your seedlings avoid transplant shock since their temporary containers become part of the soil. A family of four can repurpose 50 tubes annually—enough to start an entire vegetable patch.
Using Recycled Bottles for Mini-Greenhouses
Cut clear plastic bottles horizontally, keeping the bottom third. Place these domes over young plants to trap warmth and humidity. The transparent walls let sunlight through while shielding sprouts from wind or frost.
Rotate the lids daily to regulate moisture levels. You’ll spot condensation forming—a sign your microclimate works. Urban gardener Rosa Mendez shares: “My bottle greenhouses let me start tomatoes three weeks earlier than neighbors. The difference in growth is staggering.”
Transforming Kitchen Scraps into Thriving Plants
Your kitchen holds more potential than you might realize—those leftover veggie ends can become tomorrow’s harvest. With minimal effort, you’ll witness new life emerging from what others toss away. This approach turns waste into wonder while teaching valuable lessons about plant resilience.
Regrowing Vegetables from Scrap Bases
Start with green onion stubs or celery bottoms placed in shallow water near sunlight. Change the liquid every two days to prevent stagnation. Within a week, you’ll spot delicate roots stretching downward as fresh shoots reach upward.
| Vegetable | Regrowth Time | Success Tips |
|---|---|---|
| Green Onions | 7-10 days | Keep water level below stem joints |
| Celery | 14-21 days | Mist leaves daily |
| Romaine Lettuce | 10-14 days | Use warm water initially |
Once roots establish, transfer plants to soil using creative container solutions. Bok choy and basil cuttings thrive using this method too. Urban gardener Nina Patel notes: “My windowsill scrap garden supplies 30% of our salad greens—it’s like nature’s magic trick.”
This process reduces grocery bills while minimizing food waste. Children especially love watching growth unfold daily—it’s science class meets snack time. Plus, home-regrown veggies often taste crisper since you pick them at peak freshness.
Maximizing Soil Health with DIY Compost and Mulch
Healthy earth forms the foundation of every thriving green space. By working with nature’s recycling systems, you build richer growing environments while keeping resources in use. Two powerhouse methods—composting and mulching—transform waste into garden gold through simple processes anyone can master.
Homemade Compost Benefits
Turn kitchen scraps and yard debris into black gold for your plants. Combine these materials in a 3:1 ratio of brown to green matter:
- Fruit peels and coffee grounds (nitrogen-rich “greens”)
- Dry leaves and shredded paper (carbon-heavy “browns”)
- Eggshells for calcium boost
- Twigs for airflow structure
Within 6-8 weeks, microorganisms create dark, crumbly compost packed with nutrients. This living amendment improves soil structure better than any bagged product. “My plants doubled in size after switching to homemade compost,” shares urban farmer Diego Martinez.
Effective Mulching Techniques
Apply a 2-3 inch layer around plants using free or low-cost materials:
| Material | Best For | Duration |
|---|---|---|
| Shredded leaves | Vegetable beds | 3-4 months |
| Straw | Berry patches | Entire season |
| Grass clippings | Flower borders | 6 weeks |
Keep mulch 3 inches from stems to prevent rot. This protective blanket reduces watering by 30% while suppressing weeds naturally. Over time, organic mulch breaks down, feeding earthworms and improving soil fertility.
Regular composting paired with strategic mulching creates self-sustaining beds. You’ll notice fewer pests, better water retention, and vibrant plant growth—all without expensive additives. Start small with a countertop compost bin and fallen leaves from your yard. Nature handles the rest.
Leveraging Natural Fertilizers and Organic Nutrients
Your morning coffee ritual can become a secret weapon for thriving plants. Everyday household items and farm-sourced materials offer powerful alternatives to synthetic plant food. These solutions nourish greenery while keeping your practices eco-conscious.
Coffee Grounds as a Soil Enhancer
Used coffee grounds deliver a nitrogen boost that supports seed germination and chlorophyll development. Mix a handful into topsoil around acid-loving plants like tomatoes or blueberries. They improve soil structure while releasing nutrients slowly—just avoid thick layers that might compact.
Combine this with monthly Epsom salt treatments. Dissolve two teaspoons in a gallon of water to provide magnesium. This helps plants absorb nutrients more effectively, leading to deeper green leaves and stronger stems.
Utilizing Manure and Organic Amendments
Well-aged manure from local farms packs nitrogen, phosphorus, and potassium—the holy trinity of plant food. Let it cure for six months before use to prevent burning roots. For quick feeding, steep compost in water for 48 hours to create nutrient-rich tea.
| Amendment | Key Nutrients | Best For |
|---|---|---|
| Coffee Grounds | Nitrogen, Potassium | Acidic soil plants |
| Aged Manure | N-P-K Blend | Vegetable beds |
| Compost Tea | Microbial Life | Seedlings & containers |
These methods encourage earthworms and beneficial microbes. As Oregon farmer Clara Yates observes: “Healthy soil isn’t bought—it’s built through patient, natural care.” Your plants gain resilience without relying on store-bought formulas.
Designing Raised Beds with Recycled Materials
Elevate your growing game with structures that boost plant health while reducing clutter. Raised beds offer better drainage, easier access, and custom soil mixes tailored to your greenery. Best of all? You can build them using items already gathering dust in your garage or local reuse center.
Building with Old Pallets and Bricks
Wooden pallets become instant bed frames when disassembled. Arrange the planks into rectangles, securing corners with screws. Line the bottom with cardboard to suppress weeds while letting roots breathe. For brick beds, stack them in staggered rows without mortar—this allows natural drainage through gaps.
Fill your new beds with layered soil: compost first, then potting mix. The elevated design warms faster in spring, giving seedlings a head start. Group moisture-loving herbs in one bed and drought-tolerant flowers in another for smarter watering.
These structures keep your space organized while reducing back strain. As urban farmer Tasha Wells notes: “My pallet beds tripled my harvests—they’re like plant apartments with perfect growing conditions.”


