
What if your food scraps could transform into nutrient-rich soil amendment? Composting is nature’s way of recycling organic waste into a powerful garden booster. It’s simple, eco-friendly, and saves money on fertilizers.
By diverting leftovers from landfills, you cut methane emissions while creating a free plant superfood. Healthy soil retains more water, fights diseases, and even pulls carbon from the air. No wonder gardeners call it “black gold.”
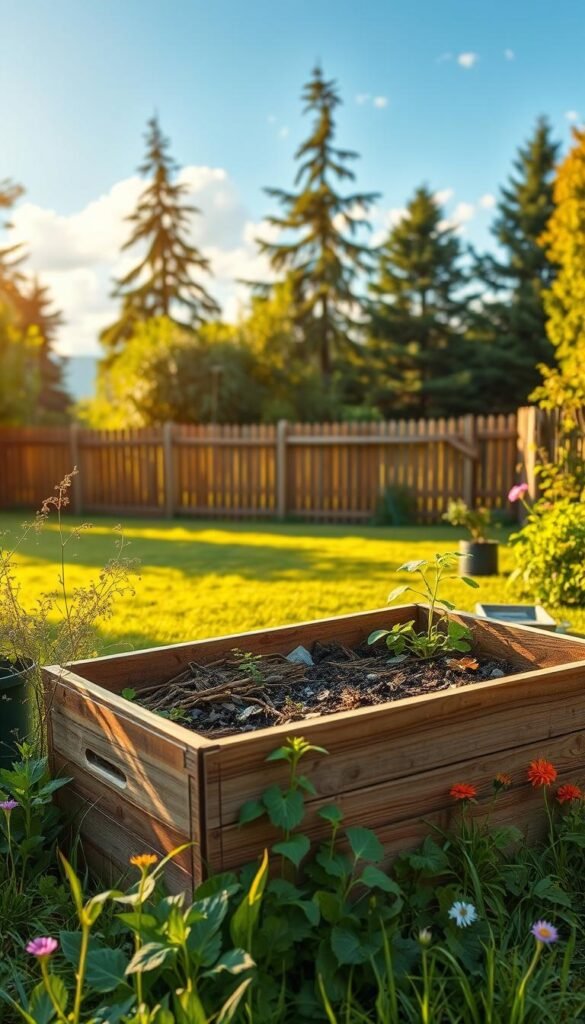
Starting is easier than you think. Layer greens like veggie peels with browns such as leaves in a bin or pile. Microbes do the hard work, breaking it down over time. For faster results, try no-dig beds layered with compost—they improve soil life and drought resistance.
Ready to reduce trash and grow lusher plants? Let’s explore how to set up your own efficient recycling loop.
Why Building a Sustainable Compost System in Your Backyard Matters

Did you know your banana peels could fight climate change? When organic waste breaks down in landfills, it releases methane—a gas 26 times more potent than CO2. Composting flips the script by using oxygen to speed up decomposition, slashing methane emissions by 50–75%.
The Environmental Impact of Composting
Globally, 44% of trash is organic. Tossed in landfills, it rots anaerobically, spewing greenhouse gases. But in a compost pile, microbes feast on your scraps, turning them into carbon-rich humus.
“Aerobic composting is like giving the earth a probiotic,”
says a Project Drawdown researcher.
Benefits for Your Garden and Soil
Healthy soil isn’t just dirt—it’s alive. UCLA found compost boosts water retention by 30%, meaning fewer dry spells for your plants. Over 19 years, UC Davis recorded a 20% jump in crop yields for compost-fed plots.
Skip synthetic fertilizers. Compost’s slow-release nutrients build resilient roots and prevent erosion. Your garden gets richer every season, naturally.
Understanding the Basics of Composting

Ever wonder how banana peels and fallen leaves turn into garden gold? The magic happens through decomposition, where nature’s recyclers—microbes and insects—transform waste into rich, dark humus. This composting process is simpler than you might think, but it follows precise natural rules.
What Is Compost (And How Does It Work)?
Compost is organic matter broken down by bacteria, fungi, and worms. These tiny workers need four things:
- Carbon (browns like dry leaves)
- Nitrogen (greens like veggie scraps)
- Oxygen from turning the pile
- Moisture like a damp sponge
Mix two parts browns with one part greens for the perfect recipe. This balance fuels microbial activity, generating heat up to 160°F in active piles.
The Science Behind Decomposition
When you layer materials correctly, microbes multiply rapidly. They digest carbon for energy and nitrogen for protein, releasing nutrients plants love.
“A healthy pile should smell earthy, not rotten,”
notes a USDA soil scientist. Backyard piles run cooler than industrial ones but still kill weed seeds at 130°F.
pH matters too. Aim for 6–8 to keep decomposers happy. Test with a kit or watch for white fungal threads—a sign of thriving microbes. Want faster results? Try hot composting by turning weekly.
Choosing the Right Compost Bin or Pile

Your compost setup can make or break your recycling success. The right container keeps odors controlled, speeds up decomposition, and deters pests. Whether you buy a pre-made bin or build your own, focus on airflow, size, and convenience.
Types of Compost Bins: Pros and Cons
From tumblers to stationary bins, each design suits different needs. Tumblers like the Maze Compost Tumbler ($200+) spin for easy mixing but cost more. Stationary options, like the Aerobin®400, require no turning and collect compost tea.
| Type | Pros | Cons |
|---|---|---|
| Tumbler | Fast decomposition, rodent-proof | Expensive, limited capacity |
| Stationary Bin | Low-cost, large capacity | Requires manual turning |
| Wire Pile | Cheap, flexible size | Exposed to pests |
DIY Compost Bin Ideas for Any Budget
For a $5 worm bin, repurpose a plastic tote with drilled holes. Line it with shredded newspaper and add red wigglers. Upcycle pallets or chicken wire for open piles—just layer materials like leaves and veggie scraps.
- Trash Can Bin: Drill holes in a metal can for airflow. Secure the lid with bungee cords to keep raccoons out.
- Straw Bale System: Stack bales into a square—no tools needed. Replace bales yearly as they decompose.
- Wood vs. Plastic: Cedar resists rot but costs more. Plastic bins last longer in wet climates.
“A well-built DIY bin works just as well as store-bought—if you maintain it,”
says a USDA composting guide. For small spaces, try a countertop compost bin with a charcoal filter to trap smells.
The Perfect Compost Recipe: Greens vs. Browns

Mastering the greens-to-browns balance turns waste into garden gold. Like a recipe, composting thrives on the right mix of nitrogen-rich greens and carbon-packed browns. Get the ratio wrong, and your pile might smell or stall. Nail it, and you’ll have crumbly, nutrient-dense humus in weeks.
Nitrogen-Rich Greens to Add
Greens fuel microbial activity with nitrogen. Fresh materials break down fast but can get slimy alone. Toss in:
- Vegetable scraps (no oils)
- Coffee grounds (filters too!)
- Fresh grass clippings (thin layers)
- Seaweed (rinse salt off first)
- Tea bags (remove staples)
Carbon-Packed Browns to Balance
Browns add structure and prevent odors. They decompose slower but keep airflow optimal. Try:
- Dry leaves (shredded)
- Cardboard (no glossy prints)
- Eggshells (crushed)
- Pine needles (great for acid-loving plants)
- Shredded newspaper (black ink only)
“Pizza boxes count as browns—their carbon content outweighs food stains,”
The Ideal 2:1 Ratio Explained
Aim for two parts browns to one part greens by volume. This ratio keeps microbes fed without suffocating them. Too many greens? Your pile turns slimy. Too many browns? Decomposition slows.
Layer materials like lasagna: browns first, then greens, and repeat. Turn weekly to aerate. If your pile smells like ammonia, add more browns. If it’s dry, sprinkle water or toss in juicy scraps.
Step-by-Step Guide to Starting Your Compost

Turning kitchen waste into rich soil doesn’t require a science degree—just smart layering. A 3’x3’x3’ bin or pile is ideal for heat retention. Chop scraps to 2” pieces to speed up the process.
Step 1: Selecting Your Location
Pick a spot with partial shade—full sun dries piles too fast. Near a water source helps with moisture control. Avoid low areas where water pools.
- Sunny spots: Faster decomposition but need more watering.
- Shaded areas: Slower but retain moisture better.
Step 2: Layering Your Materials
Start with twigs for airflow at the base. Alternate materials like lasagna:
- Browns (leaves, cardboard)
- Greens (veggie scraps, coffee grounds)
- Soil or finished compost to inoculate microbes
“A base layer of sticks prevents compaction—think of it as your pile’s foundation,”
Step 3: Maintaining Moisture and Airflow
Keep the pile damp like a wrung-out sponge. In dry climates, water weekly. Turn with a pitchfork or compost screw every 7–10 days to boost air circulation.
- Too wet? Add browns and turn more often.
- Smelly? Sprinkle baking soda to neutralize acidity.
In 4–6 weeks, your black gold will be ready to nourish plants!
What to Compost (And What to Avoid)
Not all kitchen scraps are created equal—some speed up decomposition while others sabotage it. A well-balanced pile avoids odors, pests, and slow breakdowns. Knowing what belongs in your bin saves time and boosts results.
Kitchen Scraps That Belong in Your Bin
Most kitchen scraps break down quickly. Coffee grounds, filters, and nut shells add texture. Citrus rinds and stale bread work but chop them small. Even hair and paper towels (unbleached) decompose well.
Pro tip: Eggshells neutralize acidity but crush them first. Avocado pits take years—skip them. Onions and garlic slow microbes, so use sparingly.
Surprising Items You Should Never Compost
Avoid these items to prevent odors and pests:
- Meat or bones (attracts rodents)
- Dairy products (creates rancid smells)
- Glossy cardboard (contains PFAS chemicals)
- Diseased plants (spreads pathogens)
“BPI-certified products need industrial facilities—they won’t break down in backyard piles,”
warns an EPA composting guide. Pet waste carries parasites, and coated papers leach toxins.
| Safe to Compost | Avoid |
|---|---|
| Fruit peels | Meat/fish |
| Tea bags | Dairy |
| Shredded newspaper | Oily foods |
| Dry leaves | Coated paper |
When in doubt, leave it out. Your pile thrives on simplicity—stick to plant-based scraps and untreated paper.
Maintaining Your Compost System
Like a living ecosystem, your compost requires balance to work efficiently. Regular checks and small tweaks keep the process humming. Ignore it, and you might face odors or pests. But with simple care, you’ll get that crumbly “black gold” faster.
How Often to Turn Your Pile
Turning mixes air into the pile, fueling microbes. For hot composting (130–160°F), flip every 3–4 days. Cold piles need just monthly turns. Use a pitchfork or compost crank to avoid compacting layers.
“The sweet spot? Your pile should feel warm 12 inches deep—like a cozy bath,”
Signs Your Compost Needs Attention
Foul smells? Add browns (leaves, cardboard) to fix anaerobic conditions. Pests? Bury food scraps under 6 inches of browns. Other red flags:
- Dry pile: Sprinkle water or add juicy greens (veggie scraps).
- Soggy layers: Mix in shredded newspaper or straw.
- Matted clumps: Chop materials smaller for faster breakdown.
Test moisture by squeezing a handful—it should feel like a wrung-out sponge. In heavy rain, cover with a tarp. Snow? Insulate with straw to keep microbes active.
Troubleshooting Common Compost Problems
A healthy pile should smell earthy—not like a landfill. When odors or critters appear, your materials or moisture levels likely need adjusting. Most problems have simple fixes to get your process back on track.
Fixing a Smelly or Slimy Compost Pile
Strong odors mean imbalance. Ammonia smells signal too many greens (nitrogen). Rotten egg stench? Lack of oxygen. Try these fixes:
- Ammonia: Mix in shredded paper or dry leaves (browns).
- Sour vinegar: Add crushed eggshells or garden lime.
- Slime: Turn the pile weekly and add twigs for airflow.
“A slimy pile needs carbon ASAP. Cardboard or straw absorbs excess moisture,”
Dealing with Pests and Unwanted Visitors
Pests like fruit flies or raccoons avoid well-managed piles. Deter them with:
- Fruit flies: Bury scraps under 2″ of soil or browns.
- Rodents: Line bins with ¼” hardware cloth.
- Ants: Turn and water dry sections—they hate dampness.
For raccoons, use a locking tumbler lid. Sprinkle cayenne pepper around the bin to repel curious noses.
Creative Ways to Use Your Finished Compost
Your finished compost is a powerhouse—here’s how to unleash its full potential. This nutrient-rich humus can revitalize your garden, lawn, and even potted plants. No waste, no fuss—just natural results.
Enhancing Garden Beds and Vegetable Patches
Mix 20% compost into potting soil for containers. It boosts water retention and feeds plants slowly. For raised beds, layer 1–2 inches on top each season. The Marin Carbon Project found this locks carbon in soil for over a decade.
Pro tips:
- Compost tea: Steep 1 cup compost in a 5-gallon bucket of water for 48 hours. Strain and spray on leaves for instant nutrients.
- Sheet mulching: Smother weeds with cardboard topped with 3 inches of compost. Plant directly into this lasagna-like layer.
- Trench composting: Bury compost 6 inches deep between crop rows. It feeds roots as it breaks down further.
Compost as Natural Lawn Fertilizer
Top-dress grass with ⅛ inch of sifted compost in spring or fall. Rake lightly to let it settle. Unlike synthetic fertilizers, it won’t burn turf and builds healthier soil over time.
Other clever uses:
- Winter blankets: Spread compost around perennials to insulate roots from frost.
- Seed starters: Press compost into muffin tins, add seeds, and transplant later—no plastic pots needed.
“Compost is the Swiss Army knife of gardening—it solves multiple problems at once,”
notes a UC Master Gardener. Whether you’re growing tomatoes or turf, your finished compost has a way to help.
Advanced Composting Techniques
Ready to supercharge your composting skills? These pro methods speed up decomposition and fit any space—whether you’re tight on yard space or craving faster results. From turbocharged hot piles to compact worm bins, there’s a way to match your lifestyle.
Hot Composting for Faster Results
Hot piles work like microbial jet fuel. Build a 4’x4’x4’ cube with equal parts greens and browns for a 50:50 carbon-to-nitrogen process. This mix heats up to 160°F, breaking down materials in just 6 weeks—versus 6 months for cold piles.
- 3-bin system: Rotate batches for continuous processing (add to Bin 1, turn into Bin 2, harvest from Bin 3).
- Thermometer checks: 130–150°F kills weed seeds; below 100°F? Turn and add greens.
“Hot composting is like baking bread—the right heat and ingredients make all the difference,”
Vermicomposting with Worms
Red wigglers (Eisenia fetida) are the MVPs of small-scale composting. One pound of worms eats ½ lb of scraps daily in a ventilated bin. Keep them cozy (55–77°F) and avoid citrus or onions, which irritate their skin.
Troubleshooting tips:
- Overheating: Move the bin to shade and add damp newspaper.
- Mites: Sprinkle diatomaceous earth—harmless to worms but deadly to pests.
For homes without outdoor space, Bokashi bins ferment waste anaerobically in 2 weeks. Layer scraps with bran, then bury the pre-compost to finish. No turning, no smell—just nutrient-packed results.
Join the Movement: Your Compost Journey Starts Today
Every small step you take adds up to big environmental wins. At home, composting diverts 700+ pounds of waste annually—enough to fill a pickup truck. That’s less trash in landfills and more nutrients for your garden.
Ready to go further? Share bins with neighbors or join local compost advocacy groups. A printable C:N ratio cheat sheet makes balancing greens and browns effortless.
Take the EPA’s pledge to cut greenhouse gases. Your pile isn’t just dirt—it’s a way to fight climate change, one peel at a time. Start your compost journey today.


