
Transforming your backyard into a thriving green oasis doesn’t require deep pockets. With simple materials like cedar fence posts – priced at just $3.15 each – you can craft durable planters that boost soil quality and simplify maintenance. Six boards per unit keep costs below $22, as shown in this affordable garden setup guide.
These elevated planters offer practical perks beyond savings. You’ll gain precise control over soil composition while reducing weeds and back strain. Their modular design lets you arrange multiple units in hours, perfect for tailoring layouts to your space. Need inspiration? Explore creative square-foot gardening layouts that maximize yield.
First-time builders will appreciate the straightforward process. Cedar’s natural rot resistance ensures your project lasts 7-10 years, and basic tools like a circular saw handle most cuts. By sunset, you could be prepping soil for tomorrow’s tomato seedlings or herb sprouts.
Understanding the Benefits of Raised Garden Beds
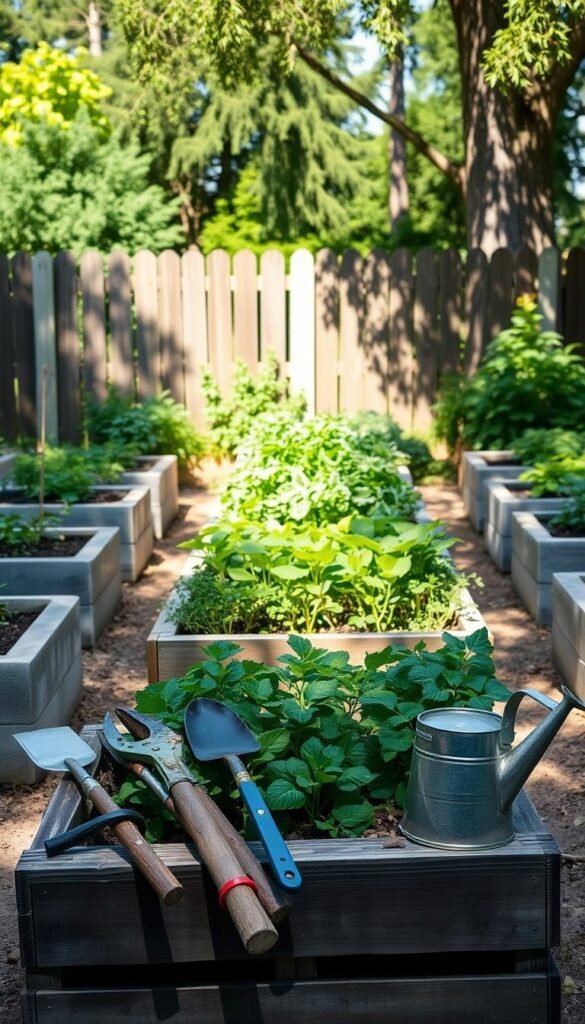
Imagine harvesting veggies without bending over—raised beds make it possible. These elevated planters keep your soil loose and fertile since kids and pets won’t trample your growing area. Healthy roots develop better in undisturbed earth, giving you stronger plants and bigger yields.
You’ll spend less time battling weeds too. The contained design acts like a barrier, stopping invasive grasses from creeping into your crops. Fill your beds with custom soil blends instead of struggling with rocky or clay-heavy ground. This control means happier tomatoes, crispier lettuce, and herbs that actually taste like something.
Space becomes your ally with these setups. Forget wide rows—pack plants closer using square-foot techniques. You can reach every leaf and stem without stepping on soil, which is perfect for tending delicate greens or pruning tomatoes. Need to build one? This step-by-step guide shows how simple it is.
Water management improves dramatically. Excess moisture drains faster than in flat gardens, protecting roots from rot during heavy rains. Your plants get hydration without the swampy conditions that attract pests. It’s gardening made smarter, not harder.
Planning Your Space and Materials

Mapping out your growing area turns guesswork into strategy. Start by sketching your yard’s sun patterns—most vegetables thrive with 6-8 hours of direct light daily. Keep water sources within hose reach, and position planters near your kitchen for quick herb grabs while cooking.
Measure twice to buy once. Cedar posts come in standard lengths, so calculate exact needs based on your layout. For multiple units, leave 30-36″ between them—enough room for a wheelbarrow or kneeling pad. Compact designs work wonders for urban yards, while sprawling setups suit rural spaces.
| Bed Size | Best For | Materials Needed |
|---|---|---|
| 4’x4′ | Leafy greens & herbs | 6 cedar posts |
| 4’x8′ | Tomatoes & peppers | 10 cedar posts |
| 3’x6′ | Root vegetables | 8 cedar posts |
Slope matters more than you think. Place beds where water drains naturally after storms. Avoid low spots where puddles linger—soggy roots spell trouble for plants like rosemary or lavender. Leave space at one end for compost bins or future trellises.
Smart designs grow with you. Start small if you’re new, but mark areas for potential expansion. This foresight lets you add berry bushes or fruit trees later without reworking your entire setup.
Cheap Raised Garden Beds DIY: Building a Budget-Friendly Plot – A Closer Look

Crafting your own planters unlocks surprising savings without sacrificing quality. A standard 6×3-foot unit requires six cedar fence posts at $3.15 each—totaling under $22. Compare that to store-bought kits, which often triple the price for similar dimensions.
| Feature | DIY Option | Pre-Built Kit | Savings |
|---|---|---|---|
| Materials | $22 | $100+ | 78%+ |
| Assembly Time | 2-3 hours | 30 minutes | More customization |
| Durability | 7-10 years | 3-5 years | Longer lifespan |
You’ll spend less time building than shopping for pre-made options. Basic tools like a drill and saw handle most of the work—no advanced skills needed. First-timers often complete their initial bed in an afternoon, then breeze through additional units.
“The real value comes from tailoring sizes to your space. Start small, expand later—your wallet will thank you.”
Scaling your setup becomes effortless. Build one planter this weekend, add another next month. This phased approach lets you grow fresh herbs while planning larger crops like tomatoes. For layout ideas, explore square-foot gardening layouts that maximize every inch.
Cedar’s natural resistance to rot means your investment keeps giving. Over seven years, that $22 bed could yield hundreds in homegrown produce—all while avoiding store-bought markup.
Selecting the Right Wood and Materials

Choosing materials for your growing space feels like picking teammates—some options work harder while others cost more. Three wood types dominate planters: cedar, redwood, and pine. Each brings unique strengths to your project.
Comparing Cedar, Redwood, and Pine
Cedar shines as the practical choice. At $3.15 per fence post, it balances cost with natural rot resistance. Redwood offers similar durability but doubles the price—ideal for rainy climates. Pine costs less initially but may need replacing in 3-5 years.
| Wood Type | Cost per Board | Lifespan | Best Use |
|---|---|---|---|
| Cedar | $3.15 | 7-10 years | Edible gardens |
| Redwood | $6.50 | 10-15 years | High-moisture areas |
| Pine | $2.10 | 3-5 years | Decorative beds |
Smart Sourcing Strategies
Local lumber yards stock fence-grade cedar—perfect for planters. These rough-cut boards cost 40% less than finished lumber. Ask about bulk pricing if building multiple units.
Skip pressure-treated wood for edibles. Its chemicals can seep into soil over time. Instead, use stainless screws and galvanized corner braces. They withstand weather without contaminating your crops.
Remember: Appearance-grade wood wastes money. Your beds will develop a rustic patina naturally. Focus on structural integrity rather than flawless surfaces.
Essential Tools for Your Raised Garden Bed Project

The right toolkit transforms garden projects from frustrating to fulfilling. Whether you’re crafting your first planter or expanding an existing setup, having these items on hand ensures smooth assembly and lasting results.
Carpentry and Cutting Tools
A circular saw makes quick work of cedar posts, creating clean edges for tight joints. Pair it with a speed square to verify 90-degree angles before cutting. Your drill becomes the MVP here—use a 1/8″ bit for pilot holes, then switch to a Phillips head to drive 3″ screws through the wood.
Safety Gear and Supporting Equipment
Protect your eyes from flying debris with wrap-around safety glasses. Thick work gloves prevent splinters while handling rough lumber. For extended sawing sessions, noise-canceling earmuffs keep your hearing sharp.
| Tool Type | Must-Have Items | Key Purpose |
|---|---|---|
| Cutting | Circular saw, tin snips | Precise material sizing |
| Fastening | Drill/driver, staple gun | Secure joints & mesh |
| Safety | Gloves, respirator | Injury prevention |
Sawhorses create a stable surface for measuring and cutting. They eliminate back strain compared to ground-level work. Keep a tape measure handy—marking exact dimensions prevents wasted materials.
Don’t overlook specialty tools. A staple gun secures pest-proof mesh to bed bottoms in seconds. Tin snips trim metal flashing for custom corner protectors. These extras add polish while saving time during assembly.
Step-by-Step Preparation and Measurements

Precision marks the difference between a haphazard project and a thriving growing space. You’ll transform raw materials into a functional planter through methodical planning—no guesswork needed.
Measuring and Marking Your Garden Plot
Grab your tape measure and speed square for this critical phase. Each 6-foot cedar post gets marked at 36 inches—the midpoint where you’ll make clean cuts. Double-check these marks before sawing to ensure uniform 3-foot end pieces.
Your final bed dimensions might surprise you. Six-foot boards create planters closer to 5’10” when accounting for corner overlaps. This slight reduction matters when arranging multiple units in tight spaces.
Cutting and Preparing Lumber
Transform decorative pickets into sleek planter walls by trimming their scalloped tops. A circular saw makes quick work of these adjustments, creating straight edges that align perfectly during assembly.
Group identical cuts together to save time. Stack four posts, mark them simultaneously, and slice through all at once. This technique guarantees matching pieces for multiple planters while minimizing errors.
“Measure twice, cut once isn’t just a saying—it’s your shield against wasted materials.”
Organize components before drilling. Separate long sides from short ends, then group screws and corner brackets. This prep work turns assembly into a smooth, frustration-free process.
Assembling Your Raised Garden Bed Frame
Transform loose boards into a sturdy growing space using simple framing methods. Start by laying two long cedar pieces parallel on your work surface. Position 10-inch corner supports (1x2s or split 2x4s) at each end – these hidden heroes create rock-solid joints that outlast seasons.
Mastering Corner Connections
Flip the assembly vertically so cedar boards hug your table edge. The supports now stand upright like metal braces on a treehouse ladder. This positioning lets you attach short end pieces at perfect right angles. Drill pilot holes through both components to prevent wood splitting.
Work clockwise around the structure for consistent results. Secure each connection with three screws:
- Top and bottom screws lock vertical alignment
- Center screw prevents twisting over time
- Stagger fasteners to avoid weak points
Double-layer construction adds durability against soil pressure. Stack identical boards directly over the first set, offsetting seams by 6 inches. This technique strengthens weak spots while maintaining clean lines. Your completed box should withstand 300+ pounds of moist earth without bowing.
“Proper framing isn’t about perfection – it’s creating joints that flex just enough to handle nature’s surprises.”
Check diagonals with a tape measure after assembling all sides. Matching corner-to-corner measurements guarantee squareness. Adjust gently with rubber mallet taps before filling with soil.
Securing the Structure with Supports and Screws
A sturdy frame begins with smart reinforcement strategies. While cedar offers natural durability, proper fastening techniques ensure your planters withstand years of soil pressure and weather changes. Let’s explore how to lock everything in place.
Building Lasting Connections
Galvanized screws prove essential here—they resist rust better than standard options. Drive them through pre-drilled holes to prevent wood splitting. You’ll notice cleaner joints and tighter corners compared to rushed installations.
Position support posts along the inner walls for hidden strength. This placement keeps edges smooth while anchoring the structure. Add center braces on long sides—they act like seatbelts, holding soil weight without letting walls bulge.
“Proper supports turn flimsy boxes into fortress-like planters that laugh at heavy rains.”
Check screw heads sit flush with the wood surface. Protruding edges snag gloves and scratch arms during planting. Use a drill’s clutch setting to avoid over-tightening—cedar needs gentle handling despite its toughness.
These reinforcements do double duty. Besides preventing bowing, they create anchor points for attaching trellises or frost covers later. Think of them as built-in upgrade slots for your evolving gardening needs.
Optimizing Soil, Drainage, and Weed Prevention
The secret to a productive garden lies in its base layers. Start by smothering existing weeds and grass with cardboard—a simple trick that creates a natural barrier. This foundational step sets up your raised bed garden for success while recycling household materials.
Using the Lasagna Method for Soil Enrichment
Layer organic materials like a culinary masterpiece. Begin with flattened cardboard at the bottom to block sunlight from reaching stubborn weeds. Add sticks and leaves next—they’ll break down slowly, improving drainage as they decompose.
Top this with unsprayed straw and grass clippings for nitrogen-rich fuel. Finish with 4 inches of quality soil blended with compost. This approach mimics forest-floor ecosystems, creating ideal conditions for roots to thrive. For larger projects, consider a backyard transformation using similar layering principles.
Your plants will reap the rewards:
- Cardboard suppresses weeds naturally without chemicals
- Organic layers retain moisture during dry spells
- Soil stays loose and nutrient-dense for years


