
What if you could harvest crisp lettuce or crunchy carrots long after summer ends? A simple cold frame makes this possible by shielding plants from frost and creating a cozy microclimate. Think of it as a mini greenhouse that traps warmth and sunlight, letting you enjoy fresh produce even as temperatures drop.
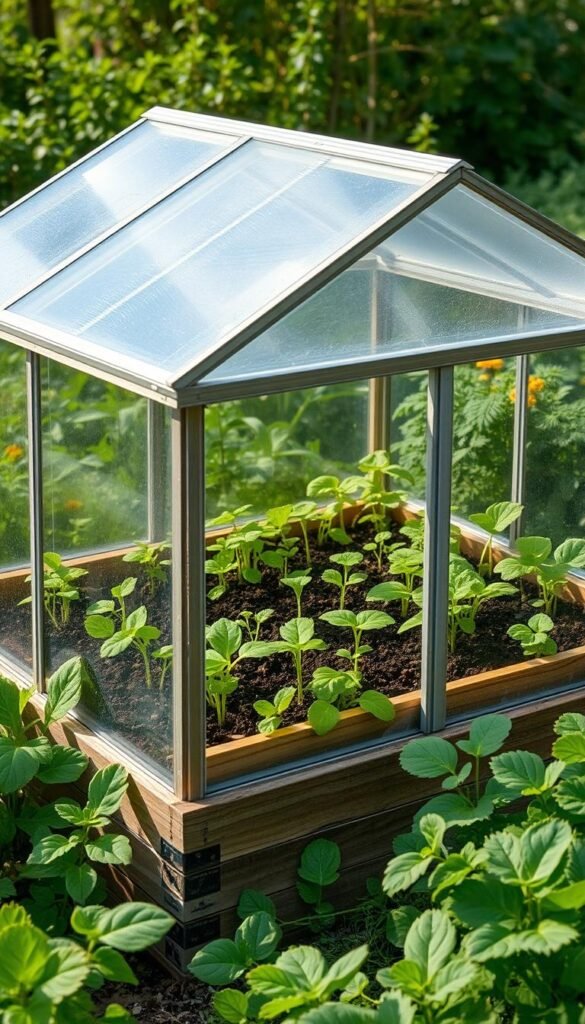
These structures are easy to build or buy—many gardeners use basic materials like wood and old windows. The design is straightforward: a low, bottomless box with a slanted transparent cover to maximize sunlight. Angling the top toward the winter sun helps plants thrive when days are short.
Why bother? Imagine snipping herbs for soups in December or picking spinach in January. A well-placed frame protects crops from harsh winds, heavy snow, and icy rain. Retailers like Charley’s Greenhouse & Garden offer ready-made options, but DIY versions work just as well for most climates.
You don’t need fancy tools or skills to get started. With a little planning, your garden can stay productive year-round. The best part? You’ll savor homegrown flavors while neighbors settle for grocery-store veggies.
Introduction to Cold Frame Gardening

Imagine stepping into your backyard in November and plucking fresh arugula or radishes from a protected space. This is the magic of cold frames—simple tools that stretch your planting calendar by weeks or months. Unlike traditional methods, these structures act as nature’s pause button, shielding crops from early frosts while letting sunlight work its warmth-trapping wonders.
Their design couldn’t be simpler: a shallow wooden or metal box topped with a clear lid. This setup captures daytime heat and releases it slowly overnight, creating a snug environment for plants. Even in areas where snow arrives early, leafy greens like kale and spinach can flourish under this shelter.
Why does this matter? Shorter days and unpredictable weather often cut harvests short. With a well-positioned frame, you maintain control. It’s like giving your veggies a cozy blanket while the world outside turns icy. You’ll find yourself picking herbs for holiday meals or adding homegrown crunch to winter salads.
Later sections will dive into the science behind these microclimates and share step-by-step setup tips. For now, picture your garden thriving long after others have gone dormant—all thanks to a humble box and some clever planning.
Understanding the Science Behind Cold Frames

The secret to winter harvests lies in the science of microclimates. These small, controlled environments trap heat and sunlight, creating conditions up to 15°F warmer than outside air. Your frame acts like a solar battery—absorbing rays by day and releasing warmth at night.
How Sunlight and Angles Build Warmth
An angled window or plastic lid is key. Positioned toward the southern horizon, it captures maximum low winter sun. This design intercepts light even during short days, heating the interior like a car parked in sunshine. Veteran gardeners report temperatures inside can rise 20°F above outdoor readings.
Balancing Heat and Airflow
Too much warmth can harm plants. That’s why ventilation matters. On sunny afternoons, cracking the lid prevents overheating. At night, insulation like burlap sacks helps retain heat. This balance lets cold-tolerant crops like spinach and kale flourish.
Real-world tests show these setups mimic climates one USDA zone warmer. In Michigan (Zone 5), a well-built frame creates Zone 6 conditions—enough for arugula to thrive beneath January snow. It’s physics working for your plate!
Why Cold Frame Gardening is Ideal for Colder Months

Ever wondered how your garden could defy winter’s chill? Traditional methods stop at frost, but a simple cold frame keeps vegetables thriving. While summer crops like tomatoes need warmth, cold-hardy varieties flourish in these sheltered spaces—turning barren months into harvest time.
Standard gardens shut down when temperatures drop. Frost nips tender leaves, and frozen soil halts growth. With a protective structure, you extend the growing season by weeks. Spinach stays crisp, mâche remains sweet, and carrots grow sweeter after light frosts—all shielded from harsh elements.
Benefits go beyond longevity. Winter conditions intensify flavors in leafy greens while reducing pests. You’ll also save money—no need for expensive heated greenhouses. Just ensure proper airflow on sunny days and add insulation like straw bales during extreme cold snaps.
Think of it as a thermostat for your plants. Open the lid slightly when midday sun warms the interior, then close it before dusk to trap heat. This balance lets you harvest fresh produce even when snow blankets the ground outside.
Why settle for store-bought greens that lose nutrients in transit? With smart planning, your backyard becomes a year-round pantry. Imagine serving salads in January with ingredients picked hours earlier—proof that winter doesn’t have to mean dormancy.
Setting Up Your Cold Frame

Building your own protective growing space starts with smart material choices. Whether you’re repurposing old items or buying new, durability matters. Many gardeners use cedar or recycled plastic lumber for the box—both resist rot and last for years.
Selecting the Right Materials
Opt for transparent tops like polycarbonate panels or salvaged storm windows. These let sunlight through while retaining heat better than glass. For insulation, line the interior walls with foam board or straw bales. If you’re handy, repurpose an old wooden crate and add hinges for easy access.
Step-by-Step Construction Tips
Start by assembling a bottomless wooden frame. Angle the top slightly southward to catch maximum winter sun. Secure the lid with sturdy hinges—this lets you vent heat during sunny afternoons. Add weatherstripping around edges to seal gaps.
Place your structure where it gets morning light and shelter from northern winds. Test the location by checking shadows throughout the day. If building feels daunting, retailers like Gardener’s Supply Company offer affordable kits with pre-cut materials.
Once built, add 3 inches of compost to nourish seedlings. Sow hardy seeds like spinach directly into the soil, spacing them for growth. Water lightly but consistently—overwatering in cool weather invites mold. With these steps, you’ll create a cozy haven for winter crops.
Optimizing Sunlight Exposure

Have you ever noticed how plants lean toward sunlight in winter? Your setup’s placement determines whether crops thrive or barely survive. Positioning the structure on a south-facing site is like giving plants front-row seats to winter’s limited sunshine. This angle captures 40% more light compared to north-facing spots.
Finding the Perfect South-Facing Spot
Sunlight fuels both warmth and growth. A clear southern exposure ensures your plants soak up every possible ray during short days. Avoid placing structures near buildings or trees casting afternoon shadows—even partial shade can drop internal temperatures by 10°F.
| Orientation | Sunlight Hours | Avg. Temp Increase |
|---|---|---|
| South | 6-8 | 15°F |
| North | 2-3 | 5°F |
| East | 4-5 | 10°F |
| West | 3-4 | 8°F |
Design Tweaks for Brighter Days
Slant the lid so the back sits higher than the front. This design grabs low-hanging winter sun while letting rain slide off. If your space gets limited light, try lining the interior with aluminum foil—it reflects 90% of available light onto leaves.
Check shadows at 10 AM and 2 PM in December. If obstacles block light, move the structure 3-5 feet. Small adjustments can mean the difference between limp greens and vibrant harvests all season.
Selecting Cold-Tolerant Crops

Did you know some vegetables actually taste better after a frost? Choosing the right crops makes all the difference in winter gardening. Focus on varieties that laugh at chilly weather and sweeten under frosty conditions. Your success starts with seeds bred for resilience—not every plant can handle the freeze-thaw dance.
Leafy Greens and Salad Selections
Spinach steals the show here. Its leaves stay tender even when temperatures dip below freezing. Pair it with mâche or claytonia—two salad greens that thrive when others wilt. These superstars don’t just survive; their flavors deepen, offering peppery or nutty notes you won’t find in summer harvests.
Root Vegetables That Thrive in Winter
Carrots transform into sugar-packed treats after a few light frosts. Their roots grow sweeter as starch converts to natural sugars—a winter survival trick. Other hardy options include parsnips and radishes, which develop crisp textures perfect for roasting or fresh salads.
Timing matters most. Plant spinach 6-8 weeks before your first hard freeze so it reaches harvest size. Lettuce varieties like ‘Winter Density’ need similar schedules. Veteran gardener Linda From Maine shares: “My November-harvested carrots taste like candy compared to August batches.”
- Top performers: Spinach, kale, mâche, claytonia
- Root rockstars: Carrots, radishes, turnips, beets
- Flavor boosters: Frost-kissed greens develop complex tastes
Stick to cold-adapted varieties labeled “winter-hardy” or “overwintering.” These crops evolved to handle temperature swings, ensuring steady growth even as days shorten. Your winter salads will thank you!
Cold Frame Gardening: Grow More Greens in Colder Months

Picture your garden beds bursting with life while snow blankets the ground—this isn’t a fantasy. With a well-designed structure, you can cultivate vibrant spinach, peppery arugula, and crisp radishes all winter long. These setups aren’t just for survival—they let your plants thrive, turning barren months into a time of abundance.
Why does this method work so well? The answer lies in consistency. A sturdy frame maintains stable temperatures, shielding crops from sudden freezes and drying winds. Gardeners in Minnesota report harvesting leafy greens every week through January—proof that even extreme climates can yield fresh produce.
Variety is another perk. Beyond classic kale and carrots, try growing mustard greens or tatsoi for bold flavors. One Vermont gardener shares: “My December salads feature six different greens—all picked minutes before dinner.” This diversity is possible because the season never truly ends under protective covers.
Reliability comes down to smart habits. Check moisture levels weekly and ventilate on sunny days. Pair your setup with hardy varieties like ‘Winter Bloomsdale’ spinach, which laughs at single-digit temps. For detailed guidance, explore this cold frame gardening guide to refine your approach.
Your backyard can outlast the winter with minimal effort. As days shorten, your harvests lengthen—proof that a little ingenuity beats the cold every time.
Managing Temperature and Ventilation in Your Cold Frame

Ever opened your protective growing box to find wilted greens? It’s all about balance. Too much heat cooks plants, while poor airflow invites mold. Your setup’s success hinges on maintaining a stable climate—like Goldilocks finding the “just right” zone.
Effective Ventilation Techniques
Cracking the top open 2-3 inches on sunny days prevents overheating. Use a wooden stick or automatic arm like the Univent control—it lifts the cover when temps rise above 70°F. This simple trick can drop internal heat by 15°F in minutes.
Controlling Internal Temperatures
Lightweight plastic lids help here. They’re easier to lift than glass and diffuse harsh sunlight. At night, add old blankets or bubble wrap over the top for insulation. A min/max thermometer ($12 at hardware stores) lets you track swings without guessing.
Try these tips for consistency:
- Check plants twice daily—10 AM and 2 PM are peak heat times
- Use shade cloth during unexpected warm spells
- Seal gaps with weatherstripping to retain nighttime warmth
Sudden cold snap? Close the plastic lid early and pile snow around the base. This creates an igloo effect, keeping soil temps steady. Remember: Your plants prefer gradual changes, not rollercoaster swings.
Extending Your Harvest: Winter Salad Greens and More

What if your garden could keep giving fresh salads even as snow piles up? With smart timing and care, you’ll enjoy peppery arugula and buttery mâche for weeks beyond the first frost. Start by sowing seeds in late summer—early August for carrots and September for spinach—to ensure plants mature before daylight dwindles.
Rotate crops inside your protected space. After harvesting radishes, replant with cold-loving claytonia. This staggered approach guarantees a steady supply. Use floating row covers during early frosts—they add 4-6°F of protection without blocking light.
Pick leaves gradually instead of uprooting whole plants. Snip outer spinach leaves first, letting inner ones grow. Mâche can yield 3-4 cuttings over six weeks if you trim just above the crown. Your patience pays off in prolonged production.
Tailor plans to your area’s fall and winter patterns. In Vermont? Start spinach in July. Texas gardeners might wait until October. Track local frost dates and adjust sowing times yearly. One Maine grower shares: “By tweaking my schedule each year, I harvest greens from October through March.”
When heavy snow arrives, brush it off the structure promptly. A clear top lets sunlight revive plants even during short days. Pair these tactics, and your harvest becomes a marathon—not a sprint—through the coldest months.
Innovative Methods for Cold-Weather Gardening
Winter doesn’t have to mean putting your tools away. Beyond traditional setups, creative structures and simple tools can boost your harvests. Let’s explore clever ways to shield plants while stretching your growing zone.
DIY Hoop Houses: Quick & Affordable
Bend PVC pipes or old hula hoops over garden beds to create instant shelters. Drape heavy-duty row covers over the frame—these let light through while blocking frost. Rick Stone, a Vermont gardener, shares: “My 10-minute hoop house keeps spinach alive at -10°F.”
Row Covers & Cloches: Double Defense
Layer protection! Use floating fabric covers directly over plants, then add bell-shaped cloches for tender seedlings. This combo traps heat like a thermos. Watch video tutorials from experts to master installation tricks in under 15 minutes.
Three things boost success in harsh zones:
- Anchor covers with rocks or sandbags during storms
- Choose UV-resistant fabrics for season-long use
- Combine methods—hoops + cold frames = unstoppable
People in Minnesota swear by milk jug cloches. Cut the bottom off, place over seedlings, and secure with soil. These mini-greenhouses cost nothing and extend harvests by weeks. Try these zone-tested ideas to keep your garden thriving when others sleep.
Tips for Starting Seeds Early in the Season
Starting seeds indoors isn’t just for summer—it’s your winter garden’s secret weapon. By giving plants a head start, you’ll transplant sturdy seedlings ready to thrive in cooler conditions. Timing is everything: begin 10-12 weeks before your first fall frost for crops like spinach and kale.
In most regions, mid-July kicks off the indoor sowing window. Adjust dates based on your local frost calendar—Alaska gardeners might start in June, while Texans wait until August. Use a quality seed-starting mix and trays with drainage holes to prevent soggy roots.
Grow lights are non-negotiable. Position them 2-3 inches above seedlings for 14 hours daily, mimicking spring sunlight. Rotate trays every few days to avoid lopsided growth. Weak stems? Increase airflow with a small fan to strengthen them.
Hardening off takes patience. Seven days before transplanting, expose plants to outdoor conditions gradually—start with 1 hour of shade, adding more time and sunlight each day. Shield them from strong winds or sudden temperature drops during this phase.
Your final tips for success? Water seedlings from below to encourage deep roots. Label trays clearly—it’s easy to forget varieties when they’re tiny. With these steps, your winter garden will hit the ground running!
Understanding Your Local Microclimate and Zones
Did you know your backyard has hidden warm spots even in winter? These microclimates—small areas with unique weather patterns—can boost your growing success. A spot near a south-facing wall might stay 5°F warmer than open spaces, letting you push planting limits.
Zone-Specific Strategies for Success
Start by checking your USDA hardiness zone. This number guides which plants thrive in your area’s average winter cold. But don’t stop there—track where snow melts fastest or where wind hits hardest. These clues reveal your garden’s hidden warm zones.
| Zone Range | Key Adjustments | Best Crops |
|---|---|---|
| 3-5 | Add straw insulation & windbreaks | Kale, spinach |
| 6-7 | Use reflective mulch | Arugula, carrots |
| 8-9 | Partial shade for heat relief | Lettuce, radishes |
Natural barriers matter. A fence or evergreen shrub blocks icy winds, creating a sheltered pocket. Observe morning sun patterns—areas that get early light thaw faster after snow. Test different locations by placing thermometers 10 feet apart for a week.
Not all zones behave the same. Urban gardens often run warmer than rural ones. If you’re in Zone 6 but near a brick wall, you might grow Zone 7 plants. Keep notes each season to refine your approach. Small tweaks turn challenging weather into growing opportunities!
Insights from Veteran Cold Frame Gardeners
Mark Levisay still remembers the December day his spinach survived -15°F. “I thought everything was lost,” he admits. “But under that sturdy box, leaves stayed crisp.” Stories like his reveal what textbooks can’t—how real people adapt to frost, wind, and surprise snowstorms.
Real-World Experiences and Lessons Learned
Rick Stone from Vermont shares his #1 rule: “Check plants twice daily. Sun can turn your box into an oven by noon.” He once lost a batch of arugula by forgetting to crack the lid on a 45°F afternoon. Now, he uses automatic vent openers from FarmTek.
Seasoned growers emphasize crop rotation. Linda From Maine swaps radishes for claytonia every 3 weeks. “This keeps soil nutrients balanced,” she explains. Her family enjoys 5 months of salads from one 4×6 structure.
| Gardener | Location | Key Insight | Result |
|---|---|---|---|
| Mark L. | Colorado | Use dark stones to absorb daytime heat | Spinach survives -10°F |
| Rick S. | Vermont | Ventilate above 40°F | Zero mold since 2019 |
| Linda F. | Maine | Rotate crops weekly | 6x more harvests |
Newcomers often overwater. “Winter vegetables need 60% less hydration,” notes Stone. His neighbor learned this after drowning two batches of kale. Now, they use moisture meters from Amazon.
Community feedback matters. When 12 families in Minnesota tried Levisay’s methods, 10 reported fresh crops through January. “Our kids actually eat vegetables now,” one parent laughed. Proof that shared wisdom grows stronger harvests.
Utilizing Tools and Technology for Smart Gardening
What if your garden could manage itself while you sip cocoa indoors? Modern gadgets turn this dream into reality, simplifying every step from building to harvesting. Devices like the Univent automatic vent opener adjust airflow based on real-time temperatures—no more rushing outside at noon to prop open lids.
Smart sensors take the guesswork out of care. Wireless models from FarmTek track soil moisture and air temperature, sending alerts to your phone if conditions shift. Pair these with LED grow lights for seedlings, which mimic natural sunlight during gloomy weeks. Your plants get perfect conditions without constant checks.
| Tool | Function | Benefit |
|---|---|---|
| Temp-activated vents | Auto-open at 70°F | Prevents overheating |
| Wi-Fi soil probes | Track moisture levels | Reduces overwatering |
| Dimmable grow lights | Boost winter light | Speeds up growth |
Learning curves vanish with video tutorials. Channels like Epic Gardening show how to install polycarbonate windows or retrofit old storm panes. These visual guides help beginners avoid common mistakes, ensuring sturdy builds from day one.
Upgrade your materials for better results. Insulated covers with UV coatings last 3x longer than basic plastic. Combine them with aluminum frames for lightweight durability. One Ohio gardener reported 30% larger spinach harvests after switching to these upgrades.
With tech handling the heavy lifting, you gain time to experiment. Try new crops or expand your setup—the tools adapt as your skills grow. Winter harvests become effortless victories rather than chilly chores.
Adapting Your Techniques for Extreme Conditions
When winter throws curveballs, your garden doesn’t have to strike out. Heavy snow and sudden temperature drops test even seasoned growers, but smart adjustments keep your bed thriving. Start by reinforcing your setup before storms hit—weak spots invite trouble.
Managing Heavy Snow and Frost
Clear snow promptly using a soft broom. Never chip ice off glass—it cracks easily. If drifts pile high, shovel from the sides first to reduce pressure on the front panel.
Add insulation when temps plummet below 10°F. Straw bales stacked around the base trap heat, while reflective covers bounce warmth back onto plants. Check weather apps daily—anticipate shifts to act fast.
Ventilation needs change rapidly during storms. Open lids slightly on sunny mornings, even if flakes fall. Close them before dusk to lock in heat. A wireless thermometer helps track swings without braving the cold.
Protect your bed from wind tunnels. Position structures near fences or evergreen shrubs. These natural barriers deflect gusts that dry out soil. Spot-check hinges and seals weekly—tighten loose screws to maintain stability.
Remember: Your plants rely on steady care. A few minutes of prep each day ensures fresh harvests, no matter what the weather brings. Stay vigilant, and your setup will handle whatever winter hurls its way.
Embracing the Joy of Year-Round Gardening
There’s something magical about stepping into your bed of thriving greens while snowflakes dance outside. Year-round gardening isn’t just a hobby—it’s a celebration of resilience and flavor. Those crisp winter salads? They’re proof that nature’s bounty doesn’t pause when temperatures drop.
With simple tools like straw mulch and strategic planning, you’ll savor homegrown meals every month. Imagine snipping fresh herbs in March or harvesting spinach as spring buds emerge. Each season becomes a chance to experiment, learn, and connect with your food’s journey from soil to plate.
Challenges like frost or heavy rain? They’re just puzzles to solve. Share triumphs with fellow growers online or swap tips at local clubs. Every bite of your peppery arugula or sweet carrots carries the pride of self-sufficiency.
Your bed isn’t just dirt and plants—it’s a year-round classroom. Start small, celebrate progress, and let each harvest remind you: growth happens even in the quietest months. Ready to join the gardening revolution? Your next spring salad is already taking root.


