
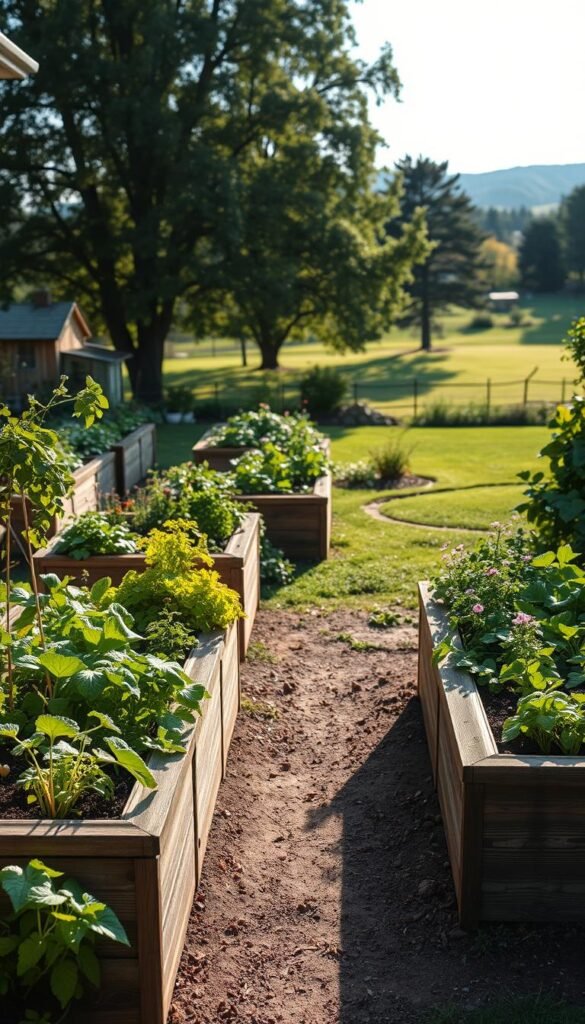
Switching from traditional in-ground plots to elevated growing spaces changes how you interact with your plants. Many gardeners describe this shift as transformational, offering better control over soil quality and easier access to crops. Whether you’re working with a small patio or a sprawling backyard, these structured planters keep your greenery organized while boosting productivity.
Raised garden beds solve common challenges like poor drainage, invasive weeds, and back strain. Their contained design lets you customize soil blends for specific plants—a mix of compost, peat moss, and topsoil works wonders. For step-by-step guidance, explore this resource on raised bed essentials.
You’ll appreciate how these systems warm faster in spring, extending your growing season. Materials like cedar or recycled plastic ensure durability, while heights between 12-24 inches reduce bending. Need pest control? Lining the base with hardware cloth keeps burrowing critters at bay.
This approach works for everyone—from beginners testing their green thumbs to seasoned growers optimizing yields. Curious about building your own? Check out this practical tutorial for creating custom beds. Let’s dig into how these innovative solutions can revitalize your outdoor space.
Introduction to Raised Garden Beds
Transforming your gardening approach with elevated planting systems can lead to healthier plants and easier maintenance. These structured growing spaces adapt to any yard size while solving persistent issues like rocky soil or invasive roots. Let’s explore what makes them a smart choice for modern growers.
Why You Should Consider Raised Beds
Imagine customizing soil exactly for your tomatoes or blueberries—no more guessing about pH levels. Raised beds let you create ideal conditions while reducing weeds by 60-70% compared to ground planting. Urban gardener Mia Torres notes:
“My kale harvests doubled once I switched to elevated planters. The controlled environment makes all the difference.”
The Evolution of Garden Bed Kits
Early versions were basic wooden boxes, but today’s kits feature smart upgrades. Modular designs now include:
- Adjustable heights for wheelchair accessibility
- Built-in irrigation channels
- Interlocking corners for stability
| Feature | 1990s Kits | 2020s Kits |
|---|---|---|
| Materials | Untreated pine | Weather-resistant cedar/composite |
| Assembly Time | 4+ hours | Under 90 minutes |
| Customization | Fixed sizes | Expandable panels |
Modern designs even incorporate recycled plastics, appealing to eco-conscious gardeners. This progression means anyone can grow food efficiently—whether you’re tending herbs on a balcony or managing a backyard farm.
Understanding the Benefits and Limitations of Raised Garden Beds

While raised beds offer numerous advantages, they also come with specific considerations. Let’s explore what makes these systems popular while addressing practical challenges you might face.
Why These Systems Shine
Durability stands out with materials like galvanized steel—metal beds last decades compared to wood’s 5-7 year lifespan. You’ll notice fewer weeds thanks to elevated soil barriers, and drainage improvements prevent root rot in water-sensitive plants like lavender or rosemary.
Modern designs add visual structure to yards. Sleek metal or composite beds create crisp lines that complement contemporary landscapes. Maintenance stays minimal since these materials resist rot and pests naturally.
Practical Challenges to Consider
Initial costs for quality metal beds run higher than basic wood kits. However, their longevity often offsets this over time. In sunny regions, metal can heat soil rapidly—strategic shading or lighter-colored frames help protect heat-sensitive greens.
Safety matters too. File down any sharp edges during assembly, or choose rounded-corner designs if kids play nearby. With smart planning, these limitations become manageable trade-offs for a thriving garden.
Complete Guide to Raised Garden Bed Kits: Assembly, Pros, and Cons

Elevated growing systems revolutionize how you cultivate plants while addressing common frustrations. This resource walks you through every decision point—from choosing weather-resistant materials to mastering soil layering techniques. You’ll find actionable advice tailored to urban balconies and spacious backyards alike.
- Compare wood vs. metal frames for longevity
- Design efficient layouts maximizing yield
- Troubleshoot drainage issues before planting
| Topic | Key Focus | Skill Level |
|---|---|---|
| Material Selection | Durability vs. cost analysis | All |
| Assembly Steps | Tool-free vs. hardware needs | Beginner+ |
| Soil Preparation | Nutrient balancing | Intermediate |
| Planting Techniques | Space optimization | Advanced |
| Maintenance | Seasonal care | All |
“This guide became my blueprint for turning a rocky slope into productive terraced beds,” shares Oregon gardener Lila Chen. Whether you’re rehabilitating poor soil or protecting crops from pests, our methodical approach removes guesswork.
You’ll discover solutions for uneven terrain and microclimate challenges. The content adapts to your growing goals—organic herbs or cut-flower production. Clear comparisons help you invest wisely in structures that endure decades rather than seasons.
Choosing the Perfect Materials for Your Raised Bed Kit

Your garden’s success starts with selecting the right foundation. Different materials bring unique strengths and trade-offs to your growing space. Let’s break down what works best for your climate, budget, and style.
Wood, Metal, Composite, and Plastic Options
Natural wood beds charm with earthy aesthetics and affordability. Cedar and oak stand out—their natural oils resist rot for 10+ years. “Using cedar was a game-changer—it’s lasted five seasons with minimal upkeep,” shares Colorado grower Marco Ruiz.
Metal frames like galvanized steel offer industrial durability. They withstand harsh weather but absorb heat in direct sun. Aluminum versions solve this with rust-proof lightness—ideal for portable setups.
Composite materials blend recycled wood fibers and plastics. Though pricier initially, they resist warping and require zero staining. Plastic beds shine for temporary use—UV-resistant models last 3-5 years without fading.
Comparing Durability and Maintenance Needs
Consider long-term costs alongside upfront prices. Wood needs annual sealing, while metal just needs occasional hose-downs. Here’s how options stack up:
| Material | Lifespan | Care Tips |
|---|---|---|
| Cedar | 7-12 years | Re-stain every 2 years |
| Galvanized Steel | 20+ years | Wipe debris monthly |
| Composite | 15+ years | No maintenance |
| UV Plastic | 3-5 years | Store in winter |
Heat management matters most for metal beds—plant shade-loving greens nearby. Plastic works well for herbs but struggles with heavy vining plants. Match your pick to what you’re growing and how hands-on you want to be.
Planning Your Garden: Size, Layout, and Location

Effective garden design starts with understanding sunlight patterns and movement through your space. Position your beds where leafy greens get morning light but avoid afternoon scorching. South-facing areas often work best for heat-loving tomatoes and peppers.
Optimal Spacing and Sunlight Requirements
Sunlight drives growth—track your yard’s exposure using free apps like Sun Seeker. Leave 2-foot pathways between beds for wheelbarrows and kneeling. Texas gardener Roy Nakayama advises:
“I use painter’s tape to map bed locations before building—it reveals shadow patterns I’d otherwise miss.”
Tailor bed heights to your plants:
| Plant Type | Ideal Height | Spacing Tip |
|---|---|---|
| Lettuce/Herbs | 6-12″ | 8″ between plants |
| Carrots/Beets | 18-24″ | Rows 12″ apart |
| Accessible Beds | 36″+ | 3′ clearance sides |
Group plants with similar water needs together. Leave expansion space—you’ll likely want more beds next season. Avoid placing near tree roots that might invade your soil. Check drainage after heavy rain—puddles mean you need to regrade the area.
Step-by-Step Assembly of Raised Garden Bed Kits

Creating a thriving garden begins with proper setup. A well-built foundation ensures your plants receive consistent moisture and nutrients while preventing structural issues. Let’s walk through the essential stages to transform your space into a productive growing area.
Preparing Your Site and Foundation
Start by leveling the ground where your bed will sit. Use a carpenter’s level and rake to eliminate slopes—this prevents water from pooling in one area. For drainage, lay down materials like:
- Landscape fabric (blocks weeds but lets water pass)
- Pea gravel (improves airflow)
- Rubber mulch (reduces soil compaction)
Cardboard or newspaper makes an eco-friendly base. These biodegradable options suppress grass while letting earthworms enrich your soil. Avoid plastic sheets—they trap moisture and harm root systems.
Building and Installing the Kit
Unpack all components and sort them by size. Most kits use numbered panels or color-coded connectors. Follow these steps:
- Secure corner posts first for stability
- Attach side panels using provided bolts
- Check alignment with a measuring tape
Stainless steel mesh works best for rodent-prone areas—line the bottom before adding soil. For metal beds, wear gloves to avoid sharp edges. Tighten all screws firmly, but don’t strip the threads.
Test drainage by pouring water into the empty bed. If puddles form, add more gravel or adjust the slope slightly. Once satisfied, fill with your chosen soil mix and start planting!
Soil Preparation and Filling Techniques
The secret to thriving plants lies beneath the surface. Smart soil strategies save money while creating nutrient-rich environments for roots to flourish. Let’s explore how to build productive layers without emptying your wallet.
Building a Budget-Friendly Foundation
Start with recycled materials at the base. Fallen branches or cardboard boxes create air pockets and reduce soil needs by 30-40%. These decomposing layers feed earthworms while preventing waterlogging. One gardener shares:
“Using old newspapers under my beds eliminated weeds and saved $200 on soil last season.”
Mix bulk topsoil with homemade compost for balanced nutrition. Aim for a 3:1 ratio—three parts soil to one part organic matter. Sand improves drainage in clay-heavy blends. Test your mix with a simple jar test:
- Fill a clear jar ⅓ with soil
- Add water, shake vigorously
- Check layer separation after 24 hours
| Layer | Materials | Purpose |
|---|---|---|
| Base | Logs/Cardboard | Drainage boost |
| Middle | Compost + Sand | Nutrient balance |
| Top | Topsoil/Mulch | Root support |
Local resources slash costs dramatically. Check municipal composting programs—many offer free or discounted organic matter. Farm supply stores often sell bulk soil by the cubic yard. Expect settling: add 2 extra inches of soil initially, then top-dress annually with compost.
Planting Techniques for Thriving Raised Beds
Unlock your garden’s full potential by mastering smart planting methods tailored for elevated growing spaces. Strategic arrangements and timing boost yields while keeping your green oasis healthy season after season.
Companion Planting and Crop Rotation Strategies
Pairing compatible plants creates natural pest control and nutrient-sharing systems. Marigolds repel nematodes near tomatoes, while basil improves flavor and deters flies. Beans planted with corn return nitrogen to the soil—a classic “Three Sisters” combo used by Indigenous growers for centuries.
Rotate crops annually to prevent nutrient depletion. Follow heavy feeders like spinach with nitrogen-fixing peas. One urban farmer notes:
“Switching my kale and pepper locations each year stopped soil fatigue—my harvests stay consistent now.”
Spacing Tips to Maximize Growth
Give roots room to breathe while optimizing every square inch. Use the square foot gardening method:
| Plant | Spacing | Yield Boost |
|---|---|---|
| Lettuce | 4 per sq ft | Succession planting |
| Tomatoes | 1 per 2 sq ft | Vertical supports |
| Carrots | 16 per sq ft | Thin seedlings early |
Stagger taller plants to avoid shading smaller neighbors. Trellises let cucumbers and peas climb upward, freeing ground space for leafy greens. Regular pruning improves air circulation—snip lower leaves when plants reach 12 inches tall.


