
Cold weather doesn’t mean your garden’s recycling efforts have to freeze. With a few adjustments, you can transform kitchen scraps and yard waste into nutrient-rich soil year-round. Winter offers surprising perks for breaking down organic matter, like fewer pests and steady moisture levels—if you know how to work with the season.
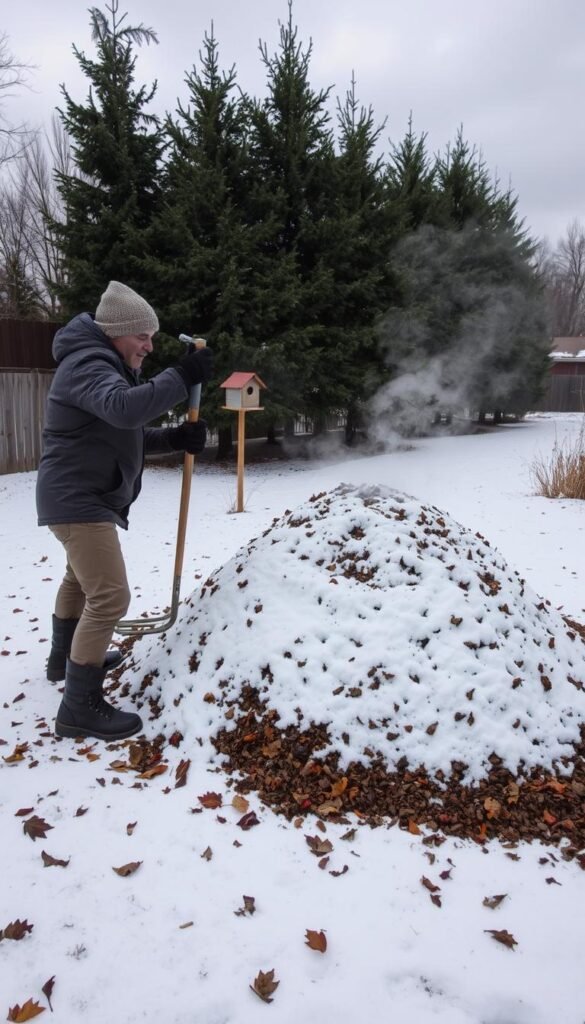
While decomposition slows in colder months, microbial life still thrives beneath the surface. The key lies in balancing greens (like veggie peels) and browns (such as dried leaves) to create insulation. For example, a well-layered heap can generate enough heat to melt nearby snow, keeping beneficial bacteria active even during frosty days.
Preparation matters, too. Setting up your bin in a sunny spot during fall or adding insulating materials like straw can make a big difference. Want more tips? Explore our guide on how to maintain microbial activity in cold for deeper insights.
By spring, you’ll have dark, crumbly compost ready to boost flower beds or vegetable plots. It’s a rewarding way to reduce waste and feed your soil—no matter what the thermometer says.
Setting Up Your Winter Composting System

When temperatures plummet, your compost doesn’t have to go dormant—smart setup keeps it thriving. The right tools and techniques protect beneficial microbes while turning food waste into garden gold. Focus on insulation and accessibility to maintain momentum during frosty weather.
Choosing the Right Composting Bin and System
Not all bins handle cold well. Insulated models with double walls trap heat better than single-layer designs. Look for these features:
| Feature | Winter-Ready Bin | Standard Bin |
|---|---|---|
| Wall Thickness | 2+ inches | 1 inch or less |
| Lid Design | Removable, snug fit | Basic cover |
| Material | UV-resistant plastic | Thin metal/wood |
Retrofit existing bins with foam boards or straw bales if buying new isn’t an option. Urban composters love tumbler styles for easy turning without snow buildup.
Indoor Vermicomposting Solutions for Colder Months
Red wiggler worms transform kitchen scraps into castings indoors. These efficient workers need:
- Stackable trays for easy harvesting
- 60-80°F temperatures (avoid garages below freezing)
- Bedding like shredded newspaper
“A well-maintained worm bin processes 2-3 pounds of scraps weekly—perfect for apartments or harsh climates.”
Place bins under sinks or in laundry rooms. Bury food waste to prevent odors, and fluff bedding weekly for airflow. Your worms will munch through peels and coffee grounds while snow piles up outside.
Maintaining Proper Insulation Techniques

Insulation isn’t just for homes—your compost bin needs it too during cold months. A well-protected setup traps microbial warmth while shielding materials from icy winds. Think of it as building a cozy blanket that lets decomposition breathe.
Using Straw, Hay, and Natural Barriers
Nature provides perfect insulators. Pack straw or hay bales 10 inches thick around your bin’s sides. This creates air pockets that slow heat loss. For extra protection:
| Material | Best For | Lifespan |
|---|---|---|
| Straw | Dry climates | 3-4 months |
| Hay | Moisture control | 2-3 months |
| Dried leaves | Urban spaces | 6-8 weeks |
Rotate materials every 60 days. Tightly packed layers work better than loose piles. Leave space at the top for airflow.
DIY Options for Enhancing Bin Insulation
Upcycle household items to boost warmth. Try these budget-friendly fixes:
- Wrap bins with bubble wrap—secure with bungee cords
- Line walls with flattened cardboard boxes
- Drape old moving blankets over lids
“My reflective foil-wrapped bin stayed 15°F warmer than unprotected ones during last January’s freeze.” – Minnesota Gardener
For plastic bins, stick insulation foil with duct tape. Remove layers during warmer spells to prevent overheating. Your microbes will reward you with steady breakdown activity all season.
Balancing Carbon and Nitrogen Ratios for Winter Composting

Winter’s chill tests your compost’s balance, but smart layering keeps microbes busy. Cold temperatures slow decomposition, making the classic 30:1 carbon-to-nitrogen ratio harder to maintain. Focus on nitrogen-packed kitchen scraps that generate heat and pair them with abundant browns to insulate your pile.
Selecting Winter-Friendly Green Materials
Not all food waste works equally well in cold. Prioritize these nitrogen sources:
- Used coffee grounds (acidity boosts microbial activity)
- Chopped vegetable peels (1-2 inch pieces thaw faster)
- Citrus rinds (break down slowly, perfect for extended cold)
Frozen banana peels and apple cores should be thawed before adding. Mix greens thoroughly with browns to prevent icy pockets.
Stockpiling Browns: Leaves, Paper, and Cardboard
Autumn prep determines winter success. Store dry leaves in trash bags or bins near your compost setup. Shred newspaper into strips and keep cardboard boxes flattened for easy layering. Winter ratios shift to 3-4 parts browns per 1 part greens—this prevents sogginess while trapping heat.
| Material | Carbon Content | Winter Prep Tip |
|---|---|---|
| Oak leaves | High | Crush before storing |
| Egg cartons | Medium | Soak & shred |
| Paper bags | Low | Store flat |
“I keep a garbage can of shredded junk mail next to my bin—it’s saved my ratio balance during snowstorms!” – Vermont Composter
Managing Moisture Levels in Freezing Conditions

Frozen mornings bring unique challenges to compost care. Moisture control becomes a tightrope walk—too dry, and microbes stall; too wet, and ice crystals form. Your goal is to maintain a damp sponge texture without letting water dominate the mix.
Preventing Ice Formation Around Your Pile
Ice blocks oxygen flow, starving your compost’s microbes. Use these defenses:
- Cover piles with breathable tarps during storms
- Build a 6-inch base of twigs for drainage
- Angle the top layer to shed melting snow
| Problem | Solution | Effectiveness |
|---|---|---|
| Surface ice | Rake frozen crust weekly | High |
| Drainage issues | Dig trench around bin | Medium |
| Snowmelt seepage | Elevate bin on pallets | High |
Strategic Watering on Warmer Days
Timing matters when adding moisture. Wait for afternoon thaws when temperatures climb above 35°F. Use a watering can to sprinkle room-temperature water—never cold—and mix thoroughly.
“I water my pile at noon during January warm spells. By sunset, moisture reaches the core without freezing.” – Colorado Urban Gardener
Swap watering cans for moisture-rich scraps like melon rinds or lettuce when thermometers dip below freezing. These break down slowly while releasing water gradually. Pair these with carbon sources from your cold-hardy crops harvest for balanced winter feeding.
Activating Decomposition with Hot Composting Methods

When frost nips at your garden, hot composting becomes your secret weapon. This method uses microbial heat to break down organic matter faster than traditional cold piles. The trick? Creating a self-insulating environment where bacteria work overtime despite icy conditions.
Building the Right Pile Size for Heat Retention
Size matters more than you think. Aim for a 3-foot cube—smaller heaps lose warmth quickly, while larger ones become unmanageable. This golden ratio traps heat at the core, where temperatures can reach 130°F even in snow.
| Pile Size | Heat Retention | Decomposition Speed |
|---|---|---|
| 2′ × 2′ × 2′ | Low | 40% slower |
| 3′ × 3′ × 3′ | Optimal | 2× faster |
| 4′ × 4′ × 4′ | High | Hard to turn |
Utilizing Compost Activators and Nitrogen Boosters
Jumpstart your pile with these power-ups:
- Used coffee grounds (1 cup per layer)
- Alfalfa meal (sprinkle between browns)
- Finished compost (shovel-full as microbial starter)
“My 3-foot pile with coffee grounds stayed steaming through -10°F nights. By March, it was ready for spring planting!” – Wisconsin Gardener
Check temperatures weekly with a compost thermometer. If readings drop below 100°F, add fresh greens and fluff with a pitchfork. This keeps your composting process active until warmer months arrive.
Continuing Food Waste Collection and Indoor Pre-Composting
Don’t let freezing temps pause your sustainability efforts—shifting focus indoors keeps food waste recycling efficient. A dedicated prep area and smart storage solutions ensure scraps stay fresh until they’re ready to join outdoor piles.
Establishing an Indoor Pre-Compost Station
Set up a small bin under the sink or in a pantry. Use airtight containers with charcoal filters to trap odors. Layer scraps with shredded paper to absorb moisture. For faster breakdown, try accelerated methods like bokashi bran or electric composters.
Kitchen Scrap Storage and Odor Control
Freeze peels and coffee grounds in reusable bags until transfer day. Sprinkle baking soda in bins weekly, or add citrus rinds for natural freshness. Empty containers every 3-4 days to prevent mold.
These indoor strategies pair perfectly with year-round growing. By spring, you’ll have nutrient-dense compost ready to energize seedlings and revitalize soil—no thawing required.


