
Got an awkwardly shaped yard that feels more like a puzzle than a paradise? You’re about to discover how unusual spaces become golden opportunities. Unlike cookie-cutter lawns, your distinctive plot lets you create something truly original that mirrors your personality.
This guide reveals professional strategies for turning challenging landscapes into functional beauty. You’ll learn to assess slopes, angles, and existing features – then use them to your advantage. Our approach blends practical planning with creative problem-solving, perfect for American homeowners seeking personalized solutions.
By embracing your space’s natural contours, you’ll craft areas that feel both intentional and effortlessly organic. Imagine curved seating nooks following a property line or terraced planters dancing with a hillside. These signature touches transform limitations into showstopping features neighbors will admire.
We’ll walk through every phase together – from initial sketches to selecting plants that thrive in your microclimate. You’ll gain confidence to make smart decisions about lighting, pathways, and focal points. Soon, that “problem area” will become your favorite spot for morning coffee or weekend gatherings.
Understanding Your Unique Garden Area

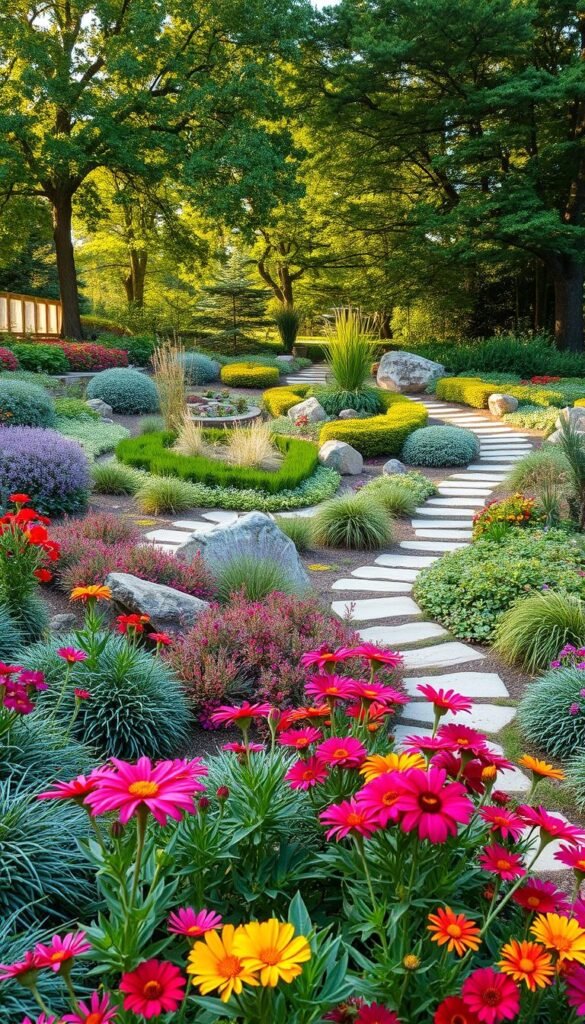
Your backyard’s quirky angles aren’t flaws—they’re design gold waiting to be uncovered. Start by exploring your outdoor space like a detective, noticing how sunlight dances across slopes and where shadows linger longest. These natural clues reveal hidden opportunities most people miss.
Reading Nature’s Blueprint
Walk your land during different times of day. Notice how rainwater collects in dips and rushes down inclines. These patterns show where moisture-loving plants will thrive naturally. Gentle slopes become perfect spots for terraced herbs, while flat areas invite cozy seating nooks.
Mapping Man-Made Influences
Existing fences and neighboring buildings shape your garden’s personality. That tall maple tree? It creates shifting shade patterns throughout summer. Your garage wall? It’s a built-in windbreak for delicate blooms. Document these features to turn limitations into strategic advantages.
Remember to check underground utilities and note mature trees’ root zones. These permanent elements guide your design choices without stifling creativity. By blending nature’s curves with practical considerations, you’ll create an area that feels effortlessly intentional—no cookie-cutter solutions required.
Sketching Your Garden Layout for Success

Transform your outdoor area into a functional masterpiece by starting with pencil and paper. A well-planned sketch acts like a GPS for your creativity, helping you avoid costly mistakes while maximizing every inch. Professional designers swear by this step—it’s where dreams meet reality.
Creating a Scaled Garden Sketch
Begin by drawing your main patio area using this pro tip: let it occupy just half your paper. This leaves room to map surrounding elements that shape your design. Note permanent fixtures like walkways and utility boxes—these become anchors for new features.
Include elevation changes with simple contour lines. A slight slope could become a cascading flower bed, while flat zones might host dining areas. “Always draw to scale—it’s the secret to accurate material estimates,” advises landscape architect Mia Torres.
Marking Key Structural Elements
Identify sun patterns by sketching light/shade zones at different times. Morning coffee spots need eastern exposure, while evening fire pits benefit from western light. Don’t forget access points—keep pathways wide enough for wheelbarrows yet narrow enough to feel intimate.
Use symbols to flag views worth highlighting or eyesores needing screening. That neighbor’s garage wall? Turn it into a vertical garden canvas. Existing trees get circled in red—their root zones dictate planting boundaries.
Utilizing the Rule of Three in Garden Design

Ever wonder why some outdoor spaces feel instantly harmonious? The secret lies in a principle used by artists and designers across disciplines. From classic fairy tales to smartphone camera grids, groups of three create patterns our brains recognize as complete.
Why Groups of Three Enhance Aesthetics
My interior designer mom taught me this truth: “Three’s the magic number for visual comfort.” When planting in threes, you create natural focal points that guide the eye without overwhelming it. Odd-numbered groupings feel dynamic yet balanced—perfect for shaping memorable garden design.
Try this pro trick: combine tall grasses, mid-height shrubs, and groundcover in triangular formations. The layered heights add depth while maintaining cohesion. Repeat three colors across different areas to tie your space together—maybe purple salvias, white daisies, and silver lamb’s ear.
Hardscape elements thrive in trios too. Cluster three stepping stones near your gate or arrange matching pots in a staggered line. For year-round appeal, choose plants offering creative container arrangements with spring blooms, summer texture, and fall berries.
Remember, the rule works because it mimics nature’s patterns. Next time you arrange seating or plan flower beds, think trios. Your garden will gain professional polish while feeling effortlessly inviting.
Crafting Garden Layouts for Irregularly Shaped Spaces

What if your yard’s quirks became its greatest strengths? Professional landscapers see potential where others see problems. Their secret? Strategic planning that celebrates uniqueness rather than fighting against it.
Mastering Spatial Harmony
Top designers suggest dividing tricky areas into purposeful zones. Create a reading nook in that narrow strip, or turn a triangular corner into a fire pit area. “Always let the land speak first,” advises award-winning designer Elena Martinez. “Your job is to enhance what’s already there.”
Curved pathways work wonders in angular yards, guiding the eye smoothly between areas. Repeat key plants or decorative stones to connect disjointed spaces. This trick creates rhythm without rigid symmetry – perfect for organic-feeling designs.
Anchor plants become living sculptures in awkward corners. A dramatic Japanese maple or sculptural agave draws attention while hiding odd angles. For year-round impact, pair evergreens with seasonal bloomers using aesthetic principles that elevate any space.
Smart material choices unify diverse areas. Use matching pavers around irregular patios, or echo fence colors in container plantings. These subtle repetitions help chaotic areas feel intentional. Remember – your yard’s uniqueness is its superpower when handled with expert strategies.
Defining Functional Zones Within Your Garden

Imagine your outdoor space as a collection of purposeful rooms rather than one chaotic area. This approach helps even the most unusual yard feel organized and inviting. Start by listing your family’s favorite activities – do you host summer barbecues? Need a quiet spot for yoga? Love growing vegetables?
Designating Areas for Relaxation and Activity
Create dedicated spaces that match daily routines. That sunny corner becomes your morning coffee nook with a weather-resistant bench. The sheltered alcove near the house? Perfect for an outdoor office with wifi-friendly plants like snake plants.
Active zones need smart placement. Position play areas where you can watch kids from the kitchen window. Place dining spaces near indoor kitchens for easy serving. Fire pits work best in central locations that naturally draw people together after sunset.
Transitional elements make zones flow smoothly. Use low hedges between seating and play areas, or install stepping stones that lead from workbenches to flower beds. “Always leave breathing room between functions,” suggests landscape designer Marco Perez. “Three feet between zones prevents that cramped feeling.”
Consider year-round use too. Install retractable awnings over summer dining spots that become winter storage areas. Choose deciduous trees that shade play spaces in August but let sunlight through during cooler months. Your clever zoning lets every season shine.
Measuring Your Garden Accurately
Precision transforms guesswork into garden magic. Knowing your exact dimensions helps you choose furniture that fits and plants that flourish. Let’s turn numbers into your secret weapon for creating a cohesive outdoor retreat.
Tools and Techniques for Precise Measurements
Start with a 100-foot tape measure—it handles most residential spaces. Graph paper becomes your best friend, letting you sketch curves and angles true to life. Pro tip: measure twice and note numbers in both inches and feet for flexibility.
That odd-shaped corner? A carpenter’s square reveals hidden right angles you can’t see. Work clockwise around your space, recording each wall and elevation change. Make sure to mark permanent features like trees or slopes—they’ll impact your design choices.
Interpreting Your Space’s Dimensions
Your measurements tell stories. A 12-foot-wide area could host a dining set, while a 6-foot nook becomes a reading bench. Use your scale drawing to test furniture arrangements before buying. “Always account for plant growth—mature sizes matter more than nursery tags,” reminds landscape pro Jake Reynolds.
Calculate square footage using garden math principles for accurate material estimates. Slopes over 3 feet need terraced solutions, while flat zones invite playful patterns. Your numbers become the exact blueprint for bringing ideas to life.
Selecting Plants and Materials That Enhance the Layout
What if your plant choices could turn tricky spots into showstoppers? The right selections make sloped areas sing and tight corners thrive. Focus on varieties that adapt to your space’s natural flow rather than fighting against it.
Choosing Plants Suited for Unusual Shapes
Curved beds demand flexible growers. Try these adaptable options:
- Spreading groundcovers like creeping thyme soften sharp angles
- Upright grasses add vertical interest in narrow strips
- Cascading sedums spill over retaining walls naturally
Group plants with similar soil needs in odd-shaped zones. Acid-loving hydrangeas thrive together in that awkward triangular bed. Dry-loving succulents conquer rocky slopes effortlessly.
Balancing Colors and Textures
Mix fine ferns with bold hosta leaves near winding paths. Silver sagebrush pairs beautifully with purple heuchera in crescent-shaped beds. “Repeat one foliage color across different areas to visually connect disjointed spaces,” suggests plant designer Lila Chen.
For year-round drama, combine:
- Spring-blooming witch hazel trees
- Summer-flowering coneflowers
- Winterberry shrubs with persistent fruit
Test your soil pH before planting acid-lovers like blueberries. Amend clay-heavy areas with compost to help roots spread in confined spaces. Your clever plant pairings will make every curve count.
Integrating Hardscaping and Structural Elements
Your landscape’s unconventional shape holds hidden potential for stunning structural features. Thoughtful hardscaping adds both function and artistry, turning challenging areas into intentional design moments. Let’s explore how to blend practicality with personality.
Designing Walkways and Defined Borders
Curved pathways guide the way through your space while celebrating its natural rhythm. Try irregular flagstones with creeping thyme between cracks – they create organic flow and prevent erosion. For narrow sides, gravel paths edged with weathered steel keep beds contained without harsh lines.
Borders become design tools in angled areas. Stacked stone walls follow slopes gracefully, while low brick edging defines planting zones. Pro tip: Match materials to your home’s exterior for a cohesive look that ties everything together.
Creating Focal Points with Patios or Walls
Turn that awkward corner into a destination. A circular patio with a fire pit becomes an instant gathering spot. Decorative walls do double duty – they screen utilities and showcase climbing roses. Add cottagecore charm with a mossy fountain or vintage bench nestled among ferns.
Remember scale when setting focal points. A bold sculpture anchors wide-open areas, while petite birdbaths shine in tight nooks. Use lighting to highlight textures at night – uplights on stone walls cast dramatic shadows that make your design pop.


