
A well-defined landscape instantly elevates your yard’s appeal. Edging creates crisp lines between flower beds, walkways, and lawns, giving your property a polished, intentional look. It’s not just about beauty—strategic borders keep mulch where it belongs, reduce soil erosion, and simplify maintenance.
You don’t need expensive supplies to achieve this upgrade. Repurposed materials like leftover bricks or irregular stones add character while staying budget-friendly. These options blend durability with eco-conscious charm, letting you customize designs for cottage-inspired whimsy or sleek modern layouts.
Beyond aesthetics, proper edging stops grass from creeping into flower beds and improves drainage. It also highlights your favorite plants, making colors and textures pop. For step-by-step inspiration, explore these creative DIY garden edging ideas that work with any skill level.
Whether tackling a weekend project or planning a full makeover, thoughtful edging delivers lasting value. You’ll protect your landscaping investments and create a space that feels organized, inviting, and uniquely yours.
Understanding the Beauty of Garden Edging
The secret to a polished landscape lies in the details you might overlook. Thoughtful edging acts like invisible glue, connecting your plantings, pathways, and lawn into a unified masterpiece. It’s where practicality meets artistry—keeping unruly roots in check while framing your favorite blooms.
Enhancing Your Outdoor Aesthetic
Sharp lines along flower beds or walkways add instant sophistication. Imagine crisp edges highlighting your hydrangeas or guiding eyes toward a cozy seating area. This visual clarity makes spaces feel larger, especially in compact yards where every inch counts.
Choose materials that echo your home’s style—rustic stones for cottage vibes or sleek metal for modern flair. Consistency here creates rhythm, turning scattered elements into a harmonious scene. As one landscaper notes:
“Edging isn’t just a divider—it’s the frame that lets your garden shine.”
Defining Garden Spaces Naturally
Without clear borders, plants spill onto grass, and mulch migrates onto paths. A well-placed edge solves this quietly, saving you hours of maintenance. It also:
- Directs rainwater away from delicate plants
- Prevents soil erosion during heavy storms
- Highlights unique features like ornamental grasses
Front yard edging boosts curb appeal dramatically. Neat lines around shrubs or mailbox gardens signal care, potentially increasing your home’s value. Whether you prefer subtle curves or geometric precision, borders offer a simple way to elevate ordinary spaces into intentional designs.
Exploring Budget-Friendly and Eco-Friendly Options

Transforming your outdoor space doesn’t have to drain your wallet or harm the planet. With a little creativity, everyday items become treasures that define your landscape. Let’s dig into solutions that balance thriftiness with environmental care.
Affordable Materials for Every Garden
Old wine bottles buried neck-down create shimmering borders that catch sunlight like stained glass. Scrap wood from pallets offers a weathered, rustic charm—simply cut planks to size and stake them into soil. Construction sites often give away leftover bricks or broken concrete chunks perfect for irregular, artsy edges.
Check local recycling centers for tin cans or tires. Paint them vibrant colors for playful accents around vegetable patches. One gardener shared:
“My kids love hunting for bottle caps to decorate our recycled border—it’s art and function combined!”
Sustainable DIY Practices
Upcycling keeps usable items from landfills while adding personality to your yard. Use fallen branches as natural dividers between flower beds or mulch paths. This approach reduces trips to home improvement stores and carbon footprints.
Invite neighbors to swap materials they no longer need. A community tool-share program cuts costs further. Every repurposed item tells a story, turning functional edges into conversation starters. Plus, you’ll inspire others to see “trash” as design gold.
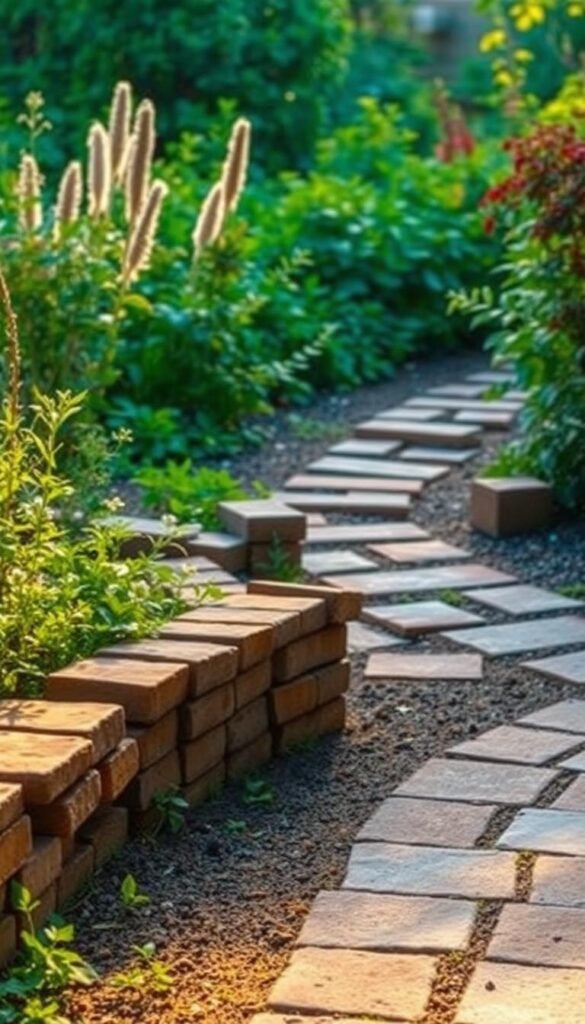
Decorative garden edges and borders DIY using old brick or stone blocks

Great landscaping starts with smart groundwork. Before placing your first brick, taking time to prep materials and map your design ensures crisp lines that endure seasons. This phase turns scattered pieces into a cohesive edge that enhances your yard’s flow.
Step-by-Step Material Preparation
Begin by scrubbing reclaimed pieces with a stiff brush to remove dirt and loose mortar. Check each brick for cracks—discard any that crumble under pressure. Sort them by thickness and hue for consistent patterns. As one landscaper advises:
“Weathered surfaces add character, but sealing them prevents moisture damage over time.”
New bricks need less prep but benefit from dry-fitting to test spacing. For stone blocks, arrange chunks on the ground to find natural fits before committing to placement.
Planning Your Layout
Mark your edge garden bed with stakes and string, adjusting curves until satisfied. Use spray paint to outline where you’ll dig trench lines. Depth matters—aim for 2-3 inches to bury one-third of each brick, keeping them stable in soil.
Account for frost shifts in colder climates by leaving slight gaps between pieces. If you’re also considering building raised beds, align their borders with your edging for a unified look. Compact the base layer of soil firmly to prevent sinking, using a hand tamper for best results.
Creative DIY Ideas for Classic Brick Borders

Classic brick borders offer timeless structure that complements any landscape style. Their clean lines bring order to garden beds while adding warmth through earthy tones. Best of all, you can achieve this look in a single afternoon with basic tools and reclaimed materials.
Traditional Brick Techniques
Experiment with patterns that transform simple layouts into eye-catching features. The running bond style creates staggered joints ideal for curved edge garden designs. For geometric precision, stack bond arrangements align bricks vertically like soldiers on parade.
Herringbone layouts add dynamic energy to straight pathways. As you plan:
- Use masonry saws or chisels to cut pieces for tight corners
- Alternate brick orientations (horizontal/vertical) every few feet
- Consider tinted mortar for subtle contrast against red clay
Installation Tips for Lasting Appeal
Start by excavating a 4-inch trench along your marked line. Fill the base with gravel for drainage—this prevents frost heave in winter. One landscaper emphasizes:
“Compact every layer twice. Loose foundations cause uneven settling within months.”
Dry-laid installations allow easy adjustments but need annual sand replenishment. Mortared joints stay put for decades but require precise mixing. Either way, slope bricks slightly outward to shed rainwater away from plantings.
Rustic Charm with Reclaimed Stone and Concrete Pavers

Nothing adds timeless character to outdoor spaces like materials with history. Reclaimed stone brings earthy textures and organic imperfections that manufactured products can’t replicate. Pair these with sleek concrete pavers for a balanced blend of rugged charm and modern precision.
Choosing the Right Stone
Scout local demolition sites or landscaping suppliers for irregular stones with weathered edges. Look for varied thicknesses and hues—these create visual depth when arranged. As one mason suggests:
“Let the stones’ natural shapes guide your layout. Forced symmetry kills their wild beauty.”
Concrete pavers offer clean lines to contrast rustic stone. Opt for tumbled varieties to mimic aged surfaces. When installing:
- Dig a 6-inch trench for stability
- Layer crushed gravel followed by leveling sand
- Tap pieces into place using a rubber mallet
Leave small gaps between stones for creeping thyme or moss—these fillers soften edges while enhancing that cottage-inspired aesthetic. Over time, lichen patterns and mineral stains add patina, making your border feel like it’s always belonged there.
Mix flat pavers with chunky stones along pathways for textural intrigue. This approach maintains structure while letting nature’s randomness shine. Remember: imperfect arrangements often deliver the most authentic charm.
Transformative Projects with Wooden and Pallet Wood Edging

Wood brings organic warmth to your outdoor spaces while offering endless design flexibility. Pallet planks and reclaimed lumber let you craft custom borders that feel both rustic and intentional. These materials blend seamlessly with nature, creating transitions that guide the eye without overpowering your plants.
Designing with Wood
Start by disassembling pallets using a pry bar—wear gloves to avoid splinters. Sand rough edges for safety, then arrange planks in staggered rows or uniform lines. Varying heights add dimension, especially when framing sloped beds or curved pathways. A landscape designer suggests:
“Mix vertical and horizontal placements every 4-5 feet. This rhythm prevents monotony in longer stretches.”
| Wood Type | Durability | Cost |
|---|---|---|
| Cedar | 15+ years | $$ |
| Pressure-Treated Pine | 10-12 years | $ |
| Redwood | 20+ years | $$$ |
Best Practices for Installation
Dig a 3-inch trench along your marked line. Place planks vertically for maximum stability, securing them with galvanized spikes every 18 inches. For horizontal layouts, use L-brackets at joints. Apply weatherproof sealant annually to combat rot—this extends your edging’s lifespan dramatically.
Pair wooden borders with vertical gardening projects to maximize small spaces. The natural textures complement climbing vines and flowering annuals beautifully. With proper care, your handcrafted edge will frame garden beds effectively for years.
Upcycled and Repurposed Materials for Unique Borders
Turn household discards into landscape treasures that spark joy while reducing waste. Everyday items like bottles and cans gain new life as functional art pieces along your planting areas. These solutions prove sustainability and style go hand-in-hand.
Glass & Plastic Bottle Magic
Bury wine or soda bottles upside-down to craft shimmering borders. Sunlight dances through colored glass, casting rainbow patterns on nearby foliage. For stability:
- Dig trenches 5-6 inches deep
- Pack soil tightly around necks
- Alternate hues for seasonal flair
Tin Can Transformations
Paint rust-free cans in shades matching your color scheme. Cluster them like floral bouquets along pathways or veggie patches. One gardener shares:
“My cobalt-blue cans make my zinnias pop while keeping rabbits out!”
Tire Revival Techniques
Slice old tires into crescent shapes for raised herb beds. Bury halves vertically to form scalloped edges that withstand foot traffic. Paint outer surfaces with outdoor acrylics for weather-resistant charm.
These projects let you way create boundaries that tell your eco-story. Involve kids in washing bottles or painting cans—it’s Earth-friendly education disguised as play. Your innovative edging will spark conversations while keeping mulch neatly contained.
Modern Appeal with Metal and PVC Edging Solutions
For those craving clean lines and fuss-free maintenance, modern materials deliver both form and function. These options blend seamlessly with contemporary landscapes while standing up to heavy use.
Sleek, Contemporary Looks
Metal strips create razor-sharp definition for flower beds or walkways. Aluminum’s slim profile disappears into the garden, letting your plants take center stage. Choose galvanized steel for industrial vibes or powder-coated finishes that pop against greenery.
PVC offers similar precision at a lower cost. Its smooth curves guide mowers effortlessly along turf lines. Both materials excel in geometric layouts where organic edges might feel out of place.
Durability for Long-Term Use
Unlike wood or stone, metal resists rot and insect damage. Properly installed edging lasts decades—often outliving the plants it frames. Weathering steel develops a rustic patina over years, adding character without compromising strength.
PVC won’t rust or splinter, making it ideal for damp climates. Its easy install process involves snapping sections together—no heavy tools required. Pair either material with gravel pathways for a cohesive, low-maintenance look that stays sharp through seasons.


