
Setting up an indoor garden? You’re not alone. Hydroponic methods are booming across the U.S., and two systems stand out for their efficiency: one that keeps roots submerged and another that uses timed flooding. Your choice impacts everything from plant growth to maintenance effort, so let’s break it down.
Why does this matter? Both setups deliver nutrients directly to plants, but they handle water differently. The first method uses a constant reservoir, ideal for fast-growing crops. The second relies on cycles, balancing aeration and hydration. Your space, budget, and crop type will steer you toward the best fit.
This guide compares how these systems manage oxygen levels, root health, and resource use. We’ll explore which works better for small spaces, which requires less daily attention, and how to avoid common pitfalls. By the end, you’ll know exactly how to match your goals with the right setup.
Ready to simplify your hydroponic journey? Let’s dive in.
Understanding Hydroponic Systems: An Overview

Forget soil—modern growers are flipping the script with water-based farming. Hydroponics lets you grow plants faster using nutrient-rich solutions instead of dirt. It’s no wonder urban farmers and apartment dwellers are swapping shovels for pumps and trays.
What Makes Hydroponics So Popular?
This method cuts water use by up to 90% compared to traditional gardening. You get total control over nutrients and pH levels, which means happier plants and bigger harvests. Beginners love it because many kits work right out of the box, while experts tweak setups for maximum yield.
Year-round growing is another perk. No waiting for spring—just adjust your lights and nutrients. Want fresh basil in December? Done. For those tight on space, compact systems like indoor hydroponic gardening setups turn windowsills into mini farms.
The Basics of Water Culture and Nutrient Solutions
In water culture systems, roots soak in oxygenated liquid full of minerals. No soil means no weeds or pests hiding in dirt. The solution does all the work—delivering food straight to plants 24/7.
| Factor | Soil Gardening | Hydroponic Systems |
|---|---|---|
| Space Efficiency | Requires large plots | Fits in small areas |
| Water Use | High evaporation | Closed-loop recycling |
| Growth Speed | Seasonal cycles | 30-50% faster |
| Year-Round Growth | Weather-dependent | Always in season |
Plants in these setups grow up to twice as fast. Lettuce thrives in three weeks instead of six. Tomatoes? They’ll surprise you with how quickly they fruit. It’s like giving your greens a first-class ticket to maturity.
What is an Ebb and Flow System?

Imagine a garden that breathes like the ocean tides—flooding with nutrients, then retreating to let roots stretch. This rhythm defines ebb and flow systems, where plants get precisely timed nutrient baths. Unlike constant-water setups, these flow systems mimic natural cycles to boost root health and growth efficiency.
How the Flooding and Draining Mechanism Works
A water pump and timer team up to automate the process. When the timer triggers, the pump floods the grow tray with nutrient-rich liquid. After 10-15 minutes, the water drains back into the reservoir, letting plant roots breathe. This cycle repeats 3-4 times daily, depending on your crops’ needs.
An overflow regulator acts as a safety net. It stops the liquid from fully submerging roots, preventing rot. Brief drying periods between floods push roots to expand, searching for moisture and oxygen. This “exercise” strengthens them, much like how lifting weights builds muscle.
Components and Setup Essentials
Building an ebb and flow system requires a few key parts. The water pump sits in the reservoir, connected to the grow tray via tubing. An air pump keeps the nutrient solution oxygenated, while the timer handles scheduling. Here’s what you’ll need:
| Component | Role |
|---|---|
| Reservoir | Stores nutrient solution |
| Grow Tray | Holds plants during floods |
| Water Pump | Moves liquid between zones |
| Overflow Regulator | Prevents over-flooding |
| Timer | Controls cycle frequency |
Set the grow tray slightly above the reservoir for smooth drainage. Use clay pebbles or rockwool to anchor plants while letting plant roots access oxygen during dry phases. Pair your air pump with air stones to maximize dissolved oxygen levels—this keeps roots happy between floods.
Deep Water Culture (DWC) Explained

In hydroponic circles, one setup consistently earns praise for its straightforward design and impressive results. Unlike flooding draining methods that alternate between wet and dry phases, this approach keeps roots fully immersed in a nutrient bath while ensuring they get plenty of oxygen. It’s a balancing act that supercharges plant development without complex machinery.
System Components and Functionality
At its core, this method uses a reservoir filled with nutrient-rich water and a floating platform to support plants. An air pump pushes oxygen through porous stones, creating bubbles that keep roots healthy. No timers or moving parts—just consistent access to food and air.
| Component | Function | Benefit |
|---|---|---|
| Reservoir | Holds nutrient solution | Eliminates refill hassles |
| Air Pump | Infuses oxygen | Prevents root rot |
| Floating Raft | Supports plants | Simplifies maintenance |
Benefits for Fast-Growing Plants
Crops like lettuce and basil thrive here because nutrients are always within reach. The steady water levels mean no stress from drying out—a common issue in flooding draining setups. For many growers, this makes it the best hydroponic choice for quick yields with minimal effort.
Want to skip daily adjustments? This system’s “set it and forget it” design lets you focus on growth, not gadgetry. Pair it with pH-balanced solutions, and you’ll see why it’s a favorite for both new and experienced gardeners.
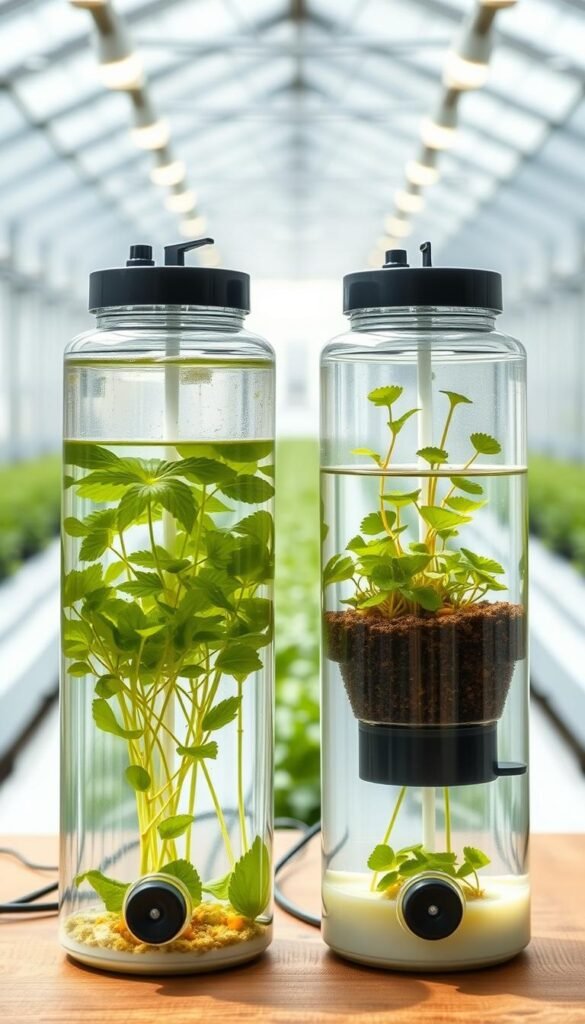
Deep Water Culture (DWC) vs. Ebb and Flow: Choosing the Right System
 and an Ebb and Flow hydroponics system, set against a clean, minimalist background. The DWC system features a transparent reservoir with plant roots suspended in nutrient-rich water, while the Ebb and Flow system showcases a raised growing tray that periodically floods and drains. Carefully arranged plants, precisely lit from above to highlight their lush foliage and healthy roots. The systems are presented with technical precision, inviting the viewer to closely examine the distinct features and benefits of each method. The overall mood is one of educational clarity, guiding the observer towards an informed decision on the optimal hydroponic system for their needs.")
Picking between hydroponic setups feels like choosing between a sports car and an SUV—each excels in different terrain. Your goals, space, and preferred crops determine which model fits your grow room best. Let’s compare their specs and see where they shine.
Side-by-Side Feature Comparison
| Feature | Constant-Water Method | Flood-Drain Setup |
|---|---|---|
| Water Usage | Higher (static reservoir) | Lower (recycled solution) |
| Nutrient Delivery | 24/7 access | Timed intervals |
| Maintenance | Weekly checks | Daily pump monitoring |
| Root Development | Compact, submerged | Expanded, aerated |
| Best For | Leafy greens, herbs | Fruiting plants, larger crops |
User Considerations for Your Grow Room
Got limited space? The constant-water approach fits snugly in corners. Its simple design means fewer parts to manage. But if you’re growing tomatoes or peppers, the flood-drain rhythm gives roots room to breathe and strengthens stems.
Think about your schedule. One system thrives on consistency, while the other demands timer adjustments. New growers often prefer setups with minimal moving parts. Experienced gardeners might enjoy tweaking flood cycles for specific plants.
Here’s a pro tip: Match your crop’s thirst. Basil and lettuce love always-wet systems. Strawberries and cucumbers? They’ll thank you for dry spells that mimic nature.
Pros and Cons of Ebb and Flow Hydroponics

Hydroponic gardens aren’t one-size-fits-all—some setups shine where others struggle. The flood-drain method offers unique perks but demands specific care. Let’s unpack what makes it a favorite for some growers and a headache for others.
Advantages for Diverse Plant Types
This system’s rhythm helps roots expand. When the tray drains, roots chase oxygen, creating stronger networks. Tomatoes and peppers thrive here because they need room to stretch. Herbs like mint also flourish with periodic drying phases.
The timed floods deliver fresh nutrient solutions each cycle. This prevents stagnation and keeps minerals evenly distributed. You’ll see faster growth in leafy greens compared to static setups.
Common Challenges and Maintenance Tips
Power outages can disrupt flood cycles, stressing plants. Always use a backup battery for pumps. Mineral buildup clogs tubes over time—flush the system monthly with pH-balanced water.
Watch for algae in exposed areas. Cover reservoirs to block light and slow pathogen spread. Check this table for quick troubleshooting:
| Factor | Ebb and Flow | Notes |
|---|---|---|
| Nutrient Efficiency | 85-90% absorption | Drains recycle unused solution |
| Water Usage | Moderate | 20% more than DWC |
| Power Dependency | High | Requires reliable electricity |
| Maintenance Frequency | Weekly checks | Clean pumps every 14 days |
Stick to a cleaning schedule. Use hydrogen peroxide rinses to disinfect trays between crops. Pair these steps with quality hydroponic tools, and your garden will reward you with fewer headaches.
Advantages and Benefits of Deep Water Culture

Imagine a system where plants thrive with minimal intervention—roots always fed, never thirsty. This is the magic of hydroponic setups that prioritize simplicity. Unlike methods requiring frequent adjustments, this approach lets you focus on growth rather than gadgetry.
Efficiency and Consistent Nutrient Delivery
Plants in these systems grow like they’re on autopilot. Their roots stay submerged in oxygen-rich liquid, absorbing nutrients 24/7. Lettuce and basil shoot up 30% faster here than in soil, thanks to nonstop access to food. One classroom project saw kale reach harvest size in just 21 days—a record for student growers.
The secret? A well-maintained reservoir and reliable pump. These components work like a heart and lungs for your garden. The pump keeps oxygen flowing, while the reservoir holds a balanced mix of minerals. Organic farmers in Vermont report 40% higher yields using this combo compared to traditional methods.
| Aspect | Traditional Methods | Constant-Immersion Systems |
|---|---|---|
| Growth Speed | 6-8 weeks (lettuce) | 3-4 weeks |
| Water Use | High evaporation | Closed-loop recycling |
| Labor | Daily monitoring | Weekly checks |
Newcomers love how easy it is to start. Just fill the reservoir, set the pump, and watch your plants flourish. As one urban gardener put it: “It’s like hitting the easy button for fresh herbs.” For those exploring hydroponic gardening, this method offers a stress-free entry point with proven results.
Critical Factors in Selecting Your Hydroponic System
Your hydroponic journey begins with three key questions: How much can you invest? What space do you have? What crops excite your green thumb? Let’s turn these into actionable steps to find your perfect match.
Budget, Space, and Ease of Setup
Start with a quick audit. Measure your available area—countertops, shelves, or spare rooms work. Then, jot down your budget, including hidden costs like electricity and nutrients. Here’s a cheat sheet:
- Under $200? Look for plug-and-play kits
- Tight on square footage? Vertical setups save space
- Short on time? Prioritize low-maintenance designs
Complex systems demand more upfront effort. While flood-and-drain setups offer scalability, they require pump adjustments. Simpler methods let you focus on growing, not troubleshooting.
Matching the System to Your Plant Needs
Plants whisper their preferences through root structures and growth rates. Leafy greens thrive in oxygen-rich baths, while fruiting crops prefer periodic drying. Check this table to align your picks:
| Factor | Constant Immersion | Timed Flooding |
|---|---|---|
| Best Crops | Lettuce, basil, kale | Tomatoes, peppers, strawberries |
| Oxygen Demand | High (air pumps critical) | Moderate (drain cycles help) |
| Space Efficiency | Compact reservoirs | Larger footprint |
| Startup Cost | $120-$300 | $250-$500+ |
Urban growers using high-yield strategies for small spaces often combine both methods. Remember: Your system should adapt to your life—not the other way around. Choose joy over complexity, and watch your garden flourish.
Practical Tips for Setting Up and Optimizing Your System

A well-optimized hydroponic system blends precise setup with proactive care. Whether you’re arranging your first tray or refining an existing garden, these strategies help maximize growth while minimizing headaches.
Step-by-Step Setup Advice
Start by positioning your tray level with the reservoir—even slight tilts cause uneven nutrient distribution. Secure air stones near the root zone for optimal oxygenation. Test pumps before adding plants to avoid mid-growth surprises.
Use this checklist during installation:
- Anchor plants firmly in net pots
- Position lights 12-18 inches above the tray
- Label reservoirs with mix dates
Troubleshooting and Long-Term Maintenance
Cloudy water? Check for algae in shaded corners of your tray. Slow growth often signals pH imbalances—test weekly and adjust using citrus juice or baking soda. Always keep spare air tubes; clogs happen when least expected.
| Issue | Quick Fix |
|---|---|
| Leaky connections | Wrap threads with Teflon tape |
| Weak bubbles | Clean air stones monthly |
| Wilting plants | Boost oxygen flow immediately |
Enhancing Oxygenation and Nutrient Flow
Double your air pump capacity if roots appear slimy. Rotate spray nozzles quarterly to prevent dead zones in the tray. For flood systems, extend drain cycles by 2 minutes every week—this mimics natural dry spells that strengthen root networks.
Experiment with pump placements. Some growers find off-center air stones create better circulation. There’s no single right way—track changes in plant vigor to find your sweet spot.
Expert Insights and Real-World Experiences
What separates a thriving hydroponic garden from a struggling one? Often, it’s the tweaks you don’t see. We asked five professional growers to share their hard-won wisdom—here’s how to turn their lessons into your success.
Tips from Seasoned Hydroponic Growers
Portland-based grower Maya Rodriguez swears by timer adjustments during growth phases. “Seedlings need shorter, frequent floods,” she explains. “As roots mature, extend cycles to 20 minutes.” Her tomato yields jumped 25% after fine-tuning timer intervals weekly.
Chicago urban farmer Devin Carter prioritizes room airflow. Adding a $15 oscillating fan reduced mold outbreaks in his basil crop. “Stagnant air invites trouble,” he notes. “Keep leaves dancing slightly—it mimics outdoor breezes.”
Three quick fixes experts recommend:
- Double-check nutrient amounts after water top-offs
- Label reservoir lines to avoid mix-ups
- Wrap timer controls in plastic to prevent moisture damage
San Diego’s GreenThumb Nursery saw a 40% efficiency boost by painting their room walls white. Reflective surfaces helped lower light costs while maintaining top yields. Small changes, big impact.
| Adjustment | Effect |
|---|---|
| +2°F water temp | Faster nutrient uptake |
| Weekly pump tests | Fewer mid-cycle failures |
| pH checks at dawn | More stable readings |
Remember: Your room isn’t just a space—it’s an ecosystem. Track one variable each week (like timer accuracy or nutrient amounts) to stay on top of performance. As one grower put it: “Perfection comes from noticing the tiny things others ignore.”
Final Thoughts on Empowering Your Hydroponic Journey
Your hydroponic adventure starts with a single choice—but grows into a rewarding journey. Whether you prefer constant nutrient access or rhythmic flooding cycles, both setups offer unique advantages. Leafy greens thrive in oxygen-rich buckets, while fruiting plants benefit from periodic drying phases.
Take advantage of expert tips: adjust timers as crops mature, and prioritize airflow. A simple bucket system can yield impressive results in tight spaces. Larger environments? Timed setups scale beautifully.
Your environment and goals shape success. Experiment with pH levels and pump placements. Track progress weekly—small tweaks often deliver big gains. Remember, there’s no “wrong” choice here, just smarter fits for your lifestyle.
Ready to grow? Start small, stay curious, and watch your efforts bloom. Your perfect harvest is one adjustment away.


