
Transforming ordinary outdoor areas into whimsical escapes has never been more popular. These tiny wonderlands let you craft magical spaces using everyday items like containers, stones, and clever plant choices. Whether you’re working with a patio planter or reviving broken pottery, the possibilities for creative expression are endless.
This guide reveals how to build captivating environments that spark joy in any setting. You’ll learn to select climate-friendly greenery that stays lush through seasonal changes. Discover how natural stone arrangements and clever pathways add structure while maintaining that storybook charm everyone loves.
We’ll explore practical techniques for defining areas using both store-bought and handmade barriers. From multi-level designs to space-saving solutions, you’ll gain skills to maximize even the smallest corners. The journey includes tips for choosing durable materials and accessories that withstand outdoor elements.
Beyond initial setup, you’ll master maintenance strategies to keep your creation thriving year-round. Learn to adapt your setup for different weather patterns while preserving its magical appeal. Get ready to turn overlooked spaces into conversation-starting showcases that delight visitors of all ages.
Getting Started with Your Fairy Garden Vision

Creating your own enchanted retreat begins with thoughtful planning. Start by observing your yard’s unique features – that shady tree base or sunny patio corner could become the perfect foundation. Light exposure shapes everything: sun-loving succulents thrive in bright spots, while ferns prefer dappled shade.
Understanding Your Space and Style
Measure your available area and decide between container setups or ground-level designs. A friend once transformed an old wheelbarrow into a mobile wonderland – proof that creativity trumps size. Consider themes that spark joy, like coastal escapes with sand-textured paths or woodland hideouts with mushroom decor.
Setting Your Budget and Goals
Many enthusiasts start small using recycled items like teacups or cracked birdbaths. Allocate funds for durable elements like weather-resistant miniatures while saving on soil and rocks from local sources. Remember: involving kids might mean embracing playful chaos, but their stick-and-pebble creations often become cherished highlights.
Ask yourself: Should this be a permanent showcase or seasonal experiment? Annual themes let you refresh looks without major overhauls. Either way, document your progress – those “before” photos make future transformations even sweeter.
Choosing the Perfect Pot and Soil
Your container choices set the stage for your tiny paradise. Whether crafting a miniature landscape or curating a living sculpture, the right vessel and earth blend make all the difference. Let’s explore how to pair practical needs with magical aesthetics.
Selecting Pot Types and Sizes
Think beyond traditional planters. Upcycled teacups become charming herb homes, while cracked birdbaths transform into tiered displays. Key rule: Always drill drainage holes if none exist. Shallow containers suit mosses and sedums, while deeper pots accommodate small shrubs.
“The best vessels tell stories – a chipped teapot becomes a fairy cottage, weathered boots turn into flower beds.”
Matching Soil to Plant Needs
Your greenery dictates your ground rules. Mix these blends for thriving results:
| Plant Type | Base Soil | Additives |
|---|---|---|
| Succulents | Sandy cactus mix | Crushed lava rocks |
| Flowering varieties | Potting soil | Worm castings |
| Ferns | Peat-based blend | Perlite for airflow |
Layer different-sized containers to create elevation changes. Bury small terra cotta pots sideways as hidden root zones. This technique lets moisture-loving plants thrive beside drought-tolerant neighbors in one cohesive display.
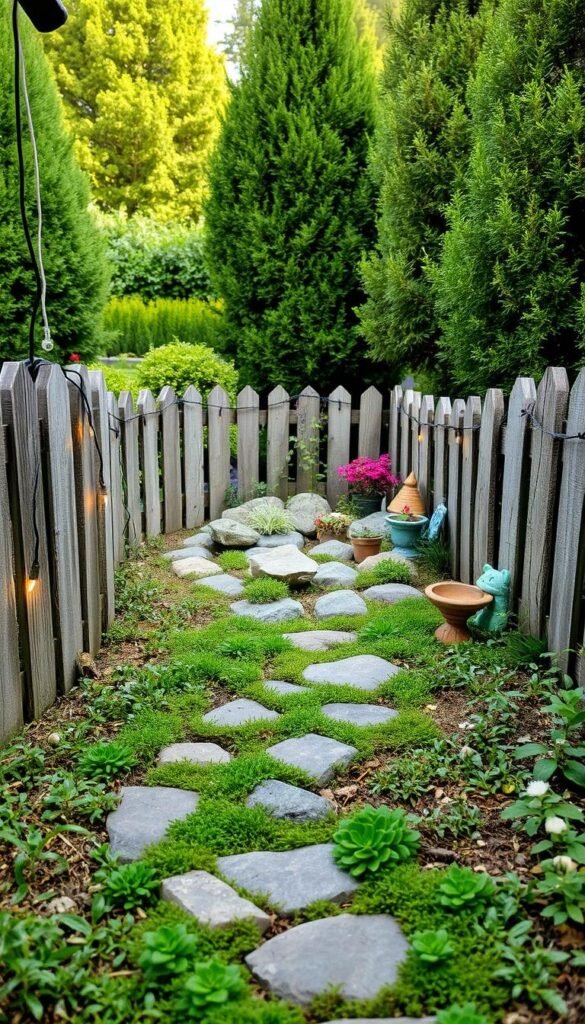
Designing a Fairy Garden Backyard Corner: Fencing, Rocks, and Mini Plants

Crafting an enchanted nook requires balancing three key components that work like puzzle pieces. Start with stone placements to establish your layout’s bones – flat rocks become stepping stones, while stacked varieties form miniature cliffs. These natural anchors guide foot traffic and prevent soil erosion while adding rugged charm.
Next, weave in living textures through petite greenery. Choose species that stay proportional to your theme:
| Rock Type | Functional Purpose | Best Plant Pairings |
|---|---|---|
| Flagstone | Pathway foundation | Creeping thyme |
| River rocks | Dry creek beds | Dwarf mondo grass |
| Sandstone | Climbing surfaces | Irish moss |
Boundaries complete the picture. Twig fences carved from fallen branches create rustic privacy screens, while painted picket borders add pops of color. Alternate fence heights to suggest different “rooms” – a low border for open gathering spots, taller screens for hidden retreats.
Remember: Your hardest-working elements should pull double duty. A moss-covered stone wall becomes both retaining structure and vertical planter. Curved pathways made of pebbles lead the eye while preventing soil compaction. This layered approach makes every inch contribute to the story.
“Great compositions feel discovered, not placed – let your materials suggest their purpose.”
Finally, soften edges where elements meet. Let groundcover spill over rock borders, or train ivy to climb fence posts. These organic transitions make your creation feel lived-in and authentic, like it’s always belonged in that corner of your yard.
Gathering Essential Materials and Tools

Building your magical space starts with smart preparation. Having the right tools and materials ensures smooth assembly and lasting enjoyment. Let’s explore what you’ll need to bring your vision to life.
Must-Have Gardening Tools
Precision is key when working in small spaces. Essential tools include:
| Tool Type | Best Uses | Pro Tip |
|---|---|---|
| Mini trowel | Soil shaping | Use plastic versions for container safety |
| Long tweezers | Placing tiny decorations | Opt for angled tips |
| Micro pruners | Trimming small plants | Clean blades after each use |
Decorative Materials and Miniatures
Transform ordinary items into enchanting features. Natural finds like acorn caps become fairy bowls, while UV resin turns pebbles into glowing ponds. Store-bought pieces blend seamlessly with handmade creations when you follow this ratio:
| Material Type | DIY Options | Store-Bought Picks |
|---|---|---|
| Pathways | Crushed eggshells | Miniature bricks |
| Water features | Resin-coated leaves | Glass pond inserts |
| Furniture | Twig chairs | Ceramic benches |
Organize supplies in labeled containers before starting. This prevents mix-ups between gravel and soil piles. Keep a dedicated brush nearby for dusting delicate pieces during assembly. With everything within reach, you’ll focus on the fun part – creating magic!
Planning Your Layout and Leveling Your Garden

Shaping your enchanted landscape begins with smart spatial organization. Start by sketching your vision, mapping where winding paths meet cozy seating nooks. This blueprint helps balance open spaces with dense plant clusters while ensuring proper drainage.
Single-Level Garden Arrangements
Flat designs thrive through clever contrasts. Pair spiky hens-and-chicks with velvety mosses near pebble trails. Use color gradients – silver succulents fading into purple ajuga – to guide the eye. Pro tip: Bury small pots at angles to create hidden “root caves” for moisture-loving plants.
Multi-Level Garden Supports
Elevated sections add drama but need sturdy foundations. Repurpose broken ceramics as retaining walls – their curved edges mimic natural stone. Here’s how materials compare for stability:
| Material | Best Use | Installation Tip |
|---|---|---|
| Broken pottery | Terraced walls | Press clay soil between shards |
| River rocks | Slope reinforcement | Stack with flat sides inward |
| Slate pieces | Staircases | Angle downward for drainage |
Clay-rich dirt becomes nature’s glue when dampened. Pack it behind stacked stones, letting it dry into rock-solid bonds. For elevated garden aesthetics, alternate thick moss mats with creeping plants over tiered walls. This softens edges while preventing soil loss.
Check structures monthly, adding gravel where gaps form. Gentle slopes (1-inch drop per foot) keep water moving without eroding details. Soon, your layered masterpiece will feel like it grew there naturally!
How to Use Fencing to Define Your Garden Space

Boundaries shape stories in your enchanted landscape. The right barriers guide visitors through your creation while adding character. Let’s explore how to balance practicality with storybook charm through clever fencing choices.
Fencing Options for Privacy and Whimsy
Scale is your secret weapon. Mini picket fences (2-3 inches tall) frame pathways without dwarfing tiny cottages. Bamboo screens work wonders for vertical gardens – their natural texture pairs beautifully with cottagecore charm.
Consider these materials:
| Material | Best For | Pro Tip |
|---|---|---|
| Twigs | Rustic woodland themes | Seal with beeswax |
| Copper wire | Modern magical styles | Shape into vine patterns |
| Recycled shutters | Shabby-chic accents | Distress edges with sandpaper |
DIY Fencing Projects
Transform backyard finds into functional art. Birch bark strips become weathered gates when glued to toothpick posts. For quick updates:
- Wrap grapevines around chicken wire
- Stack flat stones as low walls
- Thread beads onto floral wire
Anchor structures using waterproof glue and buried pebbles. Curved layouts feel more organic – trace a spoon’s edge in soil for perfect arcs. Remember: gaps between pickets let trailing plants peek through, blending nature with craftsmanship.
Incorporating Rocks and Stones for Structure
Natural elements form the backbone of any enchanting outdoor display. Thoughtful stone placement adds both visual weight and practical benefits, turning ordinary spaces into cohesive scenes. Let’s explore how these earthy materials become functional art.
Building Foundations with Natural Elements
Start by choosing pebbles for winding trails that guide explorers through your creation. Larger specimens act as natural anchors – flat slabs become staircases between levels, while angular pieces form rustic benches. Stack river varieties vertically to craft sturdy retaining walls that double as planters.
Secure arrangements using clay-rich soil as nature’s mortar. This technique keeps structures intact during heavy rains while allowing roots to breathe. For magical accents, tuck polished crystals into crevices – their sparkle mimics dewdrops at dawn.
Balance practicality with fantasy by mixing textures. Rough granite contrasts with smooth glass stones along water features. Remember: every stone tells a story. A mossy boulder might hide a fairy door, while scattered gravel suggests well-trodden paths to secret gatherings.


