
Imagine stepping beyond dirt-covered hands and unpredictable weather. What if you could nurture vibrant vegetables and aromatic herbs right in your living space? This journey began with simple flower beds outdoors but evolved into a precision-focused method that delivers consistent results, rain or shine.
By swapping soil for water-based solutions, you gain unmatched control over your plants’ environment. Every leaf and root receives exactly what it needs through carefully balanced nutrients. You’ll eliminate guesswork while tracking real-time data like temperature and pH levels—factors that make or break traditional gardening.
Modern tools let you monitor progress remotely, turning your phone into a 24/7 greenhouse dashboard. Sensors track moisture content, light exposure, and growth patterns, alerting you before issues arise. This approach isn’t just efficient—it’s empowering, especially in small apartments or homes with limited space.
Building your own setup costs far less than buying pre-made kits. You choose components that fit your budget and goals, whether starting with a single herb planter or a multi-tiered vertical farm. The flexibility ensures your system grows alongside your skills, adapting to new challenges effortlessly.
Ready to transform how you think about homegrown food? Let’s explore how water, light, and smart design can create a thriving ecosystem that fits seamlessly into your daily life.
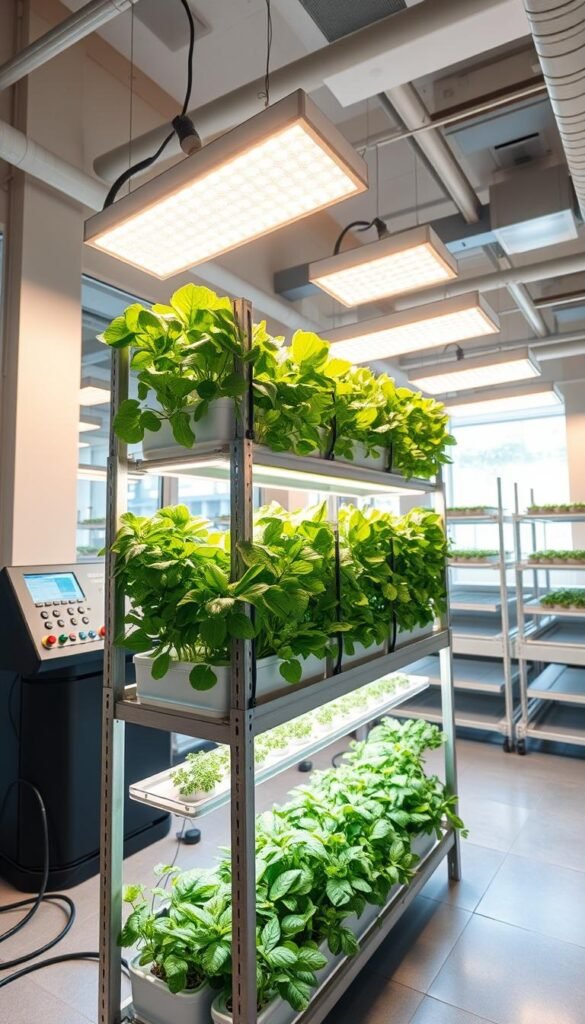
Introducing Indoor Hydroponic Gardening
What if your kitchen counter could become a year-round vegetable patch? This indoor hydroponics setup replaces dirt with water-based solutions, letting roots absorb nutrients directly. No more guessing about soil quality or battling weeds—just pure, controlled nourishment.
Your plants thrive regardless of snowstorms or heatwaves outside. Sensors track light exposure and nutrient levels automatically, ensuring perfect conditions 24/7. Studies show leafy greens mature 30% faster this way compared to traditional methods.
| Factor | Hydroponics | Soil Gardening |
|---|---|---|
| Water Use | 10% of traditional | 100% baseline |
| Space Needed | 1 sq ft per plant | 4 sq ft per plant |
| Growth Speed | 2x faster | Standard rate |
| Maintenance | Weekly checks | Daily upkeep |
You’ll notice fewer pests since there’s no soil for bugs to hide in. Basil and lettuce grow particularly well in these setups, producing harvests every 3 weeks. The closed-loop water system prevents waste—it’s like giving plants a personalized buffet that recycles leftovers.
Even better? Vertical designs let you stack planters vertically, turning blank walls into food factories. Start small with herbs, then expand as you master nutrient mixing and pH balancing. Your thumb gets greener while your floors stay cleaner.
The Benefits of Growing Hydroponically at Home

Picture harvesting basil in January or crisp lettuce during a summer drought. Water-based systems let you bypass seasonal limits, turning any room into a productive zone. You’ll enjoy fresh greens every month while neighbors wait for spring thaw.
No soil means no backaches from digging or weeding. Your setup stays clean since roots absorb nutrients directly from enriched solutions. This method slashes pest problems—without dirt, most insects can’t establish colonies.
Space constraints vanish with vertical designs. A 2’x4’ area yields as much as a 10’x10’ plot would outdoors. Urban apartments become viable farms, perfect for cherry tomatoes or mint.
| Feature | Water-Based Systems | Traditional Methods |
|---|---|---|
| Annual Yield | 4-6 harvests | 1-2 harvests |
| Pest Issues | Rare | Common |
| Nutrient Control | Precise | Estimated |
| Water Efficiency | 90% saved | Baseline use |
You’ll use 90% less water compared to soil gardening. Closed-loop systems recycle every drop, preventing waste. Roots drink exactly what they need—no evaporation or runoff.
Flavor reaches new heights when minerals are perfectly balanced. Studies show herbs grown this way contain 40% more essential oils. Your meals gain restaurant-quality freshness without store-bought pesticides.
Experiment with exotic varieties usually restricted by local climates. Try Thai basil in Minnesota or Alpine strawberries in Texas. Your culinary creativity becomes the only limit.
Understanding the Science Behind Hydroponics

Ever wonder how greenery thrives without a speck of dirt? The secret lies in how plant roots interact with water-based nourishment. Roots dangle directly into oxygen-rich solutions, absorbing minerals faster than soil allows. This direct access means no energy wasted searching for food—every resource arrives pre-mixed.
Your setup’s success hinges on two factors: oxygen flow and nutrient balance. Roots need air pockets to breathe, just like they’d find in loose earth. Without proper aeration, they’ll drown despite being surrounded by water nutrients. Air stones or frequent solution changes solve this elegantly.
pH levels act as gatekeepers for mineral absorption. Keep yours between 5.5 and 6.5 for most leafy greens. Too acidic? Iron becomes toxic. Too alkaline? Phosphorus locks up. Test weekly using strips or digital meters—it’s simpler than baking a cake.
Electrical conductivity (EC) meters reveal your solution’s strength. Young seedlings thrive at 1.2-1.8 mS/cm, while fruiting tomatoes demand 2.5-3.5. Adjust ratios as plants mature: more nitrogen early for leaves, extra potassium later for robust yields.
Notice how roots look different here? They’ll grow finer hairs to maximize surface area. This adaptation lets them extract 40% more minerals than soil-grown counterparts. You’re not just feeding plants—you’re upgrading their biology.
Master these variables, and you’ll unlock consistent harvests. Start with forgiving crops like lettuce, then experiment with peppers or strawberries. The lab is yours to command.
Exploring the Kratky Method for Simple Hydroponics

What if your plants could thrive with almost zero effort? The Kratky approach turns this idea into reality through a self-regulating water-based system. Unlike active techniques needing pumps or timers, it uses a stationary reservoir where roots partially submerge. As liquid levels drop naturally, air pockets form to oxygenate plants automatically.
Why This Technique Works for New Growers
You’ll love how this passive method skips complicated gear. No electricity means no noisy air pumps or tangled wires. Just fill the container once with nutrient-rich water, and watch greens like kale or spinach flourish. Transparent bins let you check root health and solution levels at a glance.
Kratky Versus Active Hydroponic Systems
While methods like Deep Water Culture demand constant adjustments, the Kratky setup runs independently after initial assembly. Compare it to baking: one’s a slow-cooker recipe, the other a soufflé needing precise timing.
| Feature | Kratky | Deep Water Culture | NFT Systems |
|---|---|---|---|
| Equipment Cost | $10-20 | $80+ | $150+ |
| Maintenance | Monthly check | Weekly adjustments | Daily monitoring |
| Energy Use | None | Pump required | Pump + timer |
| Success Rate | 85% | 70% | 65% |
Scalability shines here too. Start with mason jars for herbs, then expand using recycled buckets. Each unit operates independently—if one plant struggles, others stay unaffected. Perfect for testing new crops without risking your whole harvest.
Main Components of Your Indoor Hydroponic Setup

Your home setup’s success starts with selecting the right foundation pieces. Containers and reservoirs form the backbone of your operation, while oxygenation tools keep roots thriving. Let’s break down how these elements work together.
Choosing the Right Containers and Reservoirs
Match container size to your plant’s mature spread. Leafy greens thrive in 5-gallon buckets, while tomatoes need bins as wide as their canopy. Always use food-grade plastic – milk jugs or storage totes work well if labeled #2 or #5.
Lids become plant platforms. Drill holes for net pots or cut slots for floating foam boards. Dark-colored containers block algae growth, keeping solutions crystal clear. Reservoirs should hold enough liquid for 1-2 weeks of use, accounting for evaporation and root absorption.
Understanding Pumps, Oxygenation, and Nutrient Delivery
Active systems need air stones bubbling 24/7 to prevent root rot. A basic aquarium pump ($15) often suffices for small setups. Pair it with tubing and diffusers to create oxygen-rich environments.
Passive methods like the Kratky technique skip pumps entirely. Roots breathe through air gaps that form as water levels drop. Whichever approach you choose, regular maintenance checks ensure consistent performance.
Nutrient solutions flow best when reservoirs sit slightly below plant roots. Use submersible pumps in circulating systems to move enriched water through grow trays. Test EC levels weekly – young plants prefer weaker mixes than mature ones.
Implementing a Smart Monitoring System for Your Garden

What if your plants could text you when they need help? Modern technology makes this possible through real-time tracking of your garden’s environment. By connecting affordable sensors to a Raspberry Pi, you’ll catch issues before they impact your harvest.
Integrating Sensors for pH, Temperature, and Humidity
Your BME680 sensor becomes a weather station for plant roots. It tracks air temperature within 1°F accuracy and detects humidity shifts that stress crops. Pair it with pH probes in your water reservoir to maintain the ideal 5.4-7.0 range for nutrient absorption.
Set alerts for critical conditions:
– 65-70°F for seedling development
– 40-60% humidity to prevent mold
– pH swings beyond ±0.5 units
Using Cameras and Data Logging for Growth Tracking
A simple webcam documents daily progress through time-lapse videos. Watch lettuce leaves unfurl or strawberries ripen frame-by-frame. Your Raspberry Pi stores this data alongside sensor readings, creating a growth timeline.
| Monitoring Component | Parameters Tracked | Ideal Range | Tools Needed |
|---|---|---|---|
| Environment | Temp/Humidity | 65-75°F / 40-60% | BME680 sensor |
| Water Quality | pH Level | 5.5-6.5 | pH probe kit |
| Root Health | Oxygen Flow | 6-8 mg/L | Flow meter |
| Growth Rate | Height/Leaf Count | Varies by crop | Webcam + software |
Access dashboards from your phone to check water circulation or adjust lighting schedules. Historical data reveals patterns – maybe your basil thrives at 68°F but wilts above 72°F. These insights turn guesswork into precision.
DIY Hydroponic Garden Indoor: Grow Fresh Produce Without Soil
Empty corners become productive spaces when you craft your own setup. PVC pipes and plastic bins transform into efficient growing channels, letting you dictate every detail. You control light placement, nutrient ratios, and spacing—factors pre-built units often get wrong.
Commercial kits charge premium prices for basic features. A $20 PVC project delivers identical results while fitting your exact needs. Upgrade components gradually—swap basic timers for smart controllers when ready.
| Feature | Custom Build | Store-Bought Unit |
|---|---|---|
| Startup Cost | $30-80 | $300+ |
| Customization | Unlimited | Fixed design |
| Scalability | Modular expansion | Limited capacity |
| Monitoring | Open-source integration | Proprietary apps |
| Space Efficiency | Wall-mounted options | Bulky frames |
Vertical designs multiply yields without floor space. Use wall-mounted racks for strawberries or trailing herbs. Sensors track water acidity and temperature automatically, sending alerts to your phone.
“Homemade setups outperform commercial models in adaptability—you’re not paying for branding or unnecessary features.”
Begin with a single lettuce channel before adding pepper towers. Open-source software lets you replicate professional dashboards for a fraction of the cost. Your creation evolves as skills grow, always matching current ambitions.
Selecting and Germinating the Best Seeds for Hydroponics
Ever wondered how your favorite herbs sprout so quickly? The magic starts with smart seed selection. Focus on fast-sprouting varieties like arugula and basil—they’ll show progress within days, keeping your motivation high.
Preparing Your Seeds for Successful Germination
Begin by sandwiching seeds between damp paper towels. Use filtered water to maintain neutral pH levels, then seal them in plastic bags. This creates a mini greenhouse effect, perfect for coaxing out those first delicate roots.
Keep your setup in a warm spot—65-70°F is ideal. Avoid direct sunlight, which can dry out towels or overheat delicate seedlings. Check daily for tiny white roots emerging, a sign they’re ready for their water-based home.
Leafy greens like buttercrunch lettuce thrive in controlled environments. Their shallow roots adapt quickly to nutrient solutions. Start with these forgiving vegetables before experimenting with finicky varieties.
Within 3-5 days, you’ll see life bursting through. Transfer sprouted seeds gently to your system, ensuring roots make contact with the enriched water. This streamlined process turns novices into confident growers faster than traditional methods allow.


