
Imagine transforming your backyard into a lush paradise where vegetables thrive and flowers cascade like living artwork. Combining elevated planting areas with vertical supports lets you grow more in less space while adding striking visual appeal. This approach turns cramped yards into productive ecosystems where every square foot works smarter.
Seasoned growers have perfected this method over decades, like Bill from Ohio, who’s watched flowering vines completely blanket six structures between his planting zones each summer since 2010. His experience proves how quickly these systems establish themselves – often within a single growing season.
You’ll gain better control over soil quality and drainage compared to traditional plots, reducing strain on your back during maintenance. Integrating vertical elements also creates natural shade for delicate plants while maximizing sunlight exposure for climbers. For those working with limited ground space, vertical gardening techniques offer clever solutions using materials like cedar boards or repurposed wire grids.
This strategy bridges practical food production with ornamental beauty. Picture scarlet runner beans twining beside morning glories, or cherry tomatoes dangling above fragrant sweet peas. You’re not just building functional infrastructure – you’re crafting living architecture that evolves daily with nature’s touch.
Planning Your DIY Raised Garden Beds with Trellis for Climbing Plants

Strategic placement of planting areas and supports transforms ordinary yards into layered ecosystems. Start by sketching your vision on paper – this simple step helps avoid costly mistakes later. Successful layouts balance growing capacity with accessibility, ensuring every element serves multiple purposes.
Setting Your Garden Goals and Layout
Decide whether you’re growing cut flowers, veggies, or both. Measure your available space, noting sunlight patterns and water sources. Position beds within easy reach of your home – you’ll appreciate this during daily harvests.
Design Considerations for Maximum Productivity
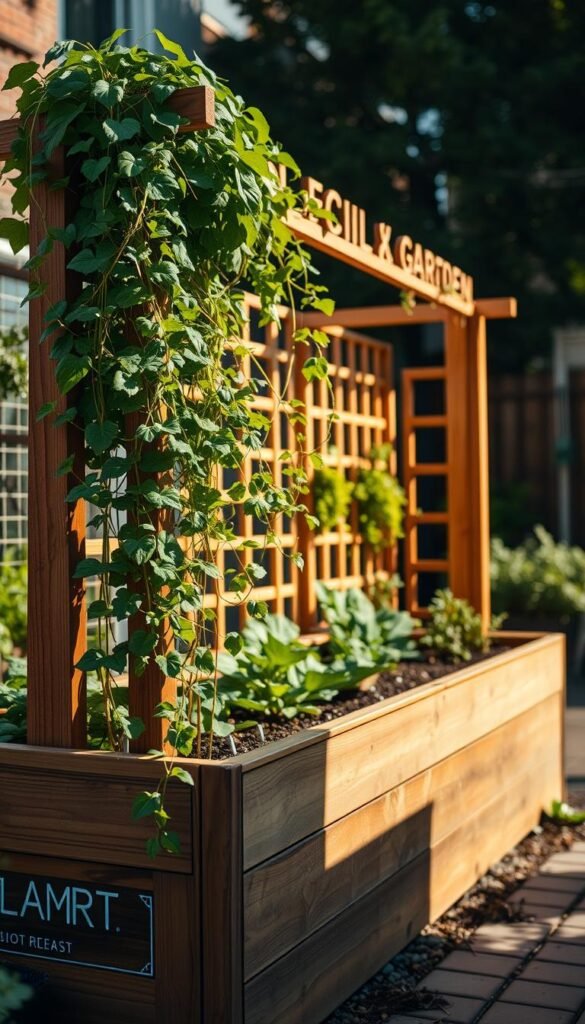
Four-foot-wide paths between raised beds allow comfortable movement and trellis installation. Opt for 4’x12′ bed dimensions – you can reach plants from both sides without stepping on soil. Integrate seating ledges into bed edges for practical resting spots.
| Feature | Compact Layout | Spacious Layout |
|---|---|---|
| Bed Spacing | 3′ apart | 4′ apart |
| Trellis Placement | North side | Between beds |
| Path Width | 2.5′ | 4′ |
| Plant Selection | Dwarf varieties | Full-size climbers |
Consider seasonal growth patterns when positioning taller plants. Morning sun exposure matters most for flowering species – place them where they’ll catch early rays. Brick paths under arches add charm while preventing muddy shoes.
Selecting the Right Materials and Tools
Choosing durable components makes all the difference in creating structures that support thriving plants season after season. Farm-grade supplies offer unmatched strength compared to standard garden products, handling everything from vigorous squash vines to heavy bean clusters without bending.
Essential Materials: Livestock Panels, Fence Posts, and More
Start with 16-foot galvanized livestock panels – the backbone of your vertical support system. These rugged grids, often used for hog fencing, withstand weather extremes while providing perfect grip for climbing plants. Pair each panel with two 8-foot fence posts sunk 2 feet into the ground for stability.
Galvanized wire and fence staples lock everything together securely. Opt for thick 12-gauge wire that resists rust, and grab extra staples – windy days might demand additional reinforcement. Farm supply stores typically stock these items at better prices than garden centers, especially if you’re building raised beds alongside your trellis project.
Must-Have Tools for a Smooth Build
A fence post driver becomes your best friend for setting posts straight and deep. Combine it with heavy-duty wire cutters for trimming panels to custom sizes and a trusty hammer for driving staples. Keep work gloves handy – those panel edges can be sharp!
Consider borrowing specialty tools if you’re on a tight budget. Many hardware stores rent post drivers by the day, making this a cost-effective option for one-time projects. With the right gear, you’ll transform basic materials into a living wall of greenery in just one weekend.
Preparing the Raised Beds for Trellis Installation

Setting up your growing space correctly from the start saves headaches later. Proper planning ensures your vertical supports handle vigorous plant growth while keeping maintenance simple. Let’s explore how to position and prepare your foundation for lasting success.
Optimal Bed Dimensions and Spacing
Position two raised beds 4 feet apart to create a natural anchor point for your trellis. This spacing allows ample room for plant growth while keeping pathways accessible. For stability, install vertical supports before adding soil – filled beds become too heavy to adjust easily.
| Feature | Narrow Layout | Wide Layout |
|---|---|---|
| Bed Distance | 3.5′ apart | 4.5′ apart |
| Path Clearance | 18″ | 24″ |
| Trellis Height | 6′ | 8′ |
| Best For | Annual vines | Perennial climbers |
Consider pairing your layout with a square foot gardening layout for efficient planting. Measure diagonally across beds to confirm equal distances – uneven spacing causes structural stress over time.
Ensuring a Level Foundation
Use a carpenter’s level across both beds before securing trellis posts. Even minor slopes become problematic when plants reach full weight. Adjust bed legs with gravel or shims until all corners sit perfectly aligned.
Mark post locations 6 inches from bed edges using spray paint. Dig holes 18-24 inches deep for fence posts – deeper in sandy soils. Compact the base with crushed stone to prevent shifting during heavy rains.
Building a Secure Trellis Structure

Creating sturdy vertical supports transforms basic planters into dynamic growing systems. Follow these proven methods to construct arches that withstand heavy foliage and seasonal weather shifts while enhancing your garden’s productivity.
Step-by-Step Instructions for Trellis Assembly
Start by anchoring two fence posts at the back corners of your planting zones. Use a post driver to sink them 24 inches deep – this depth prevents wobbling when plants reach maturity. Position the posts exactly where your arch will connect to the beds for perfect alignment.
Bend a livestock panel between the posts with a partner. Apply steady pressure from both sides to form a gentle curve. Work gloves are essential here – the metal edges can snag skin. Secure the panel at five connection points using 12-gauge wire, spacing ties evenly along each post.
Techniques for Bending and Positioning the Panels
Shape panels gradually to avoid kinks. Walk the curved section slowly while your helper maintains tension. Check clearance height – most gardeners prefer 7-foot arches for easy access. Adjust the bend until both sides mirror each other perfectly.
Double-check wire connections before adding plants. Tug test each tie – proper tension prevents sagging under weight. Leave 6-inch wire tails for future adjustments as vines mature. Your finished structure should feel rock-solid when shaken firmly.
Securing Your Trellis to Ensure Stability

A sturdy vertical support system handles wind, rain, and vigorous plant growth when anchored properly. Begin by embedding your trellis framework at least 12 inches into the soil within your planting area. If your setup sits on shallow foundations, dig 4-6 inches deeper into the native ground below your structure.
Mastering Fastener Techniques
Fence staples become your secret weapon for locking panels to posts and beds. Space these U-shaped fasteners every 10 inches along connection points, creating multiple stress distribution zones. Twist 12-gauge wire through panel gaps before securing with staples – this double-locking method prevents slippage.
For raised beds under 12 inches tall, drive ground staples through the trellis base into undisturbed soil. These specialized anchors spread pressure across wider areas than standard staples. Check connections monthly during growing season – temperature changes can loosen wires.
Position heavier fasteners near the base where wind forces hit hardest. Pro tip: Stagger staples vertically rather than lining them up horizontally. This creates a zigzag pattern that resists upward pulling forces from mature vines.
Integrating Modern Arch Elements into Your Design

Today’s outdoor spaces demand structures that blend form and function effortlessly. Modern arch trellises answer this call, offering clean silhouettes that elevate both plant health and visual harmony. These designs transform basic supports into striking focal points while maintaining their practical role.
Fresh Perspectives on Vertical Supports
Current trends favor geometric shapes that mirror architectural elements in your home. Picture powder-coated steel arches framing entryways or laser-cut aluminum screens creating dappled shade patterns. These innovations prove support systems can enhance aesthetics without overpowering plants.
Modular components let you adapt structures as your space evolves. Interlocking panels create expandable grids for annual vines, while removable crossbars simplify pruning. For urban gardeners, these adaptable features pair perfectly with creative vertical gardening solutions in tight spaces.
Weather-resistant finishes like epoxy coatings extend material lifespans while adding color accents. Integrated LED strips bring arches to life at night, casting soft glows on blooming jasmine or moonflowers. Always secure base plates with ground staples – this prevents tipping during storms while keeping sleek profiles intact.
Balance remains key in contemporary layouts. Repeat arch motifs along pathways to establish rhythm, or use varied heights to guide the eye. Your vertical elements should complement plant textures, creating layered interest from soil to skyline.
Enhancing Your Garden Aesthetics with Climbing Vines
Transform your outdoor space into a living tapestry using nature’s vertical artists. The right combination of textures and colors turns functional supports into breathtaking displays that evolve daily. Let’s explore how to maximize beauty while keeping maintenance manageable.
Curating Your Color Palette
Thunbergia’s golden trumpets pair beautifully with hyacinth bean’s purple pods for striking contrast. Cardinal climber’s scarlet blooms attract hummingbirds while softening harsh edges. For romantic charm, split-second morning glories steal the show with ruffled pink petals that resemble tissue paper creations.
Timing Your Green Thumb Moves
Wait until nighttime temperatures stay above 50°F before sowing seeds. Space 5-6 seedlings per trellis side in 1/2″ deep pockets of compost-rich soil. Pro tip: Soak seeds overnight to speed up germination – you’ll often see sprouts within a week instead of three.
Rotate annual varieties yearly to keep soil healthy and prevent pest buildup. Use lightweight ties to guide young shoots upward during early growth stages. By midsummer, your living arch will burst with color, proving patience truly grows the sweetest rewards.


