
Keeping your plants healthy doesn’t have to be time-consuming. With the right setup, you can maintain a thriving garden while saving both effort and resources. Automated solutions help deliver the perfect amount of water, ensuring your greens get what they need without waste.
According to USDA guidelines, most plants require about an inch of moisture weekly. Traditional methods often fall short, but an efficient irrigation system ensures deep, consistent hydration. Studies show these setups reduce water usage by 30-50% compared to manual techniques.
Whether you use drip lines or soaker hoses, a well-designed setup adapts to seasonal changes. Simple PVC-based systems let you customize schedules, giving you more time to enjoy your outdoor space.
Why You Need a DIY Watering System for Raised Beds

Your plants crave routine, just like you do. Inconsistent hydration stresses them, stunting growth and reducing yields. A reliable system ensures roots get steady moisture, unlocking their full potential.
The benefits of consistent watering
In raised beds, roots spread horizontally, needing even water distribution. Drip irrigation delivers moisture slowly, encouraging deep root growth. Studies show this method boosts harvests by 20% compared to manual watering.
Stressed plants struggle to absorb nutrients, leaving them vulnerable to disease. Automated setups mimic natural rainfall, preventing dry spells. An Arizona gardener reported doubling her tomato yield after switching to timed irrigation.
How automation saves time and water
Regain 3–5 hours weekly by eliminating hand-watering. Set a schedule once, and your system handles the rest—no more late-night hose checks. Slow soaker hoses use 650+ fewer gallons monthly than sprinklers.
Vacation-proof your garden with timers, ensuring hydration even when you’re away. Less guesswork means peace of mind and healthier greens. As one gardener put it: “My plants thrive, and I finally enjoy weekends again.”
Planning Your Watering System: Key Considerations

Smart planning ensures your garden thrives with minimal effort. Before installing hardware, map your space and calculate needs to avoid wasted water or dry spots.
Mapping your garden layout
Sketch your beds using graph paper or apps like Garden Planner. Note dimensions and elevation changes—slopes affect flow. Mark sunny vs. shady zones; plants in each area need different hydration.
Measure distances from spigots to beds. This determines pipe lengths and potential water pressure drops. Pro tip: Leave extra space for future expansions.
Calculating water pressure and flow needs
Test your source with a 5-gallon bucket. Time how long it takes to fill, then use this formula:
| Test Result | Flow Rate (GPH) | Action |
|---|---|---|
| 1 min fill | 300 | Supports 3–4 beds |
| 2 min fill | 150 | Split into 2 lines |
Most ½” spigots deliver 5–10 GPM. Ensure your total system demand stays below this. For larger setups, use splitters or a self-watering system to balance flow.
- Safety first: Call 811 to check for underground utilities before digging.
- Pressure loss: Add 5 PSI for every 10 ft of elevation gain.
Choosing the Right Irrigation Method
Picking the perfect hydration method makes all the difference for thriving plants. Each option—whether drip lines, *soaker hoses*, or PVC systems—has unique perks. Your soil type, layout, and budget will guide the best fit.
Drip Irrigation vs. Soaker Hoses
Drip irrigation targets roots directly, reducing evaporation. Tiny emitters release water slowly, ideal for potted plants or tight spaces. But hard water? Clogged holes become a headache 40% faster than with soakers.
*Soaker hoses* seep water evenly along their length. Fabric versions outlast rubber by 3x, perfect for winding through garden beds. They’re simpler to install but less precise for thirsty individual plants.
Pros and Cons of PVC Systems
Rigid tubing like PVC costs just $0.50–$1.50 per foot—half the price of store-bought kits. You can cut and glue custom layouts for odd-shaped beds. Downsides? Winter freezing cracks pipes if not drained.
- Durability: PVC withstands sun damage; fabric hoses resist kinks.
- Installation: Drip lines need more connectors; soakers lay flat instantly.
- Maintenance: Flush PVC annually; scrub soaker holes monthly.
Steep slopes? Pair PVC systems with pressure regulators. For hidden setups, bury drip lines under mulch. The right choice balances effort, cost, and your garden’s quirks.
Gathering Supplies for Your DIY Watering System

Skip the guesswork—here’s exactly what you’ll need to build a reliable system. Quality tools and materials prevent leaks and ensure even water distribution. We’ve split the list into essentials and smart upgrades.
Essential Tools for Precision Work
A PVC cutter ($15–$25) makes cleaner cuts than a hacksaw, reducing pipe burrs. Pair it with primer and cement (Oatey brand recommended) for leak-proof joints. Always work in a ventilated area—these chemicals release strong fumes.
Pro tip: Grab a deburring tool ($8) to smooth pipe edges. Rough cuts damage line connectors over time.
Materials Checklist for Efficiency
Start with these basics:
- ¾” PVC pipes (60–100 psi rating)
- Orbit or Rain Bird timer (dual outlets for zones)
- Dramm brass valves (last 2x longer than plastic)
- Stainless steel clamps for hose connections
| Valve Type | Cost | Lifespan |
|---|---|---|
| Brass | $12–$18 | 10+ years |
| Plastic | $5–$8 | 3–5 years |
Budget hack: Buy PVC in 10-ft bundles ($25) instead of pre-cut lengths. For soaker hoses, opt for 50-ft rolls with repair kits ($35).
Where to shop: Home Depot stocks all basics, but specialty stores like Drip Depot offer bulk discounts on emitters and fittings.
Step-by-Step Installation Guide

Ready to bring your irrigation plans to life? Let’s break it down. Proper setup prevents leaks and ensures even water distribution. Follow these steps to build a system that lasts.
Digging Trenches and Laying Pipes
Start with trenches 3–4″ deep and 6″ wide. Line the base with sand to cushion pipes. This prevents shifting and protects against sharp rocks.
Choose tools wisely:
- Pick: Best for rocky soil
- Shovel: Faster in loose dirt
- Rented Ditch Witch: Ideal for large areas
Connecting Valves and Junctions
Dry-fit all parts first, marking alignment with a pencil. Use this glue sequence:
- Apply purple primer
- Add blue cement
- Twist fittings ¼ turn for even spread
Pro tip: “Clock fittings” by aligning manufacturer marks for leak-proof joints.
Securing Pipes to Raised Beds
Space U-brackets every 32″ for support. Options for attachment:
| Method | Cost | Durability |
|---|---|---|
| Stainless screws | $8/box | 10+ years |
| Rebar stakes | $2 each | 5–7 years |
Wait 24 hours before pressurizing to let glue cure. Keep a quick-fix kit with spare connectors and Teflon tape handy.
Setting Up a Timer for Hands-Off Watering

Take the hassle out of plant care with automated scheduling. A reliable timer ensures your greens get moisture even when you’re busy. It’s the easiest way to maintain healthy roots without daily checks.
Pick the Perfect Timer
Not all timers are equal. Here’s how to choose:
- Mechanical: Budget-friendly but lacks customization ($15–$25).
- Digital: Precise scheduling with battery backups (lasts 6–12 months).
- WiFi-enabled: Syncs with weather apps like Rachio to skip rainy days.
Lithium batteries outperform alkalines in cold weather. For larger setups, ensure the timer matches your drip system’s flow rate (check GPM capacity).
Program Like a Pro
Deep watering beats frequent sprinkles. Aim for 3–4 hours every 5–7 days. Adjustments:
| Condition | Runtime Adjustment |
|---|---|
| Rainy week | -50% |
| Heatwave | +20% (early AM) |
Morning schedules (5–7 AM) reduce evaporation. Use vacation mode for temporary overrides. Remember to remove timers in winter to prevent freeze damage.
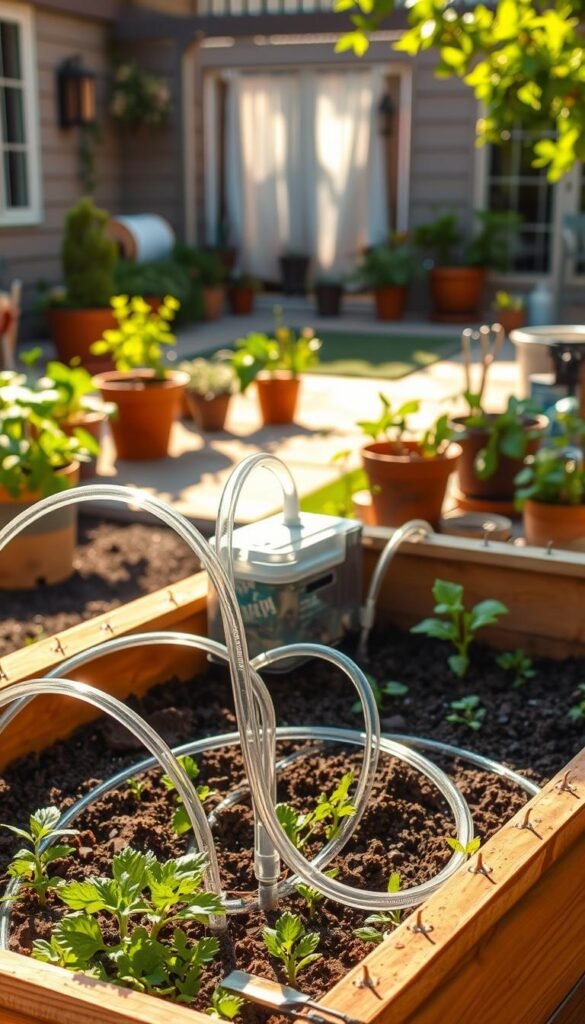
Installing Soaker Hoses for Even Distribution
Give your plants the perfect drink with precision-placed soaker hoses. These porous tubes deliver moisture directly to roots, reducing runoff and evaporation. Whether you’re reshaping old hoses or starting fresh, a few tricks ensure optimal performance.
Cutting and Repairing Hoses Like a Pro
Need to resize? Lay hoses in the sun for 30 minutes to soften them. This makes cutting smoother and prevents kinks. For clean cuts:
- Utility knives work but may fray edges.
- PVC shears ($12) give cleaner slices for repairs.
Fix leaks fast with an $8 repair kit—cheaper than replacing the whole hose. Compare options:
| Solution | Cost | Lifespan Extension |
|---|---|---|
| Mender couplers | $8 | 2–3 years |
| New hose | $25 | 5+ years |
Arranging Hoses for Maximum Reach
Spiral patterns suit circular gardens, while parallel lines fit rectangular beds. Space hoses 12–18″ apart for even saturation. A seasoned grower notes: “Closer spacing works for sandy soil—test flow first.”
Anchor hoses with:
- Landscape pins (bend-resistant)
- Brick weights (temporary fixes)
Flush hoses monthly with vinegar to dissolve mineral buildup. For buried setups, keep them 1–2″ below mulch to prevent sun damage.
Testing and Troubleshooting Your System
A flawless setup starts with thorough testing—here’s how to perfect yours. Catching issues early ensures your bed gets even hydration without wasted effort. Follow these steps to verify performance before relying on automation.
Checking for Leaks
Begin with a 5-minute flush at full pressure to clear debris. Use the tissue paper trick: wrap dry sheets around joints—damp spots reveal tiny drips. For PVC cracks, quick-set epoxy seals leaks in 10 minutes flat.
| Leak Type | Fix | Dry Time |
|---|---|---|
| Joint seepage | Teflon tape + retighten | Instant |
| Cracked line | Epoxy putty | 15 min |
Pro tip: Check connections at dawn when condensation makes drips easier to spot. Mark trouble areas with colored tape for quick fixes later.
Adjusting Water Flow per Bed
Uneven hydration? A ¼-turn on flow valves cuts output by 50%. Balance zones by elevation—high beds need 10% more pressure than low ones. Use a gradual ramp-up technique:
- Start at 25% pressure
- Increase by 10% every 5 minutes
- Stop when drippers emit steady beads
Track adjustments in a logbook. One gardener noted: “Recording pressure changes helped me spot a clogged filter before it ruined my tomatoes.”
For precision, measure GPM per bed with a $12 flow meter. Sandy soil? Add 5–10% runtime. Clay? Space soaker hoses 18″ apart to prevent pooling.
Seasonal Adjustments and Maintenance
Your irrigation setup needs regular care to stay efficient year-round. Simple seasonal tweaks prevent costly repairs and keep your plants thriving. Follow these tips to protect your investment through changing weather.
Preparing for Cold Weather
Winterizing your system prevents frozen bursts that can ruin pipes. Start by draining all water—use gravity or an air compressor set to 50 PSI for stubborn lines. This clears moisture that expands when frozen.
Key steps for protection:
- Elevation-assisted drainage: Tilt pipes slightly to help water flow out.
- Insulation choices: Foam pipe covers work for mild climates; heat tape suits extreme cold.
- Flexible connectors: Install these to prevent frost heave damage.
One gardener shared: “After losing two seasons to cracked pipes, I now blow out my system every November—no issues since.”
Keeping Emitters Flowing Smoothly
Clogged drip holes reduce efficiency by up to 40%. Monthly inspections catch buildup early. For quick fixes:
| Tool | Best For | Cost |
|---|---|---|
| Sewing needle | Small debris | $2 |
| Specialty reamer | Mineral deposits | $15 |
Preventative care matters too:
- Flush lines with vinegar before winter storage
- Lubricate O-rings annually with food-grade grease
- Replace filters every planting season
For spring startup, use a 3-stage pressurization process:
- Test at 25% pressure for leaks
- Check emitters at 50% flow
- Run full pressure for final adjustments
More low-cost irrigation ideas can help extend your system’s lifespan. Set calendar reminders for 30-minute monthly checks—it saves hours of emergency repairs later.
Water-Saving Tips for Efficient Gardening
Maximize every drop with smart gardening techniques that save resources. A few strategic changes can reduce waste while keeping plants lush. Focus on moisture retention and precise hydration to make your setup truly efficient.
Using Mulch to Retain Moisture
A 2-inch mulch layer cuts evaporation by 70%, letting soil stay hydrated longer. Compare popular types:
- Straw: Best for veggies, breaks down slowly
- Wood chips: Ideal for perennial beds, lasts 2+ years
- Living mulch: Clover or creeping thyme suppresses weeds
Pro tip: Keep mulch 3″ from plant stems to prevent rot. One gardener noted: “My basil thrived with straw mulch—I watered half as often!”
Monitoring Soil with Sensors
Ditch the guesswork with moisture sensors. Digital models (like Bluetooth-enabled probes) detect root-zone conditions with ±2% accuracy. Placement matters:
- Insert sensors at root depth (6″ for tomatoes, 3″ for lettuce)
- Avoid direct sunlight for consistent readings
- Sync to apps like PlantLink for smart watering techniques
For a DIY test, try the mason jar method: Fill with soil, wait 24 hours, and check percolation speed.
Bonus hacks: Group thirsty plants together (hydrozoning) and use 30% shade cloth to reduce midday evaporation. Track adjustments in a journal—your post-season review will reveal what worked best.
Enjoy Your Thriving Garden With Less Work
Transform your outdoor space into a thriving garden with minimal effort. Users report 90% less time spent on chores and 25% bigger harvests—like one gardener’s bumper crop of tomatoes. “My vacation-proof setup kept everything alive while I was away,” they shared.
Track progress with before-and-after photos or time logs. Expand your success by adding ornamental plants or sharing surplus produce with neighbors. Teach others to replicate your system—it’s a win for your community and the planet.
Most setups pay for themselves within two seasons. Save thousands of gallons annually while enjoying fresher greens. Start small, then scale up as confidence grows. Your home oasis is just a few inches of water and a plan away.


