
Discover how ordinary materials can spark extraordinary imagination. Crafting tiny landscapes has become a beloved activity for families seeking creative, budget-friendly ways to connect with nature. These enchanted displays transform patios, tabletops, or windowsills into storybook scenes that delight all ages.
You’ll love how simple household items like wooden craft sticks and recycled bottle stoppers become charming seating or decorative accents. This hands-on activity blends artistry with sustainability, letting you repurpose materials while building lasting memories. Many enthusiasts find it’s become their favorite weekend tradition, evolving with each season’s inspiration.
What makes these projects special? They’re surprisingly accessible, requiring no specialized tools or large budgets. For those curious about homemade dollhouse furniture, the techniques translate perfectly to outdoor creations. You’ll craft pieces that look straight from a woodland tale, using supplies already in your crafting stash.
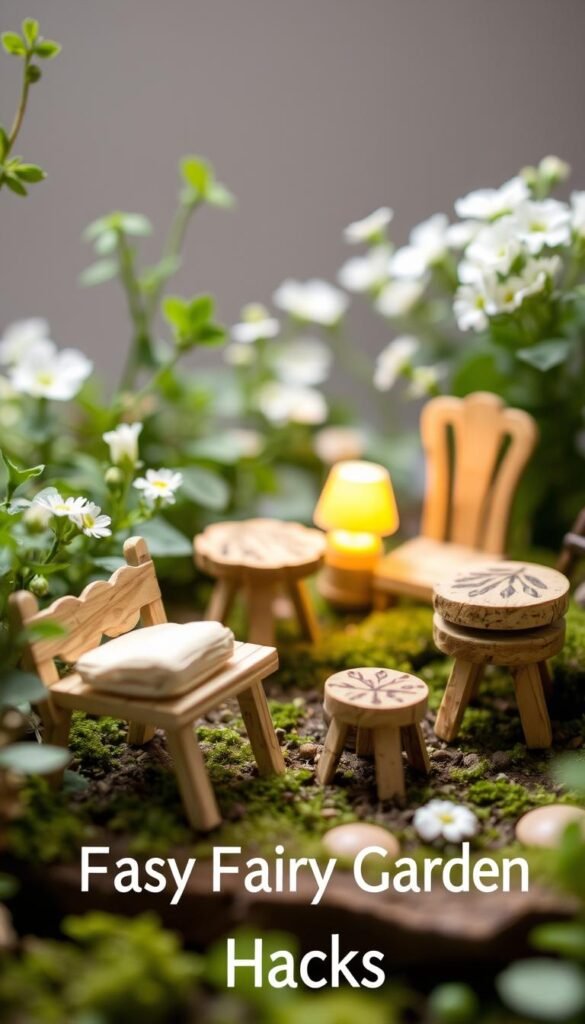
The magic lies in seeing ordinary objects through new eyes. A bundle of wooden sticks becomes a rustic bench. A cluster of wine corks turns into a quaint table set. With each addition, your miniature world grows richer – proof that big creativity comes in small packages.
Getting Started on Your Enchanted Fairy Garden

Unlock a world where creativity meets nature in your own home. These whimsical spaces blend artistry with greenery, offering endless opportunities to express your family’s personality. Whether you’re working with a balcony planter or repurposing an old flowerpot, small-scale designs let you experiment without overwhelming your space.
Why Tiny Worlds Captivate Hearts
Miniature landscapes do more than decorate – they spark wonder. Children and adults alike find joy in imagining secret lives for their tiny residents. This creative play strengthens family bonds while teaching resourcefulness through upcycled materials.
Designing Your Storybook Scene
Start by measuring your available area. A 12-inch container works beautifully for first-time creators. Sketch zones for seating areas, pathways, and focal points like handmade garden art. Consider how plants will grow around your crafted pieces.
Choose a theme that reflects your household’s interests. A mossy woodland retreat might feature twisted branch arches, while a coastal setup could use seashell accents. Position your popsicle stick bench where it’ll catch the afternoon light – perfect for fairy tea parties!
Essential Materials for Easy Fairy Garden Hacks: Making Mini Furniture from Popsicle Sticks and Corks

Building a tiny wonderland starts with gathering the right components. A shallow terra cotta container forms the perfect base, combining earthy charm with practical drainage. Pair it with fast-draining potting soil to keep plants healthy while anchoring your handmade decorations securely.
Gathering Popsicle Sticks, Corks, and Other Supplies
Small-scale projects demand precision-sized materials. Mini craft sticks (about 1.5 inches long) create proportional benches and ladders. Save wine corks – their cylindrical shape becomes table legs or decorative planters when sliced. Keep a stash of:
- Acrylic paints for weather-resistant finishes
- Quick-drying wood glue for sturdy joints
- Decorative pebbles for pathways
Selecting the Ideal Planter and Soil
Your container’s depth determines plant choices. Rosemary thrives in 4-inch soil depths, releasing fragrance when brushed. Combine it with trailing alyssum to soften edges. For stability, mix perlite into standard potting soil – this prevents waterlogging while keeping lightweight furniture anchored during windy days.
Complete your setup with found elements like twig arbors or moss carpets. These natural touches blur the line between crafted items and living greenery, making your miniature world feel truly alive.
Step-by-Step DIY Guide to Building Your Mini Furniture

Transform ordinary craft supplies into enchanting seating and surfaces for your tiny residents. These projects blend practicality with whimsy, letting you design pieces that withstand outdoor elements while sparking imaginative play.
Constructing a Delightful Fairy Bench
Begin by laying three 1.5-inch craft sticks parallel to create the seat. Glue two perpendicular sticks underneath for support. Attach four vertical sticks as legs, ensuring they’re evenly spaced. Pro tip: Angle the backrest slightly for ergonomic charm.
Once dry, paint with acrylics using thin coats. White creates a timeless look, but mint green or lavender add playful flair. Seal with clear varnish to protect against dew and sunlight.
Crafting a Cozy Fairy Table from Recycled Items
Cut a wine cork into thirds for sturdy legs. Glue them in a triangular pattern beneath a wood slice (1-2 inches wide). Sand rough edges for smooth tea-time surfaces. For extra durability, use weather-resistant adhesive.
“The magic happens when you combine natural textures,” says Oregon crafter Marie Toms. “Rustic wood paired with cork gives that lived-in cottage feel.”
| Project | Materials | Time Needed |
|---|---|---|
| Bench | 7 craft sticks, glue, paint | 45 minutes |
| Table | Cork, wood slice, sandpaper | 30 minutes |
Customize with fabric scraps as tablecloths or moss cushions. These pieces become gathering spots where stories unfold – proof that great adventures fit in small spaces.
Creative Tips to Enhance Your Fairy Garden Ambiance

Elevate your tiny wonderland with thoughtful details that spark curiosity. Pathways and accessories transform simple setups into immersive environments where stories unfold naturally. Use river rocks or crushed shells to guide imaginary visitors through your scene, creating depth and direction in limited spaces.
Adding Decorative Pathways and Mini Accessories
Curve pebble trails around seating areas to invite exploration. Position your handcrafted bench near a cluster of moss or beneath twig arches – perfect spots for whimsical gatherings. These elements encourage viewers to imagine tiny residents chatting over acorn cap teacups.
Install a charming entrance using repurposed materials. Attach a fairy door to a tree trunk or planter edge with waterproof glue. For added realism, weather it with diluted brown paint. “Doors suggest inhabitants coming and going,” notes miniature enthusiast Lara Bennett. “They make the space feel alive with possibility.”
Enhance your layout with these elements:
- Popsicle stick bridges spanning pebble “streams”
- Solar-powered LEDs tucked under mushroom caps
- Seasonal accents like berry garlands or mini pumpkins
Rotate decorations quarterly to match nature’s cycles. In spring, scatter flower petals as pathways. Winter scenes shine with faux snow-dusted branches. These changes keep your display fresh while celebrating the outdoors’ ever-shifting beauty.
Wrapping Up Your Magical Fairy Garden Adventure
Your handmade creation now stands as a living tribute to imagination. This enchanted space does more than decorate – it becomes a shared storytelling hub where generations connect. Through crafting, you’ve woven memories into every popsicle stick chair and cork stool.
Maintain your tiny paradise with simple care. Water plants at dawn when dew would naturally form. Swap seasonal accents like pinecone winter lamps or autumn leaf garlands to keep the story fresh. Many find this ritual becomes their favorite way to mark nature’s cycles.
What begins as one container often inspires entire villages. Friends might request their own miniature sets after seeing your charming results. Document growth patterns through photos – these snapshots become cherished records of creativity blossoming over time.
Your journey proves that wonder fits in any size space. Whether expanding vertically with tiered planters or crafting micro scenes in teacups, the skills you’ve gained unlock endless DIY possibilities. Each tiny chair and winding pebble path whispers: magic lives where we nurture it.


