
Imagine transforming ordinary backyard corners into enchanting spaces where creativity blooms alongside flowers. This whimsical project began when a parent noticed their children’s fascination with butterflies and dragonflies—nature’s own “fairies.” By blending simple materials with imagination, families can craft personalized miniature worlds that feel truly magical.
Creating these spaces isn’t just about decoration—it’s about connection. Kids learn to nurture plants while designing tiny landscapes, turning outdoor areas into living storybooks. The best part? You don’t need expensive supplies. Everyday items like twigs, bottle caps, or polymer clay become charming benches, lanterns, or handmade fairy garden accessories that spark joy season after season.
Why settle for store-bought when DIY options offer endless customization? Crafting together strengthens bonds and teaches resourcefulness. Plus, seeing butterflies flutter around your handmade creations adds a dash of real-life magic to your home environment. Whether you’re building a cozy cottage or a miniature pond, every detail reflects your family’s unique style.
Ready to start? This guide will show how simple, affordable materials can create durable, delightful pieces that rival pricier alternatives. Let’s turn your outdoor space into a canvas for wonder—one tiny treasure at a time.
Planning Your Enchanted Fairy Garden

Your journey into tiny landscapes begins with choosing the right spot and setup. Think of it as building a living diorama where nature meets imagination. Whether you’re working with a sprawling backyard or a small balcony, every space holds potential for enchantment.
Container Magic vs. Permanent Spaces
Deer frequenting your yard? Opt for portable planters. A $1.77 plastic drip tray works perfectly—just reinforce it with a pizza box base for easy moving. Container gardens let you control soil quality and protect delicate pieces from curious wildlife.
| Container Gardens | Permanent Installations |
|---|---|
| Ideal for renters | Best for stable outdoor areas |
| Easy to relocate | Supports larger designs |
| Wildlife-resistant | Integrates with existing plants |
Sunlight & Storytelling
Map your space like a treasure hunt. Check sunlight patterns—most miniature plants need 4-6 hours daily. Ensure drainage by poking holes in containers. Place your creation where kids can admire it daily, turning your planter into a conversation starter.
Sketch layouts on paper first. Balance open areas for “fairy gatherings” with clustered greenery for hideaways. This prep work ensures every tiny bench or lantern finds its perfect home.
Materials and Tools: Budget-Friendly Crafting Essentials

Building miniature magic starts with smart material choices. You don’t need fancy supplies—just creativity and a few key items. Let’s explore how to gather what you need without overspending.
Gathering Your Supplies for DIY Projects
Start by raiding your junk drawer. Bottle caps become stools, and old jewelry transforms into shimmering decor. For structured pieces like fences or chairs, wooden craft sticks are your best friend. Pair them with weatherproof glue (E6000 works wonders) and acrylic paint for durability.
Here’s where to shop smart:
- Hardware stores: Grab aquarium gravel for pathways
- Craft stores: Find sheet moss in floral sections
- Your backyard: Collect flat stones and interesting twigs
Smart Tips for Budget Crafting
Seal outdoor items with clear acrylic spray—it prevents fading and warping. Use this simple comparison to choose adhesives:
| Indoor Projects | Outdoor Projects |
|---|---|
| Basic craft glue | 2-part epoxy |
| Dries clear | Waterproof bond |
Organize supplies in labeled jars for quick access. Save paint by mixing primary colors instead of buying every shade. Remember: imperfect crafts often have the most charm!
Setting Up Your Fairy Garden Container and Base
A sturdy container and smart plant selection set the stage for your tiny world. Let’s explore how to build a thriving ecosystem that supports both greenery and creative designs.
Choosing the Right Container and Planter Options
Size matters more than style. Look for containers at least 6″ deep—shallow pots dry out too quickly. For patio container gardening ideas, check these practical tips. Consider these options:
- Terracotta pots: Breathable but need frequent watering
- Plastic trays: Lightweight and easy to move
- Wooden boxes: Rustic charm with built-in drainage
Plant Selection and Soil Arrangement
Nursery staff often stock special sections for miniature landscapes—just ask! Ivy spearpoint and hypoestes add texture without overcrowding. Avoid fast growers like mint. Use this soil mix formula:
- 60% potting soil
- 30% perlite for drainage
- 10% compost for nutrients
Leave 40% empty space near the planter’s edge for tiny houses and pathways. Cluster taller plants at the back to create depth.
Fairy Garden Accessories on a Budget: Crafting Tiny Furniture and Decor

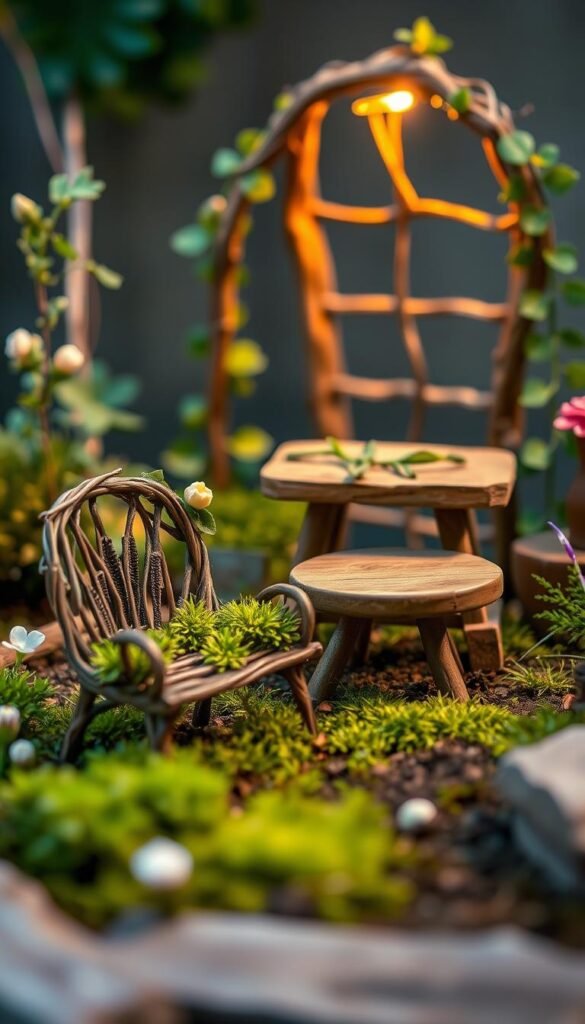
Bringing miniature scenes to life starts with crafting sturdy, whimsical structures. Follow these simple methods to build pieces that blend natural charm with playful design.
Step-by-Step Instructions for Miniature Furniture
Start your stone house by arranging quarter-sized rocks into a square base. Layer them upward, leaving space for a door. Create triangular ends using smaller stones to support the roof structure.
For the roof, cut wooden craft sticks to size using scissors. Lay them horizontally across the stone peaks, securing with weatherproof glue. Add dark brown paint and press sheet moss into gaps for a weathered look.
| Material | Best Uses | Pro Tips |
|---|---|---|
| Flat stones | Walls & pathways | Seal with clear acrylic |
| Craft sticks | Roofs & chairs | Stagger for curved shapes |
| Pebbles | Door handles | Use strong epoxy adhesive |
Construct chairs by cutting sticks into four equal parts. Arrange them parallel for the seat, then glue two horizontal supports underneath. Create curved backs by offsetting stick lengths before attaching them at an angle.
Finish your craft with personality! Paint doors in cheerful colors and add pebble handles. Fill gaps between rocks using moss or small wood chips. These techniques ensure your creations withstand rain while keeping their storybook charm.
Upcycling and Junk Drawer Inspirations for Fairy Garden Furniture

Your home holds hidden treasures perfect for crafting magical miniature settings. Before tossing those bottle caps or pizza savers, see them through a creative lens—they’re ready-made furniture waiting to shine!
Creative Uses for Household Items and Recycled Materials
Turn a pizza saver into a bistro table—no modifications needed. Paint it mint green for a cottage vibe or leave it silver for modern flair. Bamboo skewers become chair legs when cut into eight equal pieces. Attach them to bottle caps with hot glue, then secure soda can tops as seats.
Need lighting? Hot-glue marbles to golf tees for glowing path markers. Acorn caps transform into lanterns when paired with marbles and thread loops. These ideas cost nothing but spark endless charm.
Transforming Everyday Objects into Enchanting Accents
Heavy jewelry wire bends into shepherd’s hooks for hanging decor. Shape it using pliers, then press the bottom into soil near pathways. For weathered pieces, rub acrylic paint into crevices before sealing.
| Item | New Purpose | Durability Tip |
|---|---|---|
| Bottle caps | Chair bases | Use outdoor-grade adhesive |
| Soda can tops | Table surfaces | Seal with clear nail polish |
| Marbles | Lantern globes | Wipe monthly with damp cloth |
These projects prove gardens thrive on imagination, not expensive supplies. Your backyard becomes a stage for storytelling when ordinary things get extraordinary makeovers!
Final Touches to Complete Your Magical Garden Adventure

Transform your outdoor space into a living storybook with these final flourishes. Create winding pathways using aquarium gravel, flanked by flat stones for instant charm. Let kids press pebbles into the soil as stepping stones—their small hands perfect for this delicate work.
Build whimsical fences using wooden craft sticks as posts. Cut horizontal rails to size and secure with outdoor glue. Add personality with a marble “gazing ball” nestled among plants. These details turn your project into an interactive wonderland.
Protect creations with clear acrylic spray. Reapply every spring to shield against rain and sun. Encourage children to rearrange mini figures or add seasonal touches like acorn cap bowls. This keeps the scene fresh through holidays and weather changes.
Your yard now holds more than plants—it’s a stage for imagination. Watch little faces light up as they tend their tiny world. These shared moments become cherished memories, proving the real magic lies in creating together.


