
Have you ever noticed how weather and time reshape your yard? Exposed roots near trees often create bumpy, uneven ground. These natural formations might seem like obstacles, but they’re actually blank canvases for creativity.
Instead of fighting nature’s design, why not enhance it? Transforming these areas into whimsical spaces solves two problems at once. You’ll address tricky terrain while crafting a storybook-inspired corner. Think miniature pathways winding through mossy nooks or tiny cottages nestled between rugged bark.
This approach works with your landscape, not against it. Surface roots become part of the charm, adding texture and character. You’ll create stable walkways that protect delicate root systems from foot traffic. Plus, adding ground cover plants helps prevent soil erosion naturally.
Best of all, this project blends practicality with imagination. It turns an eyesore into a conversation starter—a place where functionality meets fantasy. Whether you’re crafting a hidden gnome village or a sparkling grotto, your outdoor area gains both beauty and purpose.
Embracing Natural Elements in Your Outdoor Space

What if your backyard’s quirks could become its greatest features? Nature provides endless raw materials to craft spaces that feel both intentional and wild. By working with your environment’s existing elements, you create designs that grow organically from the landscape itself.
Understanding the Magic of Nature
Observe how light dances through leaves or how rain shapes the soil. These patterns reveal your space’s hidden potential. Moss becomes velvet carpeting, while twisted branches form ready-made arches. Use natural materials like pebbles for pathways or lichen-covered stones as miniature cliffs.
Choosing the Right Setting
Look for areas where elements converge—a cluster of rocks near flowering ground cover or a dip in the terrain. These spots offer built-in texture and depth. Instead of clearing fallen leaves, arrange them as autumn-themed decor. Personalize with DIY garden art that complements, rather than competes with, your home’s surroundings.
Your imagination thrives when you let the environment guide your design. By honoring nature’s blueprint, you create spaces that feel discovered—not manufactured.
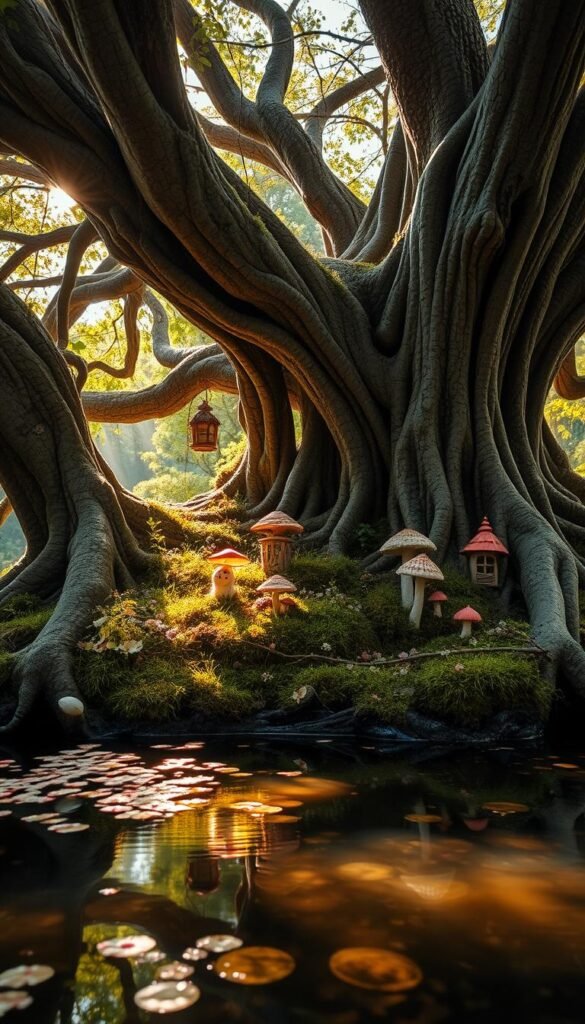
How to Create a Fairy Garden Around a Tree Root System for a Naturally Built Landscape
Every gnome-sized masterpiece begins with a blueprint. Start by sitting near your tree’s base and studying its unique contours. Notice how raised roots form natural bridges or how gaps between them create perfect miniature valleys. This observation phase helps you create fairy habitats that feel authentically rooted in nature.
- Sketch existing root patterns as pathways or borders
- Identify sheltered spaces for tiny structures
- Mark elevated areas for visual focal points
Consider drainage needs early—sloped roots might guide rainwater naturally. Local gardener Mia Torres suggests:
“Let the land whisper its secrets. That twisty root? It’s begging to become a spiral staircase for winged visitors.”
Balance practicality with playfulness. Use moss to soften jagged edges or pebbles to define walking routes. Proportion matters—a 6-inch cottage might overwhelm delicate surface roots but look perfect near thicker trunks.
Finally, establish zones that connect through the garden layout. A curved stone path could lead from a root-top lookout to a bark-walled tea house. These intentional flows make your creation feel discovered rather than forced.
Gathering Materials and Essential Tools

The right supplies transform ordinary spaces into enchanted realms. Start by collecting materials that blend function with fantasy—think soil for stability and pebbles for charm. Local hardware stores often carry affordable wood scraps perfect for tiny structures.
Selecting Natural Fill, Mulch, and Rocks
Choose organic mulch like cedar chips to protect roots while adding earthy texture. For drainage, mix coarse sand with topsoil—it prevents waterlogging near delicate bark. Flat rock slabs make ideal stepping stones, while irregular stones create rustic benches.
Pine needles work wonders as natural carpeting in shaded areas. Landscape designer Emma Carter notes:
“Layered materials create depth—start with gravel, add moss, then accent with seashells.”
DIY Tools and Accessories for a Whimsical Touch
Repurpose household items like old spoons as miniature bridges or bottle caps as ponds. Basic tools—a handsaw for shaping wood, tweezers for placing tiny accessories—make crafting manageable. Solar-powered tea lights add magic without wiring hassles.
For pathways, press mosaic tiles into wet concrete between roots. Thrift store finds like dollhouse furniture become instant focal points. Remember: creativity outweighs cost when building whimsical options.
Inspecting and Preparing Your Tree Root Area

Your tree’s roots hold secrets to a thriving miniature world. Before adding magical touches, assess the area carefully. This crucial step ensures your creation stands the test of time while protecting the living plant beneath.
Evaluating Root Health and Stability
Start by examining the tree’s base. Press gently on exposed roots—healthy ones feel firm, not spongy. Look for:
- Cracks or peeling bark indicating decay
- Sawdust trails signaling pest activity
- Discolored soil suggesting fungal issues
Landscape expert Carlos Mendez advises:
“Never build on compromised roots. Address problems now to prevent collapse later.”
Clearing Debris and Leveling the Ground
Remove loose dirt and leaves using a soft brush. For stubborn debris between roots, try:
- Plastic tweezers for precision work
- Miniature rakes made from fork tines
- Compressed air to blast tiny crevices
Grade the soil gently with a hand trowel, keeping natural slopes for drainage. Place flat stones in low spots to create stable platforms. This prepares the area while letting rainwater flow naturally around the tree’s base.
Crafting a Magical Path Through Your Garden

Twisting trails transform ordinary spaces into adventures waiting to happen. By working with your landscape’s natural curves, you create journeys that delight visitors while protecting delicate ecosystems. Let’s explore how to balance practicality with enchantment underfoot.
Curving the Path Around Exposed Roots
Nature rarely travels in straight lines—and neither should your pathway. Follow root contours like a river follows its bed. Stepping stones placed at angles create rhythm, while moss-filled gaps soften transitions. Landscape artist Ren Tanaka suggests:
“Let elevation changes become part of the story. A sudden dip? Perfect for a miniature bridge spanning two worlds.”
| Feature | Solution | Benefit |
|---|---|---|
| Curved Layout | Follow root patterns | Prevents tripping hazards |
| Elevation Changes | Build terraced steps | Adds visual drama |
| Erosion Control | Compact gravel base | Protects root systems |
Addressing Erosion and Uneven Terrain
Sloped areas need smart water management. Bury drainage pipes disguised as hollow logs to redirect runoff. For sudden drops between roots, build:
- Flagstone staircases with thyme-filled cracks
- Wooden ramps using salvaged branches
- Pebble mosaics that stabilize soil
Compact sandy loam between stones to create firm walking surfaces. This guide to fairy path construction shows how layered materials prevent washouts during storms. Remember: every puddle becomes a chance for creativity—add a tiny dock or crystal “ice” chunks!
Establishing a Stable Base with Filling and Leveling Techniques

What makes a magical space last through seasons? A rock-solid foundation. Start by building up your base with precision—this ensures pathways stay smooth and structures remain upright for years.
Layering Fill and Compacting the Soil
Add soil or sand in 6-8 inch layers for best results. Thinner sections let you compact thoroughly—use your feet or a hand tamper. Sprinkle water between layers; it helps particles lock together like puzzle pieces.
Sand naturally settles tighter than other materials. Try this test: press your thumb into a compacted layer. If it leaves no dent, you’re ready for the next step. Watch for shifting spots—they’ll need extra attention.
| Material | Compaction Ease | Best Use |
|---|---|---|
| Sand | Excellent | High-traffic areas |
| Topsoil | Good | Planting zones |
| Gravel | Fair | Drainage channels |
Smoothing the Landscape for a Secure Walkway
Once layers are set, check for uneven spots. Drag a board across the surface—low areas will collect dirt. Fill gaps with sand, then compact again. Landscape pro Devin Cole suggests:
“Walk backward while leveling—your weight distributes more evenly for consistent results.”
Test stability by jumping on finished sections. If the ground moves, add water and tamp once more. This creates a firm base that withstands rainstorms and playful footsteps alike.
Selecting and Installing a Natural Groundcover
Your enchanted space needs a living carpet that marries beauty with purpose. The right groundcover protects roots, prevents erosion, and creates visual harmony. Let’s explore options that thrive underfoot while enhancing your magical theme.
Mulch, Moss, and Vegetation Options
Moss transforms shaded areas into velvet carpets. Choose cushion moss for soft textures or sheet moss for smooth surfaces. Landscape designer Fiona Reyes advises:
“Mix buttermilk and moss in a blender—paint it onto damp soil. It jumpstarts growth like nature’s glue.”
For sunny spots, try creeping thyme or miniature clover. These plants handle foot traffic while blooming with tiny flowers. Pair them with wood mulch edges for contrast.
| Groundcover | Best For | Care Tips |
|---|---|---|
| Moss | Shaded nooks | Mist weekly |
| Clover | Sloped areas | Trim monthly |
| Pine Needles | Acidic soil | Refresh annually |
Combine materials for dynamic textures. Layer pebbles around moss patches or tuck leaves under flowering groundcovers. This approach adds depth while letting each element shine.
Installation matters. Press moss firmly into prepared soil mixed with compost. For grassy areas, sow seeds between stones. Water gently—strong streams displace delicate plants. Your garden gains cohesion when transitions feel effortless, like ferns fading into bark chips naturally.
Incorporating Whimsical Accessories and Fairy Figurines
What transforms ordinary soil into a realm of wonder? The final touches that spark curiosity. Unique ornaments breathe life into your design, turning simple spaces into interactive stories waiting to unfold.
Choosing Unique Garden Items
Seek pieces that reflect your personality while complementing nature’s textures. Metal sculptures shaped like sunflowers or ceramic birdbaths become instant focal points. Smaller accents—like mosaic mirrors tucked among vines or hand-painted stones lining paths—add layers of discovery.
Consider elevating your space with creative flair through subtle details. Miniature lanterns peeking through ferns or a tiny bench under a mushroom cap invite closer inspection. For nighttime magic, weave solar-powered lights into bark crevices or drape them over weathered branches.
Balance is key. Let one statement piece anchor the scene, then sprinkle smaller treasures throughout. This approach keeps the eye moving without overwhelming the natural beauty beneath. Your outdoor haven becomes a living storybook where every visit reveals new secrets.


