Imagine turning simple stones into tiny treasures that spark joy in your backyard. Crafters across the U.S. are discovering how hand-painted accents can turn ordinary gardens into whimsical wonderlands. These unique creations let you add names, dates, or heartfelt messages that mass-produced decorations simply can’t match.
Popular Etsy shops report a 45% increase in customized outdoor ornaments last year, with many buyers using them as meaningful gifts. Whether you’re designing miniature pathways or crafting seasonal displays, personalized touches make your space truly one-of-a-kind. Our guide reveals pro techniques for making designs that stay vibrant through rain, snow, and sunshine.
You’ll learn how to choose weather-resistant paints and create eye-catching patterns – from cheerful polka dots to intricate nature scenes. These skills also work great for DIY garden art projects beyond miniature landscapes. Local materials like river rocks or reclaimed metal add extra character while connecting your creation to its environment.
Ready to make neighbors stop and smile at your charming displays? Let’s explore how simple materials become magical keepsakes that tell your unique story through every brushstroke.
Introduction to Your Fairy Garden Art Adventure

What if your backyard could tell stories through colorful stones? Tiny landscapes are sweeping across American homes, blending creativity with nature’s simplicity. These pocket-sized projects let you build entire worlds where imagination grows faster than weeds.
Discovering the Magic of Miniature Gardens
Small-scale scenes work like portals to wonder, especially for young explorers. A recent survey shows 68% of families use these projects to unplug from screens. You’ll watch kids’ eyes light up when they spot hidden details – a pebble path here, a tiny bench there.
“Creating miniature spaces teaches patience and storytelling – every element has purpose.”
Why Painted Rocks and Signs Make a Difference
Natural stones become endless blank canvases. Unlike store-bought decor, hand-crafted pieces withstand seasons while reflecting your personality. Check out why DIY options outshine mass-produced items:
| Feature | Painted Stones | Plastic Decor |
|---|---|---|
| Durability | 5+ years outdoors | Fades in 1-2 years |
| Customization | Unlimited designs | Limited styles |
| Eco-Friendliness | Natural materials | Non-recyclable |
Painting sessions double as bonding time – grandparents share techniques while kids experiment with colors. You’ll treasure these moments long after the paint dries.
Essential Supplies for Your Fairy Garden Project

Transforming ordinary items into magical pieces starts with smart preparation. The right supplies turn simple ideas into durable creations that weather storms and spark joy season after season.
Gathering the Perfect Rocks and Materials
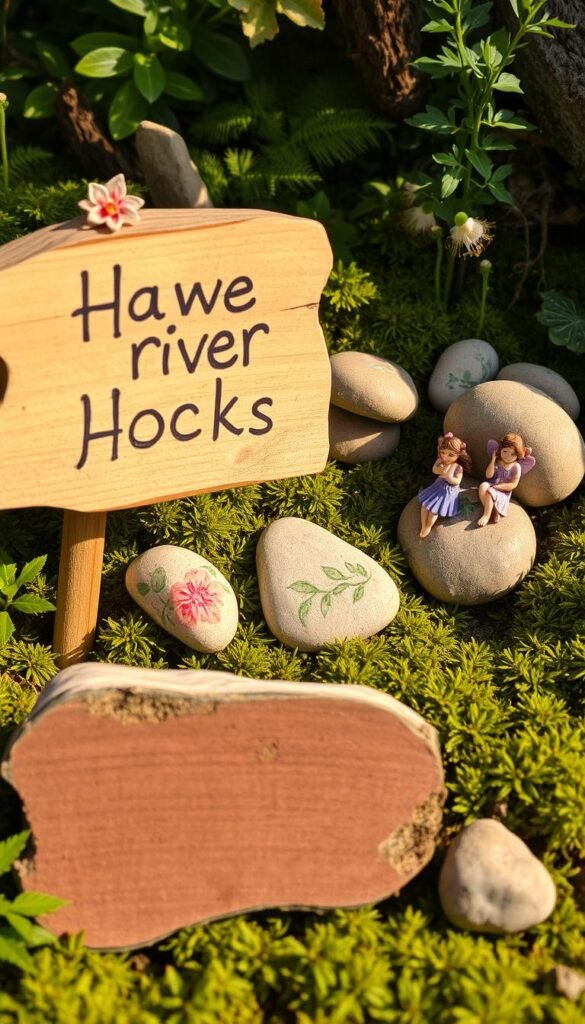
Your best rock choices have flat surfaces for painting and sturdy bases for outdoor placement. Scout riverbeds or construction sites for stones with natural curves that resemble cottages or critters. These shapes spark creative ideas before you even pick up a brush.
Combine your finds with natural materials like birch bark scraps or moss clumps. These add texture to roofs and blend seamlessly with outdoor settings. Don’t overlook flea market treasures – vintage buttons make charming doorknobs!
Tools and Paints to Bring Your Vision to Life
Paint pens dominate this craft for good reason. Their precision tips draw straight shutters and curly vines without messy cleanup. Build your collection with three tip sizes:
- Extra-fine (0.7mm) for delicate patterns
- Medium (2mm) for filling larger areas
- Chisel tips for shading effects
Pair these with acrylic paint for bold backgrounds. Quality brands like DecoArt withstand sun exposure better than bargain options. Always keep white and black pens handy – they add depth to any design.
Remember: sealed creations last up to five years outdoors. We’ll show you protective finishes in later steps!
Step-by-Step Guide to Creating Your Fairy Garden Rocks

Unlock the secret to crafting whimsical stone houses that enchant every viewer. Follow these clear directions to transform ordinary stones into miniature masterpieces perfect for outdoor displays.
Preparing Your Rocks and Gathering Natural Elements
Start your DIY project with a nature walk. Look for flat stones that sit steadily – these become perfect tiny homes. Rinse each find with soapy water, scrubbing off dirt for better paint adhesion. Let them dry overnight before designing.
Study each stone’s curves and ridges. A jagged edge might become a rustic chimney, while smooth surfaces work for detailed murals. Pair your cleaned rocks with twigs or acorn caps for 3D effects.
| Material | Best Use | Prep Tip |
|---|---|---|
| Flat stones | House fronts | Sand rough edges |
| Pebbles | Pathways | Sort by size |
| Birch bark | Roof textures | Seal with mod podge |
Designing Unique Details for Doors, Windows, and Signs
Grab your paint pens when surfaces dry completely. Begin with basic door shapes – rectangles or arches work great. Rock painting thrives on imperfection. Wobbly lines add personality to each creation.
Try these tutorial-tested techniques:
- Use metallic pens for faux hinges
- Dot white paint for window reflections
- Add moss around doorways
Snap progress photos as you work. These help track your favorite methods and inspire future DIY projects. Remember – crooked shutters tell better stories than perfect ones!
Tips for Painting and Personalizing Your Garden Ornaments

Transform plain stones into storytelling pieces with smart painting methods. These DIY techniques let you craft ornaments that reflect your style while surviving outdoor conditions. Start by exploring how different tools create unique textures and effects.
Exploring DIY Techniques with Acrylics and Paint Pens
Build your designs like a pro using layered colors. Apply base coats with acrylic paint, letting each layer dry completely before adding details. This prevents smudging and makes patterns pop. One artist created miniature houses by:
- Painting rock tops in mossy greens
- Adding rounded doors with brown shades
- Outlining features with black for sharp definition
Try these texture-building methods:
| Technique | Tools Needed | Best For |
|---|---|---|
| Dry Brushing | Stiff brush | Stone textures |
| Stippling | Sponge/brush tip | Moss effects |
| Fine Lining | 0.7mm pen | Window details |
Develop your signature style through consistent color choices. Use darker shades in recessed areas and lighter tones on raised edges. Practice intricate patterns on spare stones first – steady hands improve with repetition. For inspiration, check these creative rock designs that blend artistry with nature.
“Let the stone’s natural shape guide your brush – imperfections become charming features.”
Remember: quality paint pens last longer outdoors. Store them tip-down to keep ink flowing smoothly. Your personalized creations will soon become conversation starters!
Fairy Garden Art: Painting Rocks and Signs for a More Personalized Scene

Bring your miniature world to life with clever placement of handcrafted accents. Strategically position painted rocks along pathways or beneath shrubs to create surprise moments. Visitors will love spotting tiny cottages peeking through hosta leaves or colorful pebble mosaics guiding their exploration.
Flat stones become perfect storytelling tools. Design seasonal displays with autumn leaves or snowflakes using these simple techniques:
| Theme | Design Elements | Placement Tip |
|---|---|---|
| Spring | Floral patterns, baby animals | Near blooming bulbs |
| Summer | Butterflies, sunshine motifs | Around water features |
| Fall | Pumpkins, golden leaves | Under maple trees |
Get kids involved by letting them create their own characters. A recent study showed children who help design outdoor spaces develop stronger creative problem-solving skills. Try these family-friendly activities:
- Paint alphabet stones for outdoor spelling games
- Make numbered markers for garden scavenger hunts
- Create “fairy mailboxes” using repurposed containers
Document your progress with photos. Track how your rock painting skills evolve over time. One parent shared:
“Our collection started with three stones – now it’s become a neighborhood attraction that brings joy year-round.”
Rotate displays monthly to keep your space fresh. Combine store-bought items with handmade pieces for balanced charm. Your unique creations will make every corner whisper magic.
Enhancing Your Garden with Creative DIY Ideas
Your outdoor space becomes a canvas when blending handmade charm with nature’s offerings. Discover how unexpected combinations create eye-catching displays that evolve with the seasons. Let’s explore ways to make your space uniquely yours through clever material mixes.
Mixing Materials for a One-of-a-Kind Look
Combine DIY painted elements with organic finds for striking contrasts. Try pairing smooth stones with rough-cut driftwood or glossy painted signs beside fuzzy moss patches. These textures tell visual stories that store-bought decor can’t match.
Household tools unlock surprising effects:
| Technique | Tools | Effect |
|---|---|---|
| Sponge Stippling | Kitchen sponge | Mossy textures |
| Toothbrush Flicking | Old toothbrush | Speckled stone |
| Cotton Swab Detailing | Q-tips | Precise dots |
Seal creations with clear outdoor varnish to protect against weather. Rotate pieces seasonally – bright florals in spring, warm leaf patterns in fall.
Incorporating Natural Elements and Handcrafted Touches
Transform nature walks into supply runs. Acorn caps become tiny bowls, while twisted branches form rustic arches. Use low-temperature glue guns to attach delicate materials without damage.
Try these craft-tested combinations:
- Birch bark roofs secured with waterproof glue
- Pebble pathways bordered by painted guide stones
- Pine cone “trees” beside miniature benches
Document your favorite ideas in a weatherproof journal. Note which materials withstand local climates best – this helps refine your signature style over time.
Decorating and Maintaining Your Fairy Garden Masterpieces
Keep your colorful creations looking fresh through every season with smart protection strategies. Proper care ensures handcrafted details stay vibrant while natural accents get seasonal updates. Let’s explore how to preserve your work’s charm through sun, rain, and snow.
Shielding Creations from the Elements
Sealant becomes your best ally for outdoor displays. Quality formulas create invisible shields against UV rays and moisture. Tested projects show properly sealed pieces maintain color for over a year, while unsealed ones fade within months.
Follow these protection steps:
- Apply two thin sealant coats – thick layers cause cloudiness
- Reapply every 12 months for maximum durability
- Avoid nail polish – it yellows and cracks outdoors
Natural materials like bark roofs need different care. Replace them yearly since they break down faster than painted rocks. Track weather patterns in your area – harsh winters might require moving delicate items indoors.
Create a maintenance routine:
| Season | Task | Tool |
|---|---|---|
| Spring | Inspect for cracks | Magnifying glass |
| Summer | Clean dust buildup | Soft brush |
| Fall | Store seasonal pieces | Labeled bins |
Document changes with photos each season. This helps spot fading patterns and improves future projects. Your efforts will keep every detail telling its story for years!
Wrapping Up Your Magical Fairy Garden Journey
Your journey through miniature landscapes ends where creativity meets nature’s embrace. Step back and admire how rock painting transformed ordinary stones into storybook features. These crafts become more than decorations – they’re milestones of imagination.
Invite friends to explore your handiwork, sparking ideas for their own projects. Watch kids’ faces light up as they spot hidden details you designed together. Shared moments turn into cherished traditions that outlast seasons.
Over time, weathered stones gain character like well-loved storybooks. Each raindrop adds patina while sunbeams highlight your brushstrokes. Future visitors will marvel at how your creations evolve alongside living plants.
Carry these skills into new adventures – maybe seasonal displays or collaborative murals. Keep a sketchbook for sudden bursts of inspiration during nature walks. Remember, the real magic lives in laughter-filled afternoons and paint-splattered hands.
Your outdoor canvas now whispers tales only you could tell. What chapter will you add next?