
Imagine stepping into a world where everyday magic lives just beyond your door. Tiny pathways wind through lush greenery, and miniature structures spark curiosity at every turn. This isn’t a fantasy—it’s a creative way to reimagine your outdoor space into something truly special.
More homeowners are embracing this trend, blending nature with playful design. These pocket-sized landscapes invite you to slow down and reconnect with the outdoors. Studies show activities like this reduce stress while sparking creativity—a perfect balance of fun and mindfulness.
What makes these designs stand out? It’s all about personal flair. Swap decor with the seasons or craft tiny accessories that tell your story. A charming cottage becomes the heart of your setup, offering endless ways to refresh the look without major effort.
Ready to start? Whether you’re crafting for relaxation or family bonding, this project turns ordinary areas into whimsy-filled escapes. Let your imagination guide you as you build a sanctuary that feels uniquely yours.
Setting the Stage for Your Fairy Garden Escape

Your backyard holds secrets waiting to transform into a tiny wonderland. Whether you’re working with sprawling lawns or a cozy balcony corner, clever planning turns ordinary spots into magical escapes. Start by seeing your space through fresh eyes—every nook could host miniature charm.
Understanding Your Space and Its Potential
Sunlight patterns and soil quality shape your design choices. Notice where shadows fall during the day and which areas stay damp after rain. Existing trees or rock formations? These become natural backdrops for tiny benches or winding pebble trails.
Gathering Inspiration from Nature and DIY Projects
Look to local landscapes for color schemes and textures. Moss-covered stones or fallen branches spark creative ideas for bridges or fences. Online tutorials offer budget-friendly projects using clay pots, broken tiles, or recycled jars—perfect for crafting unique lanterns or birdbaths.
Remember: Seasons change your nature-inspired setup. Opt for hardy plants in snowy climates or movable containers for easy winter storage. Start small—a single planter with succulents and a handmade cottage proves even modest efforts create big delight.
Choosing the Ideal Location in Your Backyard
Finding the perfect spot for your miniature wonderland starts with smart location choices. Partial shade works best—it shields tiny decorations from sun damage while letting flowers and moss thrive. Look for areas near existing trees or shrubs, which add depth and blend your creation into the landscape naturally.
Easy access matters for routine care. Pick a place where you can water plants or swap seasonal decor without tripping over rocks. Check how rainwater flows through the area—low spots might drown delicate ferns or wash away pebble paths after storms.
Visibility boosts enjoyment. Position your setup where you’ll see it daily—near a patio chair or kitchen window. Leave room around the edges for adding mini benches or ivy-covered arches later. This way, your design grows alongside your creativity.
| Location Factor | Benefit | Tip |
|---|---|---|
| Partial Shade | Protects miniatures & plants | Use taller plants as natural umbrellas |
| Near Trees/Shrubs | Creates instant backdrop | Incorporate fallen leaves into pathways |
| Good Drainage | Prevents water damage | Slope the ground slightly |
Balance practicality with charm. A sloped corner becomes a cascading stream bed. A tree root? Turn it into a rustic staircase. Let nature’s quirks guide your layout for a space that feels both planned and wonderfully wild.
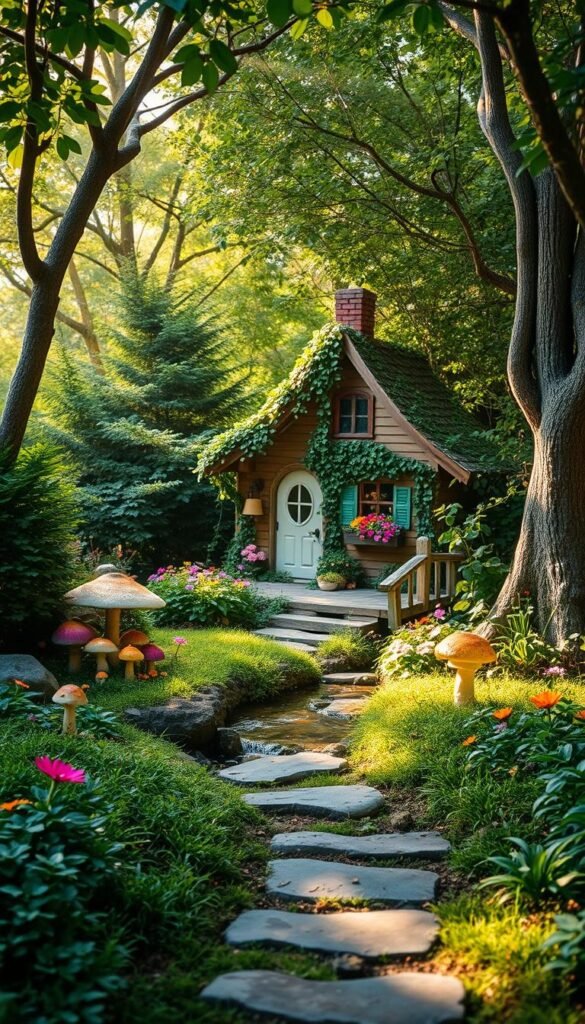
Designing the Perfect Fairy Garden Cottage: Adding Whimsical Touches to Your Backyard Hideaway

Building a lasting centerpiece for your magical nook requires smart material choices and creative flair. Stone structures shine here—they withstand harsh weather while maintaining storybook charm. Silicone sealant proves essential for outdoor durability, unlike craft glue that crumbles after one rainy season.
Match your cottage’s style to your home’s architecture for cohesive appeal. A rustic stone house pairs beautifully with woodland plants, while a painted wooden design pops against flowering ground cover. Ensure doors swing open and windows feature lace curtains thinner than a dragonfly’s wing—these details spark curiosity about who might live inside.
Keep proportions balanced. Your miniature house should tower over moss but stay dwarfed by nearby shrubs. Practical upgrades matter too: removable roofs let you clear leaves or adjust decor easily. One gardener shares, “I swap seasonal trinkets inside mine—acorn cups in fall, crystal icicles in winter.”
Finish with colors and textures that reflect your personality. Weather-resistant paints in sage green or lavender add playful touches. Hand-carved shutters or a pebble chimney turn basic designs into heirloom pieces. Your creation becomes more than decor—it’s a tiny world waiting to be explored.
DIY Fairy House Ideas to Spark Your Imagination

Crafting miniature homes brings big creativity to small spaces. Whether you’re building a cozy woodland retreat or a stone cottage, natural elements make your design feel like it grew there. Start by raiding your yard for supplies—twigs, pebbles, and moss become walls, roofs, and landscaping magic.
Using Natural Materials Like Twigs, Stones, and Moss
Transform fallen branches into log cabins by gluing uniform sticks to a foam base. Press moss between gaps for instant age and charm. For weatherproof houses, try concrete-painted birdhouses—they survive storms while looking straight from a storybook.
Stack flat stones with outdoor-safe adhesive to create rustic cottages. Add personality with acorn-cap shingles or pinecone fences. One gardener notes, “My kids love hunting for materials—it turns building into a treasure hunt.”
Simple Projects for Beginners and Kids
Popsicle sticks make perfect starter frames. Let little hands glue bark tiles or arrange pebble pathways. Try these DIY garden art projects for family-friendly ideas using recycled jars or clay pots.
Styrofoam bases let you rearrange elements as skills grow. Use silicone sealant for durability—it holds twig roofs tight during playtime storms. Keep designs open-ended: “Will this be a mushroom cottage or a treehouse? Let their ideas lead,” suggests a parenting blog.
Enhancing Your Garden with Enchanting Lighting

Light transforms ordinary spaces into magical escapes after sunset. The right illumination turns pathways into glowing trails and highlights hidden details you’d miss by day. Start by considering how different lights interact with your design—soft glows or playful sparkles each create unique moods.
Incorporating Solar and Twinkling Fairy Lights
Solar-powered options shine for eco-friendly charm. Place them near miniature cottages or along stepping stones—they charge by day and cast a warm glow at night. Pair them with LED string lights in trees for layered effects. One gardener notes, “My solar lanterns guide visitors while saving energy—win-win!”
Twinkling fairy lights add instant whimsy. Drape them over shrubs or weave through trellises to mimic fireflies. Choose weather-resistant models to survive rainstorms. For pathways, embed low-voltage options between stones—they’re safe for kids and pets.
| Type | Best For | Tip |
|---|---|---|
| Solar Lights | Pathways & Cottage Accents | Clean panels monthly for peak performance |
| LED Strings | Overhead Canopies | Use warm white for cozy ambiance |
| Battery Tea Lights | Miniature Windows | Replace batteries every 3 months |
Balance function and fantasy. Highlight focal points like tiny doors or water features while keeping walkways visible. Rotate seasonal colors—think icy blues in winter or golden hues for fall. Remember: strategic placement turns your outdoor aesthetic into a 24/7 showcase.
Creative Pathways and Stepping Stone Ideas

Paths guide adventures in your miniature landscape while adding structure to its wild charm. Start by sketching winding routes that connect key areas—this creates natural pauses to admire tiny details. Stepping stones become more than functional—they’re opportunities to showcase personality through color and texture.
Mosaic designs steal the show. Use broken dishes or sea glass to craft rainbow patterns on concrete bases. “My kids love hunting for materials at thrift stores,” shares a DIY enthusiast. Seal creations with outdoor-grade varnish to protect against rain and foot traffic.
Painted stones offer quick whimsy. Try polka dots or striped “candy” paths using acrylics topped with clear sealant. For earthy appeal, arrange flat river rocks into meandering trails. Space pieces 10-12 inches apart—comfortable for both adults and little explorers.
| Material | Best Use | Tip |
|---|---|---|
| Mosaic Tiles | Focal Points | Grout with sanded mortar |
| Painted Rocks | Playful Accents | Reapply sealant yearly |
| Natural Pebbles | Rustic Paths | Edge with larger stones |
Blend styles for visual intrigue. Pair a cobblestone path with glitter-embedded stepping stones near seating areas. Add solar lights between gaps—they’ll glow softly after dusk, making your creation magical day and night.
Magical Accessories for Your Fairy Cottage
Tiny treasures transform your miniature landscape into a living storybook. The right accents breathe personality into your setup while surviving rain, sun, and curious critters. Start by choosing pieces that spark joy and invite storytelling.
Miniature Furniture and Handcrafted Details
Polymer clay becomes magic putty for outdoor-friendly creations. Bake tiny table sets with teacups smaller than a thumbnail, or craft swinging benches from treated twine and wood slices. These pieces anchor your design while hinting at daily life in the house.
Mix materials for visual interest. Combine weather-resistant metals with hand-painted signs for rustic charm. A miniature mailbox stuffed with “letters” (dried flower petals) adds playful details. One crafter shares, “I hide tiny keys near doorways—kids love discovering them!”
Rotate seasonal accents effortlessly. Swap summer berry baskets for autumn pumpkins using Velcro dots. Store-bought lanterns pair beautifully with DIY clay mushrooms, letting you balance time and creativity. This touch keeps your display fresh without constant rebuilding.
Focus on scale when accessorizing. A table should sit knee-high to your cottage’s door. Use moss rugs and pebble walkways to connect elements naturally. For inspiration, explore timeless design blends that work in any fairy realm.
Upcycling and Recycled Elements for Unique Touches
Breathing new life into forgotten objects adds character to your outdoor space. Everyday items like teapots or mason jars become quirky houses for tiny residents. An old ladder? Turn it into a vertical planter that gives your setup height and depth.
Thrift stores and salvage yards hide treasures waiting for transformation. Vintage doors make arched entryways, while tin cans painted with weatherproof colors become charming cottages. “My kids love hunting for mismatched knobs to create miniature doorknobs,” shares a DIY enthusiast.
Balance creativity with practicality. Use silicone sealant to secure stone roofs on repurposed containers. Discarded yogurt cups? Drill drainage holes and stack them into multi-level garden towers. These vintage gardening techniques reduce waste while sparking imagination.
Involve the whole family in projects. Let grandparents sand wooden crates into benches while kids glue mosaic tiles onto stepping stones. The goal? Create a space that feels collected over time, not thrown together. Mix aged elements with fresh plants for a design that whispers stories of its past life.
Bringing Life with Plants, Flowers, and Greenery
The right greenery turns miniature scenes into living artworks. Tiny leaves and delicate petals add movement while framing your structures naturally. Focus on textures and colors that create depth without stealing the spotlight from your centerpiece.
Selecting the Best Blooms for Year-Round Color
Choose plants that stay small but pack visual punch. Dwarf lavender thrives in sunny spots, while creeping thyme spills over edges like a living carpet. For seasonal pops, swap pansies in spring with marigolds when summer heat arrives.
Moss becomes your secret weapon. Press it between stepping stones or let it climb cottage walls for instant age. Air flowers tucked into nooks need no soil—perfect for busy creators. “They’re like jewelry for tiny spaces,” shares a gardening blogger.
| Plant Type | Season | Benefit |
|---|---|---|
| Dwarf Lavender | Spring-Fall | Fragrant, drought-resistant |
| Miniature Roses | Summer | Colorful, attracts butterflies |
| Moss Varieties | Year-Round | Soft texture, low maintenance |
Rotate container flowers every few months. Ornamental cabbage adds frosty charm in winter, while violas brighten rainy days. Keep care simple—select species that match your local climate. This ensures your garden stays vibrant with minimal fuss.
Balance height and spread. Tall spiky grasses frame scenes nicely, while trailing sedum hides container edges. Leave breathing room between plants to showcase tiny benches or ceramic mushrooms. Your living display evolves beautifully through each season.
Integrating Water Features and Natural Flow
Gentle trickling sounds transform ordinary corners into peaceful retreats. A small water feature becomes the heartbeat of your magical setup, inviting stillness and wonder. Use shallow containers to craft ponds—line them with pebbles and add floating lily pads cut from waterproof foam.
Position your spot near seating areas for daily enjoyment. Surround cascading mini-waterfalls with ferns that thrive in misty conditions. Tiny boats made from bark or walnut shells drift across the surface, suggesting playful fairy activity after dark.
Balance practicality with charm. Install a recirculating pump for maintenance-free flow, hiding tubing under mossy banks. Add life with moisture-loving plants like baby tears or dwarf horsetail. These elements work together to create a serene garden corner that feels both intentional and wild—a perfect finale to your creative journey.


