
Want to grow lush vegetables and flowers without spending a fortune on soil? You’re in the right place. This guide reveals smart strategies to fill your raised garden bed using materials you already have – or can get for free.
We’ll explore an ancient German technique called hugelkultur (meaning “hill culture”). It uses rotting wood, yard scraps, and kitchen waste to create rich, moisture-saving soil. Perfect for urban areas where poor drainage and thin topsoil frustrate growers.
Here’s what makes this method special: it cuts costs by up to 70% while building a self-feeding ecosystem. Imagine turning fallen branches, grass clippings, and coffee grounds into plant food that works for years. You’ll also learn how to layer materials for maximum water retention and nutrient release.
By the end, you’ll know exactly how to source free gardening materials locally. Transform your outdoor space into a thriving oasis without expensive store-bought mixes. Let’s dig into sustainable solutions that make your garden and wallet happier.
Understanding the Basics of Raised Garden Beds

Transform your gardening experience with elevated plots that solve common soil issues while boosting plant health. These structures let you customize growing conditions, making them perfect for tight spaces or challenging landscapes.
The Benefits of Elevated Gardening
Raised garden beds warm up faster in spring, giving your plants a head start. They prevent soil compaction, letting roots breathe and absorb nutrients easily. You’ll spend less time weeding since the defined space keeps invaders out.
Ergonomic design reduces back strain – no more bending over for hours. Better drainage means no soggy roots during heavy rains. Plus, you can grow more in less space by using vertical layers.
Key Components of a Successful Raised Bed
Three elements determine your garden’s success:
- Depth: 12-18 inches for most vegetables
- Materials: Rot-resistant cedar or galvanized steel
- Drainage: Gravel base with weed-block fabric
| Feature | Raised Beds | Traditional Gardens |
|---|---|---|
| Soil Control | Full customization | Limited by ground soil |
| Weed Growth | 70% less | Frequent invaders |
| Accessibility | Waist-high options | Ground-level only |
| Season Length | Starts 2-3 weeks earlier | Standard timeline |
Quality soil mixes and smart spacing let you grow up to 4x more per square foot. Start small – even a 4×4 ft bed can yield surprising harvests!
Getting Started with Budget-Friendly Garden Planning
Smart planning turns garden dreams into reality without draining your wallet. Start by mapping out where to find free materials – fallen branches from parks, coffee grounds from local shops, or shredded leaves from neighbors. Many cities offer free compost through recycling programs, letting you skip pricey bagged options.
Timing matters more than you think. Collect woody debris after autumn storms when cleanup crews are eager to share. Grass clippings pile up in spring, while fallen leaves become abundant in November. One gardener we know saved $120 by stockpiling pine needles during a neighborhood cleanup day.
Here’s a pro tip: layer materials as they decompose. Start with logs at the base, add smaller branches, then mix greens like veggie scraps with browns like cardboard. This lasagna-style approach builds fertility over time while cutting soil costs dramatically. Test your plan by answering three questions:
- Does my area have clay-heavy or sandy ground?
- What crops need more drainage or moisture?
- When do local tree services offer free wood chips?
Not into hugelkultur? Try straw bales for quick beds or repurpose old containers as planters. One family grew tomatoes in buckets salvaged from a bakery – total cost: $8 for seeds and compost. Remember, every garden’s needs differ, but creative solutions always win.
Selecting the Ideal Soil Mix for Your Raised Garden

The secret to thriving plants isn’t just what you grow—it’s what you grow them in. A well-balanced foundation acts like a buffet for roots, offering nutrients, structure, and breathability. Let’s break down how to build this underground powerhouse without breaking the bank.
Building Blocks of Success
Three ingredients form the gold standard for garden bed soil: topsoil, compost, and aeration materials. Aim for equal parts of each. Topsoil anchors roots and supplies minerals, while compost feeds plants with organic matter. Perlite or vermiculite keep the mix light and crumbly.
Not all topsoil is equal. Look for dark, earthy-smelling options without rocks or clay chunks. Many experienced gardeners avoid bagged products from big-box stores—they often contain fillers or pests.
Nutrient Balancing Act
Compost varieties bring different superpowers. Aged manure offers slow-release nitrogen, while leaf mold improves moisture retention. Mix at least two types for balanced nutrition. If your blend feels heavy, add coarse sand—it prevents compaction in wet climates.
Save money by making your own compost from kitchen scraps and yard waste. Grass clippings and coffee grounds work wonders. One clever trick: use shredded newspaper as free brown material when leaves aren’t available.
Layering Hacks: Building Your Garden Bed Step by Step

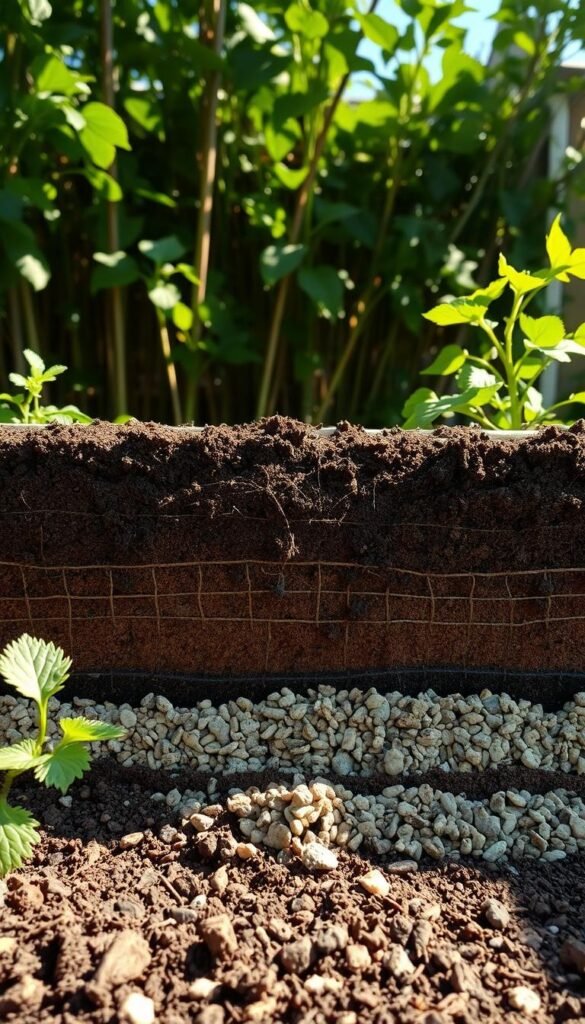
Think of your garden bed as a lasagna where every ingredient serves a purpose. The magic happens when you stack organic materials strategically, creating a living system that feeds plants for years. Start with the heaviest items at the bottom—they’ll break down slowly while anchoring your setup.
Establishing a Stable Foundation
Place logs or thick branches first—these form a spongy base that retains moisture. This woody layer takes 3-5 years to decompose, releasing nutrients gradually. Arrange pieces tightly to prevent sinking, leaving small gaps for airflow. One gardener used fallen oak limbs from a storm cleanup, saving $90 on soil fillers.
Incorporating Organic Materials Effectively
Add smaller sticks and leaves next, filling spaces between larger pieces. Alternate green (grass clippings) and brown (cardboard) layers to balance nitrogen and carbon. Time your additions: fresh kitchen scraps work best in spring when microbial activity peaks.
This approach mimics natural forest floors, where decaying wood sustains plants for decades. You’ll notice fewer dry spots and healthier roots as the raised garden beds become self-fertilizing. Remember—patience pays off. Your initial work creates a low-maintenance oasis that improves with time.
Filling a Raised Garden Bed on a Budget: Soil Mix and Layering Hacks

Cut costs and boost growth with nature’s own recycling system. Traditional methods of filling raised garden spaces often drain budgets, but innovative layering techniques flip the script. One gardener reported saving $240 annually by repurposing yard waste instead of buying bagged soil.
The hugelkultur approach turns fallen branches and coffee grounds into a nutrient-rich foundation. Here’s why it works: woody materials decompose slowly, releasing nutrients over 3-5 years. This creates a self-fertilizing system that outperforms store-bought mixes.
| Method | Cost (4×8 ft bed) | Materials Needed | Longevity |
|---|---|---|---|
| Bagged Soil | $120-$180 | 20+ bags | 1-2 seasons |
| Hugelkultur | $0-$30 | Logs, leaves, compost | 5+ years |
Calculate your needs using this rule: every 12″ depth requires 1 cubic yard of material per 30 sq ft. For a 4×8 ft garden bed, collect 10-15 logs and 6 garbage bags of leaves. Local tree services often give away wood chips – perfect for moisture retention.
Strategic layering slashes future expenses too. As organic matter breaks down, it eliminates the need for synthetic fertilizers. One study showed raised garden setups using this method required 60% less water during droughts.
Ready to start? Pair these techniques with our guide on building your elevated plot for maximum savings. Your plants – and bank account – will thank you.
Utilizing Organic Materials: Logs, Branches, and Leaves

Nature offers free resources to enrich your garden’s foundation. Fallen trees and autumn leaves become powerful tools when repurposed in raised garden beds. These materials create a self-sustaining environment that feeds plants while saving you money.
Benefits of Using Logs and Branches
Hardwood branches like birch or oak decompose slowly, releasing nutrients over years. Slightly rotten wood works best—it’s soft enough for microbes to break down quickly. Arrange logs at the bed’s base to create air pockets that improve drainage.
Avoid allelopathic species like black walnut. Their natural chemicals stunt growth in tomatoes and peppers. Stick to safe options: maple, willow, or cottonwood chunks provide structure without harming your crops.
How Leaves Improve Soil Structure
Shredded leaves act like sponges, holding moisture during dry spells. They also feed earthworms and fungi that aerate the soil. Mix different leaf types—oak adds acidity, while maple balances pH levels.
Layer leaves between green materials like grass clippings. This “brown-green sandwich” speeds decomposition and prevents matting. Your plants will reward you with stronger roots and bigger harvests!
Creative Techniques for Incorporating Grass Clippings and Compost
Turn lawn maintenance into garden gold with two free resources hiding in plain sight. Grass trimmings and kitchen scraps become powerful allies when used strategically in your garden beds.
Green Gold: Lawn to Garden Conversion
Fresh grass clippings pack more nitrogen than store-bought fertilizers. Spread them thin – no thicker than 1 inch – to avoid slimy mats. Pair with shredded leaves or cardboard at a 1:4 ratio (greens to browns) for perfect decomposition.
| Material | Nitrogen Boost | Best Paired With |
|---|---|---|
| Fresh Clippings | High | Shredded Newspaper |
| Dried Clippings | Medium | Wood Chips |
| Coffee Grounds | Moderate | Fall Leaves |
Always ask neighbors if they use weed killers before taking their clippings. Mow in the morning when dew keeps blades moist but not soggy. One gardener boosted tomato yields by 40% using this free mulch!
Compost Alchemy Made Simple
Transform food scraps into black gold that supercharges your soil. Layer coffee grounds with eggshells and torn pizza boxes for a balanced mix. Turn the pile weekly to speed up decomposition – you’ll get usable compost in 6-8 weeks.
Local cafes often give away used grounds by the bucket. Partner with three shops to collect 15 lbs weekly – enough to feed four garden beds. This trick eliminated fertilizer costs for an urban farm in Portland last season.
DIY Methods: Embracing the Hugelkultur Approach
Unlock nature’s hidden potential with a centuries-old gardening secret. This German hugelkultur technique transforms decaying wood into a nutrient factory, creating fertile soil that lasts for years. Unlike traditional methods requiring deep trenches, modern adaptations work perfectly in raised garden beds.
Understanding the Hugelkultur Method
The classic approach involves digging 6-foot trenches and stacking logs. But most gardeners now use 3-foot-deep beds filled with branches and leaves. The magic happens as wood decomposes – it releases nutrients slowly while acting like a sponge during dry spells.
Implementing It for Budget Savings
Here’s how to adapt it for your space:
- Fill the bottom third of your garden bed with logs (hardwoods work best)
- Add smaller branches, then alternate green/brown layers
- Top with 6″ of compost-enriched soil
| Traditional vs Raised Bed Hugelkultur | Cost | Setup Time | Longevity |
|---|---|---|---|
| 6-Foot Trench | $200+ | 8 hours | 10+ years |
| 30″ Raised Bed | $0-$40 | 90 minutes | 5-7 years |
Vego containers simplify the process – just layer materials without digging. As the hugelkultur technique gains popularity, more urban growers report 50% less watering and zero fertilizer costs. Your plants get steady meals from rotting wood, while you save time and money!
Optimizing Water Retention with Strategic Layering
Keep your plants thriving even during dry spells with smart moisture management techniques. Proper layering in raised garden beds creates a self-watering system that improves water retention naturally. Start by packing materials tightly at the bottom – gaps between logs or branches create air pockets that dry out roots.
Tips to Avoid Dry Pockets in the Soil
Water each layer as you build the bed. This settles materials and eliminates hidden dry zones. Focus on corners and edges where soil often pulls away from the frame.
Mix compost into every third layer to boost moisture absorption. Peat moss or coconut coir added to the top 6 inches improves water retention in sandy areas. For clay-heavy soil, blend in coarse sand to prevent pooling.
Finish with a 2-inch mulch blanket using straw or shredded leaves. This locks in moisture while feeding earthworms. Pair these steps with our soil preparation guide to build beds that stay lush with minimal effort.


