
Creating crisp boundaries in your outdoor space does more than just boost visual charm. Well-defined edging gives your landscape structure while solving practical challenges. Imagine crisp lines separating flower beds from walkways, keeping mulch in place, and guiding rainwater where it needs to go.
Smart drainage solutions protect your plants’ roots from water damage and soil erosion. Unlike solid barriers, materials like crushed stone allow moisture to filter naturally. This keeps your greenery thriving while reducing puddles after heavy rains.
Choosing the right borders adds instant curb appeal with minimal effort. The textured look of small rocks contrasts beautifully with lush foliage, creating depth in your design. Best of all, these features require little upkeep once installed—no constant trimming or repositioning.
You’ll love how organized your yard feels when every element has its place. Defined edges prevent grass from creeping into flower beds and stop gravel from scattering onto lawns. It’s a simple upgrade that makes routine care faster and keeps your property looking sharp year-round.
Understanding the Benefits of Gravel Garden Edges

Transform your landscape with smart edging solutions that work harder than you do. These features blend practicality with style, creating clear divisions between planting zones and walkways. They’re like invisible helpers keeping your outdoor space organized.
Style Meets Practicality
Crushed stone borders instantly elevate your home’s appeal with crisp lines that look professionally designed. You’ll notice how they create visual depth, making flower beds pop against softer ground covers. The textured contrast adds character while defining different areas of your yard.
These edges protect delicate plants from accidental damage during lawn care. No more worrying about mower wheels crushing your blooms! Plus, they act as gentle guides for foot traffic, keeping visitors on paths and away from tender greenery.
Water Wisdom and Weed Defense
Proper drainage becomes effortless as water filters through porous stone instead of pooling. This natural filtration supports root health and prevents soil erosion during storms. You’ll see healthier growth as plants access moisture without waterlogged roots.
Say goodbye to endless weeding sessions. A well-installed border blocks invasive grasses and stops weed seeds from taking root in beds. “It’s like building a miniature fortress for your flowers,” notes one landscaper. You’ll reclaim hours previously spent battling unwanted sprouts.
Selecting the Right Materials for Your Garden Edge

Your outdoor space deserves materials that marry function with flair. The right choice impacts durability, drainage, and visual harmony. Let’s explore options that balance practicality with personality.
Choosing the Perfect Gravel and Stone Options
Natural boulder stones stand up to heavy rain and frost while adding rustic charm. For refined spaces, limestone brings timeless elegance and handles temperature swings like a champ. One landscaper notes:
“Clients love how these options age gracefully – they look better each year.”
Consider these popular picks:
| Material | Best For | Size | Durability |
|---|---|---|---|
| Natural Boulder | Sloped areas | 8-12″ | Extreme weather |
| Limestone | Formal designs | 4-6″ slabs | Freeze-resistant |
| Decorative Chips | Color accents | 1/4-1/2″ | Moderate traffic |
Smaller gravel types like pea stones boost water flow in soggy spots. Mix textures for visual interest – try pairing chunky rocks with smooth pebbles. Remember: larger pieces stay put during storms, while compact sizes prevent messy spread.
Preparing Your Garden Space for Edging

Getting your space ready for crisp borders starts with smart groundwork. Proper setup ensures your edging stays level and functional for years. Let’s walk through the essential steps to transform your vision into reality.
Clearing and Marking Your Project Area
Begin by removing weeds, rocks, and old roots from your ground. Use a garden hose to outline curves—its flexibility helps visualize flowing shapes. Always contact 811 to locate buried utilities before digging. This free service protects you from costly mishaps.
Planning Your Garden Layout
Test your soil using a kit from local nurseries. Results reveal pH levels and drainage needs—key factors for plant health. Consider sunlight patterns and water access when positioning square-foot gardening beds near your new borders.
| Preparation Step | Tools Needed | Key Purpose |
|---|---|---|
| Site Clearing | Shovel, gloves | Remove obstacles |
| Utility Check | Phone (call 811) | Safety first |
| Soil Testing | Testing kit | Assess nutrients |
| Layout Marking | Hose/stakes | Define edges |
Allow space between your lawn and new features for easy maintenance. Flexible layouts adapt as plants grow, keeping your design cohesive through seasons. Remember: good prep work today means fewer headaches tomorrow!
Creating a Stable Base for Effective Drainage
Your landscape’s longevity begins with what lies beneath the surface. A properly constructed foundation keeps drainage systems working smoothly while preventing shifting materials. Think of it as building a hidden support network for your visible design elements.
Layering Sand and Gravel for Strength
Start by digging a 4-6 inch trench where your border will sit. This depth accommodates different stone sizes and regional weather patterns. One landscaper shares:
“I’ve seen improperly prepared bases fail within months – don’t skip this step!”
Gather these essentials before beginning:
- Coarse sand for initial leveling
- Crushed stone or pea gravel
- Hand tamper or plate compactor
- Landscape fabric (optional)
Spread a 2-3 inch mix of sand and gravel, then compact firmly. Repeat this process until the base sits 1 inch below ground level. This creates a stable platform that resists erosion while letting water flow freely.
Check your installation slope using a 4-foot level – aim for 1/4 inch drop per foot away from structures. Proper grading directs moisture where it needs to go without washing away your hard work. Remember: patience during prep pays off in reduced maintenance later!
Step-by-Step Guide to Installing Your Garden Edge

Crafting polished borders transforms your landscape in one weekend. This installation method creates clean lines while keeping materials securely in place. Let’s break down the process for flawless results.
Start by digging a 2-3 inch trench along your marked perimeter. Keep excavated soil nearby – you’ll reuse it later. A landscaper’s tip: “Work in 3-foot sections to maintain control over alignment.”
Place stones in the trench, checking levelness with a 4-foot tool. Adjust heights by tapping stones with a rubber mallet or adding sand beneath them. Curved areas? Use a shorter torpedo level for precision.
| Tool | Purpose |
|---|---|
| Shovel | Trench excavation |
| Level | Surface alignment |
| Rubber Mallet | Height adjustments |
| Sand | Stabilizing base |
| Excavated Earth | Gap filling |
Backfill gaps with reserved soil to lock stones in position. Maintain consistent spacing for that professional look. This easy install method prevents shifting during seasonal changes.
Finish by sweeping excess debris from your new edging. Water the area lightly to settle materials. You’ve now created a functional boundary that guides foot traffic the right way while enhancing your garden’s structure.
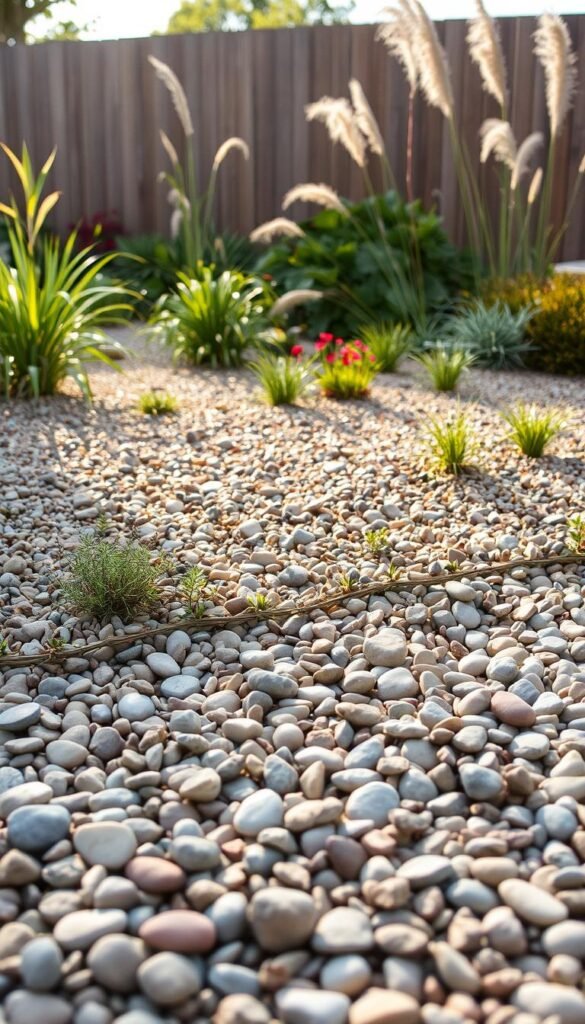
Gravel garden edges and borders for easy drainage and maintenance

Transform your yard’s functionality with a weekend project that looks pro. Stone edging creates crisp boundaries while letting water flow naturally through gaps. You’ll love how quickly it elevates your space—most installations wrap up in under three hours.
First-timers thrive with this easy install method. Dig shallow trenches, set stones, and backfill—no special skills needed. A local landscaper shares:
“Homeowners are shocked how polished their property looks after one afternoon’s work.”
Say goodbye to swampy beds after storms. Unlike concrete or plastic, crushed rock lets rain soak into the earth instead of pooling. Your plants stay hydrated without drowning, and soil stays put during downpours.
Maintenance? Nearly nonexistent. Once stones settle, they resist shifting and block weeds naturally. Sweep occasionally to keep surfaces tidy, or refresh with new pebbles if you crave a color change. No more wrestling with overgrown grass invading your blooms!
Customization options let your personality shine. Mix warm earth tones for rustic charm or sleek grays for modern flair. As seasons change, adjust layouts effortlessly—no heavy lifting required. Your outdoor oasis stays fresh year after year.
Incorporating Edging Stones and Alternative Materials
Elevate your landscape design with materials that blend form and function. While stones create natural transitions, modern alternatives offer fresh possibilities. Mixing textures and finishes lets you craft boundaries that reflect your personal style while serving practical needs.
Modern Solutions for Lasting Structure
Steel edging brings industrial chic to outdoor spaces. Corten steel develops a warm rust patina over time, blending with natural surroundings. One landscaper explains:
“This 16-gauge cold-rolled steel bends easily around curves but withstands decades of foot traffic and lawn equipment.”
Brick pavers deliver timeless appeal. Their uniform shapes create crisp lines that contrast beautifully with loose gravel. For rustic charm, wood timbers soften hardscapes – though they need seasonal sealing to prevent rot.
| Material | Durability | Maintenance | Best Use |
|---|---|---|---|
| Corten Steel | 20+ years | None | Curved paths |
| Clay Brick | 15-25 years | Occasional cleaning | Formal borders |
| Treated Wood | 5-10 years | Annual sealing | Natural themes |
Combine different edging types to define zones. Use steel near high-traffic areas and wood around relaxed seating spots. This strategic mixing maximizes each material’s strengths while maintaining consistent drainage.
Essential Tools Every DIYer Needs
Equipping yourself with the right tools transforms weekend projects from frustrating to fulfilling. Quality gear ensures precise results while saving time and effort. Let’s explore the must-haves that make creating polished borders a breeze.
Your Core Toolkit Breakdown
A sharp-edged shovel becomes your best friend for trench digging. Look for models with reinforced handles—they handle rocky soil without bending. Pro tip: “A squared-off blade creates cleaner edges than rounded designs,” advises a hardware store manager.
Long levels prevent wavy borders that distract from your landscape’s beauty. The 4-foot variety checks multiple stones at once, while a 9-inch torpedo level nails curves. Always verify alignment before securing materials.
Rubber mallets adjust stone heights without chipping surfaces. Their cushioned heads protect finishes better than metal hammers. Keep one handy for tapping pieces into perfect position during installations.
With these essentials, you’ll tackle edging projects confidently. Proper tools minimize errors and ensure lasting results—no professional help required. Now go transform that outdoor vision into reality!


