
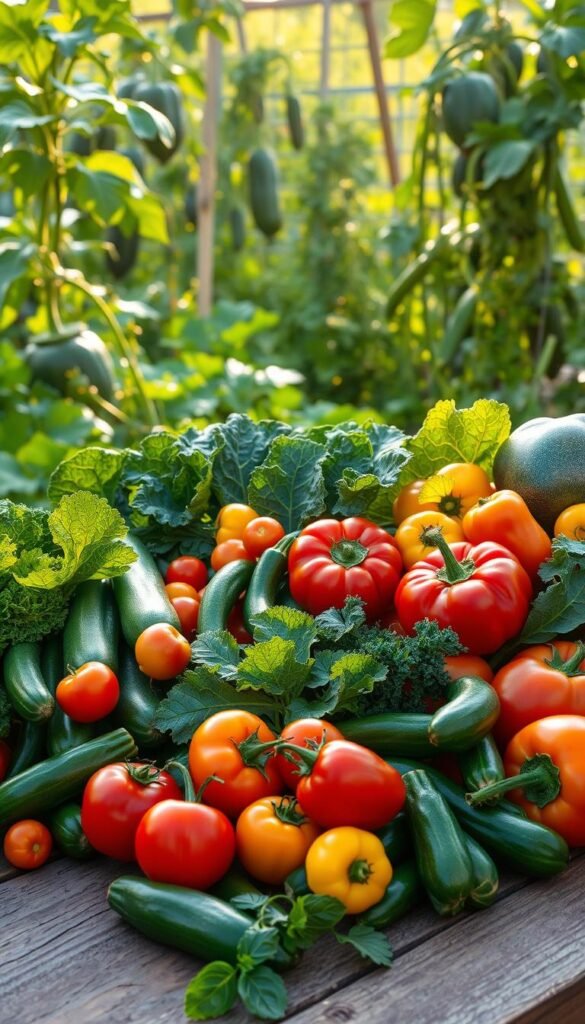
There’s nothing quite like the joy of plucking ripe vegetables and fruits straight from your own garden. The crisp snap of a pepper or the sweet burst of a homegrown tomato is unmatched. But to keep that flavor at its peak, knowing when and how to gather your crops is key.
Timing matters. Pick too early, and you miss the best taste. Wait too long, and texture suffers. This guide makes it simple—whether you’re a beginner or a seasoned grower. Learn the signs of ripeness, the best conditions for picking, and smart ways to keep your bounty fresh.
Struggling with limited storage space? We’ll cover compact solutions, from containers to the ideal spot in your refrigerator. Even small spaces, like those in urban balconies, can yield big rewards with the right approach.
Ready to enjoy garden-fresh meals year-round? Let’s dive in.
Introduction to Harvesting & Storing Your Garden’s Bounty

Great-tasting crops begin with smart care—both in the ground and after picking. How you tend your garden directly impacts the quality of your vegetables. Healthy soil and timely watering set the stage, but the real magic happens at harvest.
Proper techniques reduce waste and extend shelf life. Bruised tomatoes or wilted leaves often result from rough handling. Treat each plant like a treasure: gently twist peppers off stems, and use scissors for delicate herbs.
Three factors preserve nutrients and flavor:
| Factor | Ideal Range | Tips |
|---|---|---|
| Temperature | 32–40°F (cold crops) | Store roots in a cool basement |
| Humidity | 85–95% (leafy greens) | Use damp cloths in pot storage |
| Handling | Minimal contact | Wash only before eating |
Beat the clock—and frost—by picking at peak ripeness. Morning harvests capture crispness, while afternoon picks maximize sweetness. For more tips, explore how to extend shelf life with local resources.
Imagine savoring summer’s zest in December. With the right time and tools, your pantry will overflow with garden-fresh goodness.
When to Harvest Your Backyard Produce

The secret to crisp, flavorful veggies? Perfect timing. Picking too early or late affects texture and taste. Learn the cues to grab your crops at their prime.
Signs of Peak Ripeness for Common Vegetables
Each plant has its own “ready” signals:
- Tomatoes: Deep, even color and slight softness when gently squeezed.
- Peppers: Firm skin and vibrant hue (green varieties turn red/yellow if left longer).
- Cucumbers: 6 inches long with bright green skin—avoid yellowing.
- Corn: Dry, brown silks; kernels release milky liquid when pierced.
*Leafy greens* like spinach and kale taste best when leaves are young and tender. For fruit like watermelons, check the underside—it turns yellow when ripe.
Best Time of Day to Harvest
Early morning is the sweet spot. Cool temps keep vegetables crisp, while afternoon picks maximize sugar content. Avoid midday heat to prevent wilting.
“Morning harvests lock in moisture, making greens last longer in storage.”
Root crops like carrots and parsnips gain sweetness after a light frost. But dig them up before the ground freezes solid. For tender plants, like basil, pick before flowering to preserve flavor.
Pro tip: Use clean pruners for stems to avoid damaging plants. Handle each piece like a treasure—rough handling bruises skins and shortens shelf life.
Essential Harvesting Techniques

Gentle hands and the right tools make all the difference when gathering your garden’s bounty. Rough handling can bruise delicate skins, reducing shelf life and flavor. Whether you’re picking berries or hearty squash, a mindful approach keeps your vegetables at their best.
Handling Produce Gently to Avoid Damage
Treat each piece like a treasure. For fragile fruit like tomatoes, cradle them in your palm and twist gently. Use sharp pruners for stems to prevent tearing. Here’s how to protect common crops:
- Berries: Pluck with the stem attached to avoid leaks.
- Leafy greens: Cut outer leaves first, leaving the core to regrow.
- Root crops: Loosen soil with a fork before pulling to prevent snaps.
Tools You’ll Need for a Smooth Harvest
The right gear saves time and preserves quality. Ergonomic tools reduce strain, while breathable containers prevent moisture buildup. Compare options below:
| Tool | Best For | Tip |
|---|---|---|
| Pruning shears | Tomatoes, herbs | Clean blades after each use |
| Harvest knife | Squash, melons | Cut stems 2 inches long to protect the plant |
| Mesh basket | Berries, greens | Allows air flow to reduce wilting |
Pro tip: Rinse tools with water after use to prevent disease spread. For more resources, check local gardening guides on tool maintenance.
Preparing Your Produce for Storage

Freshness lasts longer when you treat your crops right after picking. A few simple steps—like proper cleaning and stem handling—can extend shelf life by days or even weeks. Here’s how to prep your bounty for the fridge, pantry, or countertop.
Cleaning and Drying Tips
Dirt and moisture are the enemies of longevity. For root vegetables like carrots, brush off soil instead of rinsing. If you must use water, dry them thoroughly with a soft cloth to prevent mold.
Delicate vegetables like lettuce or herbs need extra care. Swirl them in a bowl of cool water, then spin dry or pat with towels. Pro tip: Air-dry leafy greens on a rack for 30 minutes to lock in crispness.
When to Leave Stems Attached
Stems act as natural seals. Leave them on peppers, cucumbers, and tomatoes to slow bacterial growth. For squash and melons, a 2-inch stem stub prevents soft spots.
But not all crops benefit—trim tops from radishes and carrots to conserve moisture. Check this guide for more on stem retention.
| Crop | Stem Handling | Why It Matters |
|---|---|---|
| Tomatoes | Keep stems | Reduces moisture loss |
| Cucumbers | Leave ¼-inch stem | Slows spoilage |
| Leafy greens | Trim stems | Prevents wilting |
“Stems are nature’s packaging—remove them only when you’re ready to eat.”
Store prepped produce in breathable plastic bags or containers with vents. A cool, dark spot with 85–95% humidity keeps greens perky, while dry air suits onions and garlic.
Understanding Storage Conditions: Temperature & Humidity
The key to long-lasting freshness lies in mastering temperature and humidity. Different crops need specific conditions to stay crisp and flavorful. Get it right, and you’ll enjoy garden goodness for weeks—or even months.
Cold and Moist vs. Cool and Dry: What Works Best?
Not all veggies play nice in the same environment. Here’s the breakdown:
- Cold/moist (32–40°F, 95% RH): Perfect for potatoes and carrots. Use damp sand or perforated plastic bags in the fridge.
- Cool/dry (50–60°F, 60% RH): Ideal for onions and garlic. A basement or pantry works well.
- Cold/dry (32–40°F, 65% RH): Best for winter squash. A garage in straw-lined bins does the trick.
“A $10 hygrometer helps you monitor humidity levels—no guesswork needed.”
How to Adjust Home Storage Spaces for Ideal Conditions
No root cellar? No problem. Try these hacks:
| Space | Adaptation | Best For |
|---|---|---|
| Refrigerator | Use crisper drawers with vents | Leafy greens, herbs |
| Wine cooler | Set to 50°F | Peppers, eggplants |
| Garage | Insulate bins with straw | Root veggies |
Avoid overcrowding—airflow prevents mold. For more tips, explore organic storage solutions that fit any home.
Storing Leafy Greens and Tender Vegetables

Leafy greens and tender herbs need special care to stay crisp and flavorful. Unlike hardy root crops, they wilt fast without the right balance of moisture and airflow. Master these tricks to enjoy vibrant salads and aromatic herbs for days.
Lettuce, Spinach, and Kale
Keep greens fresh by mimicking their natural conditions. Wrap unwashed leaves in damp paper towels, then tuck them into perforated plastic bags. The towels maintain humidity, while the holes prevent soggy decay.
For kale, blanch and freeze extras. Drop leaves in boiling water for 2 minutes, then ice-bath them. Pat dry and freeze flat for soups later.
“A 10-minute ice bath revives wilted lettuce—it’s like a spa day for greens!”
Green Onions and Herbs
Basil turns black in the refrigerator. Instead, trim stems and place them in a glass of water on the counter. Change the water every two days to preserve flavor.
Green onions regrow indoors. Plant roots in a pot of soil near a sunny window. Snip tops as needed—they’ll replenish for weeks.
| Vegetable | Storage Method | Lifespan |
|---|---|---|
| Spinach | Damp towel + vented bag | 7 days |
| Basil | Room-temp water | 5 days |
| Green onions | Potted in soil | 3+ weeks |
Pro tip: Keep herbs away from apples or bananas—they release ethylene gas that speeds spoilage. A salad spinner ensures greens are bone-dry before storage, doubling their crispness.
Keeping Root Vegetables Fresh for Months
Root vegetables are nature’s pantry staples—durable, nutrient-packed, and perfect for long-term storage. Unlike delicate greens, they thrive in cool, dark spaces that mimic their underground homes. With a few tricks, you can enjoy their earthy sweetness well past harvest season.
Carrots, Beets, and Radishes
These crunchy favorites need moist conditions to stay crisp. Remove leafy tops immediately—they siphon moisture from the root. Layer unwashed veggies in damp sand or peat moss inside a wooden crate. This maintains humidity without sogginess.
For fridge storage, seal carrots in perforated plastic bags with a paper towel to absorb excess dampness. Beets last 3–4 months this way. Radishes? Their peppery bite holds best at 32°F—the ideal temperature for most root crops.
Potatoes and Sweet Potatoes
Never store potatoes in the refrigerator—cold turns their starch into sugar. Instead, tuck them in breathable burlap sacks in a dark cellar (45–50°F). A light frost won’t harm them, but sunlight causes toxic greening.
Sweet potatoes need a 14-day “cure” at 50–60°F to heal scratches and boost sweetness. Afterward, wrap them in newspaper to prevent shriveling. Pro tip: Keep them far from apples—ethylene gas triggers sprouting.
“Sand isn’t just for beaches—it’s a root veggie’s best friend for locking in freshness.”
| Vegetable | Storage Method | Lifespan |
|---|---|---|
| Carrots | Damp sand in crate | 5 months |
| Potatoes | Burlap in cellar | 6 months |
| Sweet Potatoes | Cured + wrapped | 4 months |
Waxing turnips seals in moisture, while parsnips actually sweeten after a light frost. With these hacks, your root cellar becomes a treasure trove of garden-fresh flavor.
Storing Summer Favorites: Tomatoes, Peppers, and Eggplants
Summer’s juiciest crops deserve special care to maintain their vibrant taste. Unlike hardy roots or leafy greens, these fruit (yes, tomatoes are technically fruit) need precise conditions to avoid texture disasters. Master these tricks to savor their peak flavor for weeks.
Why Tomatoes Should Never Go in the Fridge
That refrigerator shelf ruins tomatoes. Cold temps below 40°F break down their cells, turning flesh mealy and dulling flavor. Instead:
- Ripen green ones on a countertop away from sunlight—they’ll develop sweetness at 55°F.
- Use plastic bags with holes to slow moisture loss without trapping ethylene gas.
- Never stack them; bruises accelerate spoilage.
“A chilled tomato is a sad tomato—room temp keeps its garden-fresh zest intact.”
Keeping Peppers Crisp and Flavorful
Peppers thrive in cool, humid spots—but not your fridge’s crisper. Below 45°F, they develop pitting. Try these alternatives:
| Type | Ideal Spot | Lifespan |
|---|---|---|
| Bell peppers | Basement (85–90% humidity) | 2 weeks |
| Chilies | Vented container at 50°F | 10 days |
*Pro tip*: Toss an ethylene absorber (like a charcoal pouch) nearby to delay softening. For eggplants, slice and freeze extras—they’ll hold their texture for stews.
Preserving the Freshness of Squash and Cucumbers
Squash and cucumbers bring summer’s crunch to your table—when stored right. These vegetables demand unique care to avoid sogginess or premature spoilage. Master their needs, and you’ll enjoy their vibrant taste for weeks.
Summer Squash vs. Winter Squash Storage
Summer squash (like zucchini) thrives in cold, moist conditions but lasts just 7–10 days. Wrap them in damp paper towels and tuck into perforated plastic bags in the fridge. Avoid the refrigerator for winter squash—their thick skins prefer cool, dry spots like a basement.
Pro tip: Cure winter varieties (butternut, acorn) for 10 days at 80°F first. This hardens their skin, doubling shelf life. Keep them away from apples—ethylene gas triggers rot.
How to Prevent Cucumbers from Becoming Soggy
Cucumbers hate cold. Below 40°F, they develop watery pits. Instead, store them at 55°F in mesh bags for airflow. A paper towel inside absorbs excess water, while leaving ¼-inch stems slows moisture loss.
“Think of cucumbers as tropical fruit—they thrive in mild, humid spaces, not icy drawers.”
- Pickling: Transform overgrown zucchini into tangy spears. Vinegar’s acidity preserves crunch.
- Freezing: Slice summer squash into ½-inches long coins for soups later.
Storing Fruits from Your Garden
Sweet, juicy fruits straight from your garden deserve careful handling to lock in their natural goodness. Unlike vegetables, many fruits continue ripening after picking and need specific conditions to preserve their flavor. Whether you’re dealing with bulky melons or delicate berries, these techniques keep them at their best.
Melons and Watermelons
Whole melons thrive at 55°F—about 10 degrees warmer than your refrigerator. Look for these signs of ripeness before picking:
- Uniform color without green streaks
- A dull, hollow sound when slapped
- Slight softness at the blossom end
Once cut, seal pieces in plastic wrap and refrigerate. Whole watermelons last up to two weeks in a cool pantry spot, while cantaloupes need higher humidity.
“Melons stop ripening once chilled—room temp develops their full sweetness first.”
Berries and Stone Fruits
Delicate berries demand gentle care. Follow these steps:
- Leave unwashed until ready to eat
- Arrange in single layers in shallow containers
- Add a vinegar rinse (1:3 vinegar to water) to prevent mold
For peaches and plums:
| Stage | Storage Method | Duration |
|---|---|---|
| Unripe | Paper bag at room temp | 2–3 days |
| Ripe | Refrigerator in vented container | 5 days |
Pro tip: Freeze berries on trays before bagging to prevent clumping. This preserves their summer flavor for smoothies year-round.
Common Mistakes to Avoid When Storing Produce
Even the freshest garden bounty can spoil fast if stored wrong—here’s how to dodge the top pitfalls. Simple errors like overcrowding or mismatched pairings steal flavor and texture. With these fixes, your vegetables and fruits stay crisp for weeks.
The Sneaky Problem of Overcrowding
Packing too much into containers creates a moisture trap. Dampness speeds up mold, especially for leafy greens. Try these solutions instead:
- Use vented plastic bags for airflow (poke holes if needed)
- Stack items in single layers with paper towel dividers
- Leave 1-inch gaps in refrigerator drawers
“Think of your crisper drawer like a subway car—everyone needs personal space to stay fresh.”
Incompatible Roommates: What Not to Store Together
Some vegetables release ethylene gas, which ruins nearby crops. Keep these apart:
| Ethylene Producers | Sensitive Items | Why? |
|---|---|---|
| Apples | Carrots | Causes bitterness |
| Onions | Potatoes | Triggers sprouting |
| Bananas | Lettuce | Speeds wilting |
For small spaces, try odor-proof containers or separate crisper bins. Check local resources for more pairing tips.
Pro tip: Rotate stored items weekly. Move older produce to the front so nothing gets forgotten. A quick check prevents one bad apple (literally) from spoiling the bunch.
Creative Storage Solutions for Small Spaces
Limited space doesn’t mean sacrificing freshness—smart storage hacks can maximize every inch. Even in apartments or tiny homes, you can keep vegetables crisp for months. The secret? Repurposing overlooked areas and controlling conditions.
Using Basements, Garages, or Cool Closets
Unheated spaces often mimic ideal root cellar environments. Try these adaptations:
- Insulate bins with straw for potatoes—maintains 40°F naturally
- Hang mesh bags of onions in closets with vents
- Use thermal curtains to stabilize garage temps
“A north-facing basement wall stays 55°F year-round—perfect for winter squash.”
DIY Root Cellar Alternatives
No underground space? Create micro-environments:
| Solution | Best For | Temp Range |
|---|---|---|
| Wine cooler set to 50°F | Tomatoes, peppers | 45–55°F |
| Buried plastic containers | Carrots, beets | 32–40°F |
For urban settings, repurpose old dressers with breathable drawers. Line them with moss to regulate humidity. More resources on compact storage are available through local extension offices.
Enjoy Your Homegrown Produce All Year Round
Savor the taste of your labor with fresh, homegrown goodness all year. By picking at peak ripeness and using the right containers, you lock in summer’s flavor. Gentle handling and proper humidity keep vegetables crisp for weeks.
Experiment with freezing or canning extras. A pot of basil becomes pesto for winter pasta. Homegrown food saves money and packs more nutrients than store-bought.
Plan meals around your stash: hearty soups with root veggies or summer fruits in smoothies. Share your wins online—tag #GardenToTable to inspire others!
For more tips, check local resources or gardening blogs. Your home harvest can thrive in every season.


